This is where the math changes. We identified 37.3% more purchases that the browser Pixel failed to record.
Find out how we restored the signal and achieved results that the Pixel failed to record!
The post How Meta CAPI recovered 37% of “missing” purchases for a travel client appeared first on SeekandHit.
]]>If you’re still relying solely on the standard browser side Meta Pixel, you aren’t just missing edge cases. You’re likely losing a big portion of your customer journey. Between ITP, ad blockers, and cookie consent shifts, the traditional setup is not adequate anymore.
In travel, the customer journey involves multiple high-intent touchpoints, so losing data not only messes up your reports but also hurts Meta’s optimization.
The “Invisible Traveler” and Meta’s Attribution Shift
Travel companies usually rely on events like “Search” and “View Content” to create dynamic remarketing audiences. However, many users leave the site before the standard browser-side Pixel can record these events.
This is becoming even more critical with Meta’s recent move to align its attribution logic with GA4. Meta is shifting to a stricter, intent-based model by distinguishing between passive engagement and active clicks. The result – your metrics might look worse, but it’s just a more accurate way of tracking actions.
To navigate this, Meta CAPI has moved from a “best practice” to a technical necessity. Without it, you simply don’t have the infrastructure to verify Meta’s data against your actual source of truth.
Restoring the Signal
We moved this client to a server-side GTM setup, implementing Meta CAPI alongside the existing Pixel. The goal was to capture the data that never made it to the browser.
It is important to note: Meta CAPI and server-side tracking are not ways to “get around” GDPR or bypass user consent. In fact, server-side GTM gives you better control over what data is sent and to whom. It’s about restoring the quality of the signal for users who have consented, not about collecting data that shouldn’t be collected.
Comparing the CAPI data against the Pixel-only baseline showed exactly what was being left on the table:
1. PageView Recovery (+101.2%)
The biggest gap was at the top. We saw a 101.2% increase in reported PageView events. The client was effectively blind to half of their site traffic. Recovering this didn’t just “fix” the numbers; it doubled the size of their top-of-funnel retargeting pools.
2. Capturing Intent: Search (+35.5%) and View Content (+37.5%)
In travel, events like the “Search” and “View Content” are important for recognizing intent and retargeting those users. Capturing 35% more of these signals means your dynamic ads become significantly more efficient. You’re finally showing the right room to the person the Pixel would have completely missed.
3. The Actual ROAS: Purchase (+37.3%)
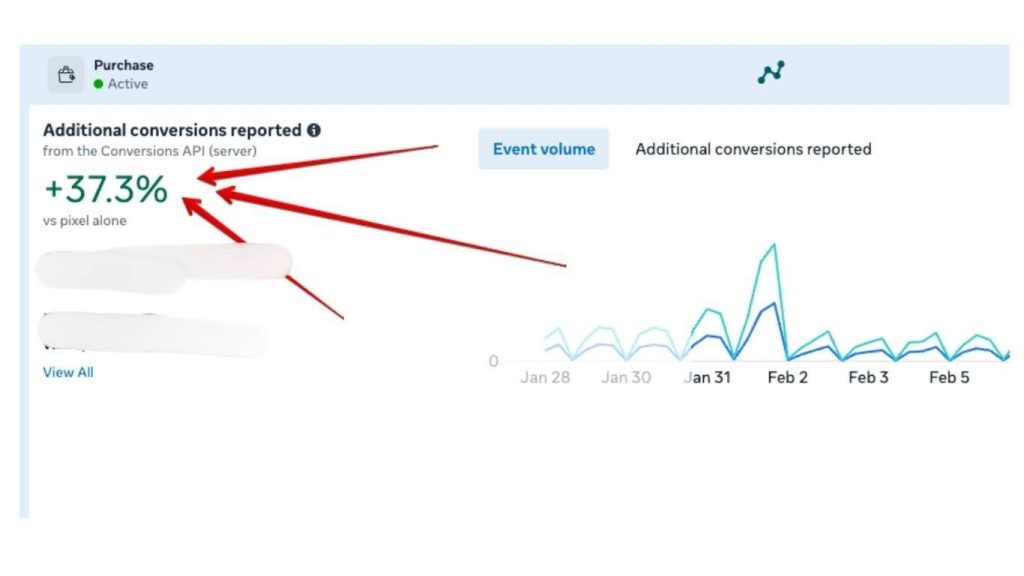
If your reporting shows a 2.0x ROAS, but you’re actually hitting a 2.7x because CAPI is catching the “hidden” sales, your entire scaling strategy changes. You can push budgets with way more confidence because you’re seeing the actual return, not a filtered version of it.
Why this matters for the algorithm
This isn’t just about making the reporting look better. Meta’s delivery model is only as good as the data you feed it.
When you feed it 37% more purchase signals:
- The learning phase completes faster: The model doesn’t starve for conversion signals.
- Targeting gets sharper: The machine-learning model gets better at finding high-value users because it actually knows who the current buyers are.
- Match Quality improves: Sending hashed parameters from the server ensures ads reach the right people across different devices.
The Bottom Line
Server-to-server communication isn’t affected by browser crashes, slow loading scripts or ad blockers. It’s the only reliable way to measure performance in a privacy-first environment.
Relying on a Pixel alone in 2026 is like trying to navigate with a map that has 40% of the streets missing. This shift in Meta’s attribution logic rewards brands that invest in solid tracking so this is really a necessity.
If you haven’t moved to server-side tracking yet, you aren’t seeing your full performance!
The post How Meta CAPI recovered 37% of “missing” purchases for a travel client appeared first on SeekandHit.
]]> The AI Evolution: Google & Reddit Lead the Way
 Search & SEO: Core Updates and AI Limits
 Paid Media Controls & Reporting
 Social Media & Creative Strategy
 Industry Insights for 2026
 Urgent Security Warning
 AI & Creative Updates
 Google Ads Platform Updates
 Other Updates