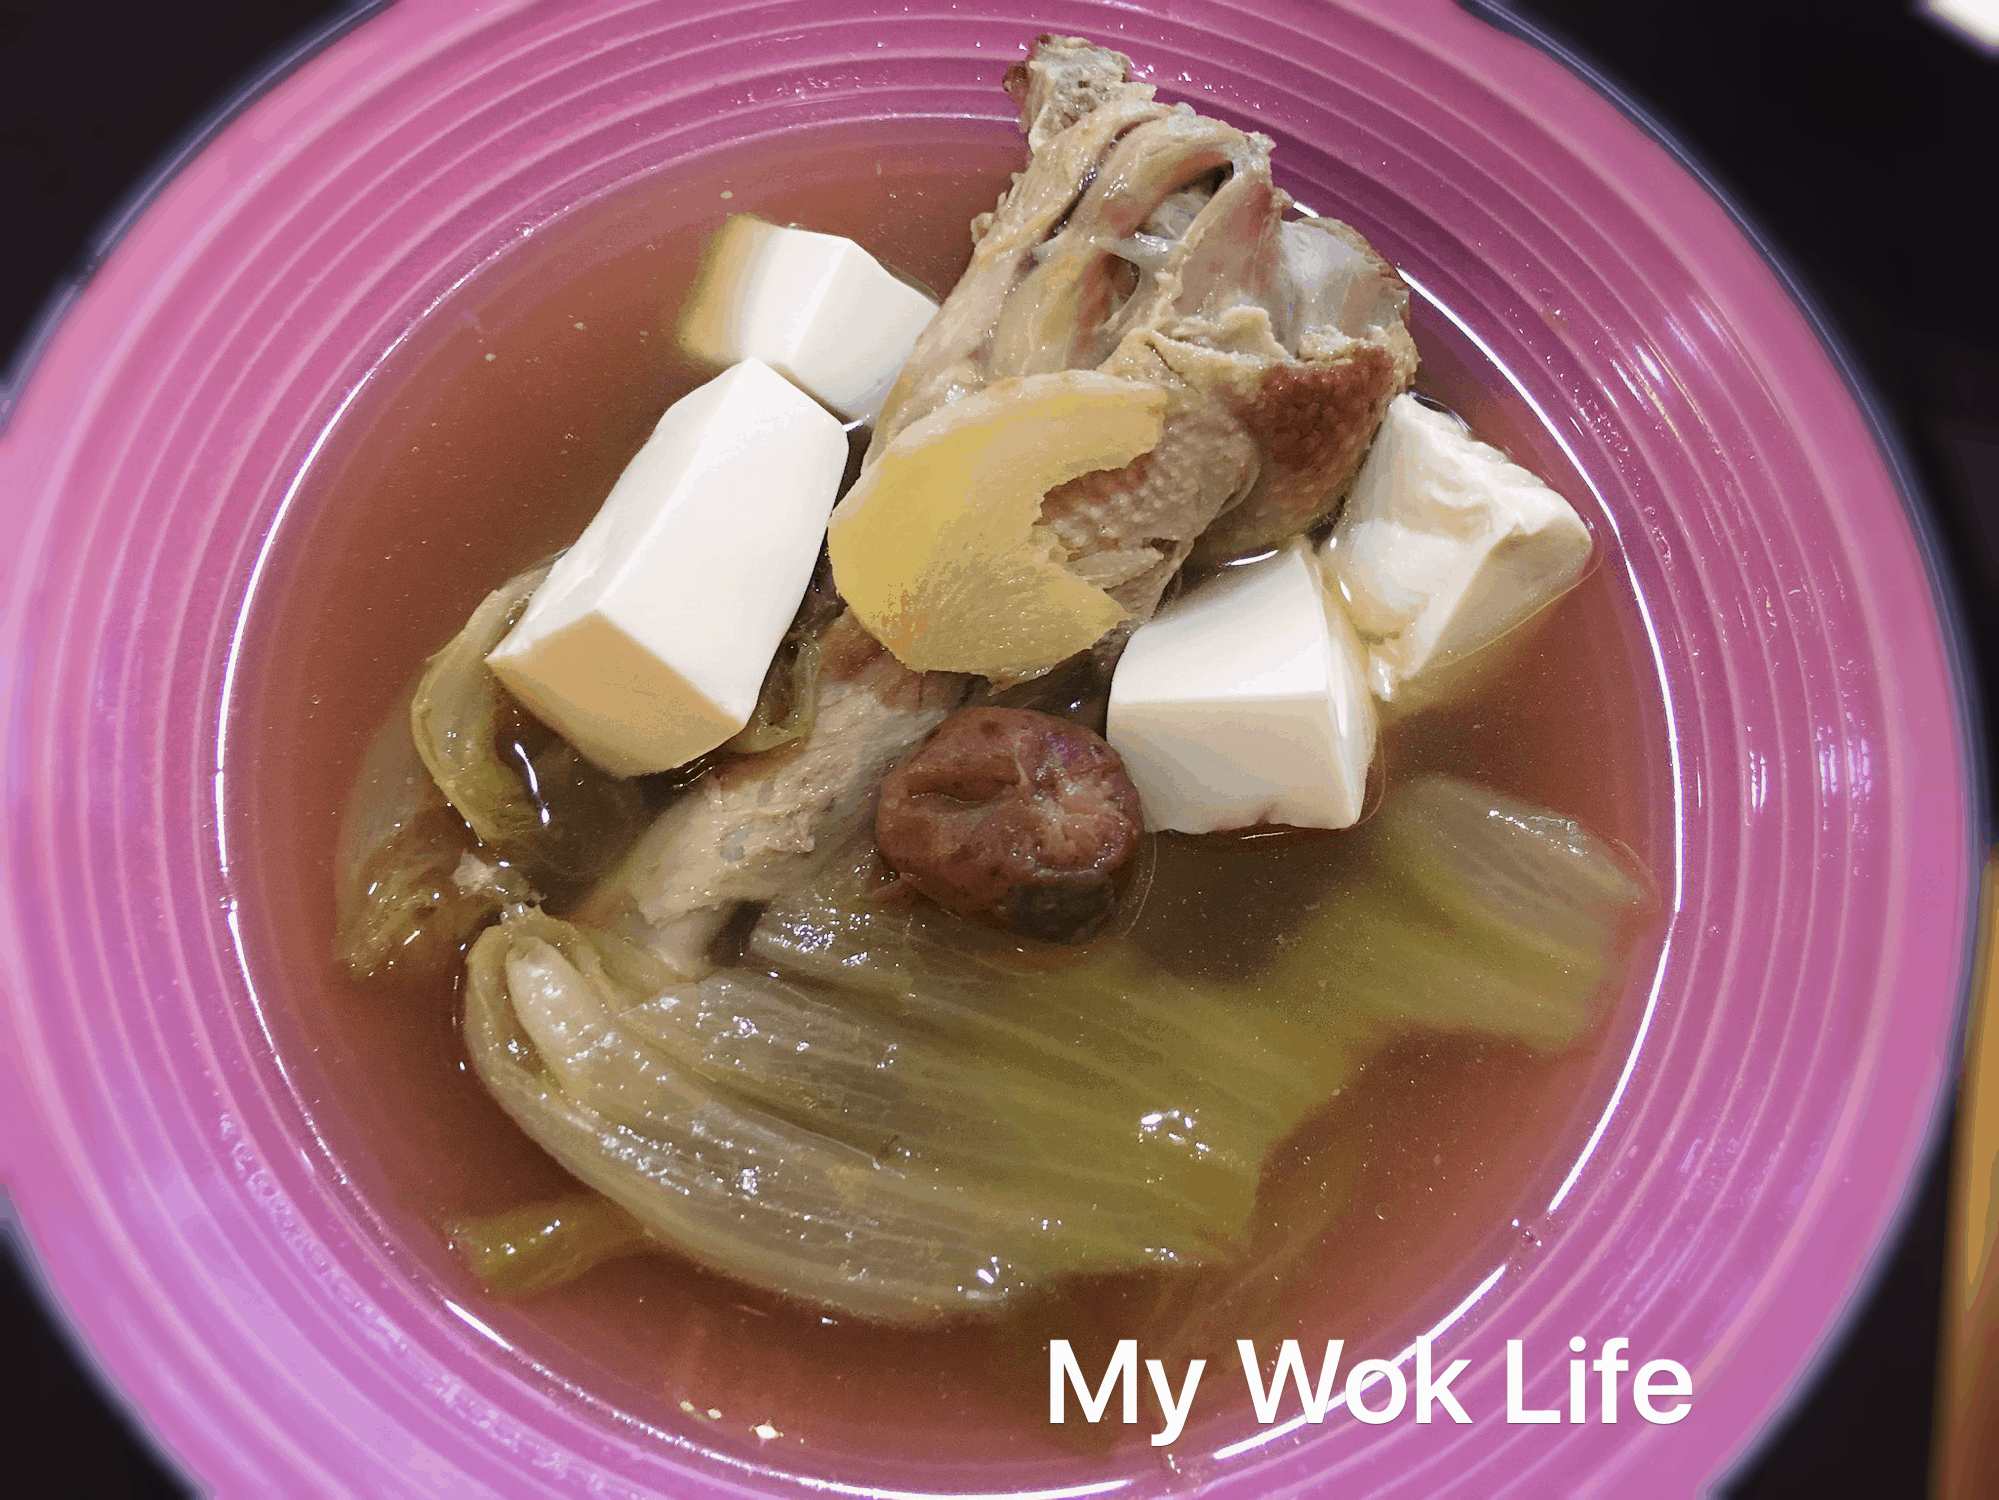
<?xml version="1.0" encoding="UTF-8"?>
<?xml-stylesheet type="text/xsl" media="screen" href="/~d/styles/atom10full.xsl"?><?xml-stylesheet type="text/css" media="screen" href="http://feeds.feedburner.com/~d/styles/itemcontent.css"?><feed xmlns="http://www.w3.org/2005/Atom" xmlns:openSearch="http://a9.com/-/spec/opensearch/1.1/" xmlns:georss="http://www.georss.org/georss" xmlns:gd="http://schemas.google.com/g/2005" gd:etag="W/&quot;DkAGRXk6fyp7ImA9WxBbFkg.&quot;"><id>tag:blogger.com,1999:blog-490982868559256368</id><updated>2010-03-15T20:05:24.717+08:00</updated><title>My Wok Life</title><subtitle type="html">Express Cooking. Simple Baking. Easy Recipe. Good Food. Diet. Parenting. Fashion. Beauty. The challenge of being a pleasant working mum and my ways of dealing with WORK &amp;amp; WOK happily and efficiently. Nothing special to be proud of, just some ideas I can share with. Join me regularly to read about my adventures.</subtitle><link rel="http://schemas.google.com/g/2005#feed" type="application/atom+xml" href="http://www.mywoklife.com/feeds/posts/default" /><link rel="alternate" type="text/html" href="http://www.mywoklife.com/" /><link rel="next" type="application/atom+xml" href="http://www.blogger.com/feeds/490982868559256368/posts/default?start-index=26&amp;max-results=25&amp;redirect=false&amp;v=2" /><author><name>PatriCa BB</name><uri>http://www.blogger.com/profile/15253488652628099847</uri><email>admin@mywoklife.com</email></author><generator version="7.00" uri="http://www.blogger.com">Blogger</generator><openSearch:totalResults>285</openSearch:totalResults><openSearch:startIndex>1</openSearch:startIndex><openSearch:itemsPerPage>25</openSearch:itemsPerPage><atom10:link xmlns:atom10="http://www.w3.org/2005/Atom" rel="self" type="application/atom+xml" href="http://feeds.feedburner.com/mywoklife/abcd" /><feedburner:info xmlns:feedburner="http://rssnamespace.org/feedburner/ext/1.0" uri="mywoklife/abcd" /><atom10:link xmlns:atom10="http://www.w3.org/2005/Atom" rel="hub" href="http://pubsubhubbub.appspot.com/" /><feedburner:emailServiceId xmlns:feedburner="http://rssnamespace.org/feedburner/ext/1.0">mywoklife/abcd</feedburner:emailServiceId><feedburner:feedburnerHostname xmlns:feedburner="http://rssnamespace.org/feedburner/ext/1.0">http://feedburner.google.com</feedburner:feedburnerHostname><entry gd:etag="W/&quot;DkAGRXk5eyp7ImA9WxBbFkg.&quot;"><id>tag:blogger.com,1999:blog-490982868559256368.post-9065561869143815221</id><published>2010-03-15T13:38:00.001+08:00</published><updated>2010-03-15T20:05:24.723+08:00</updated><app:edited xmlns:app="http://www.w3.org/2007/app">2010-03-15T20:05:24.723+08:00</app:edited><category scheme="http://www.blogger.com/atom/ns#" term="Recipe" /><category scheme="http://www.blogger.com/atom/ns#" term="Vegetables" /><category scheme="http://www.blogger.com/atom/ns#" term="Egg" /><title>Fragrant Stir-Fried Bitter Gourd with Duck Egg</title><content type="html">&lt;div class="separator" style="clear: both; text-align: center;"&gt;&lt;a href="http://2.bp.blogspot.com/_X60ewjhV9Aw/S53sL5En2kI/AAAAAAAADaE/7Spgt5URueY/s1600-h/IMG_1476%5B1%5D.jpg" imageanchor="1" style="margin-left: 1em; margin-right: 1em;"&gt;&lt;img border="0" height="317" src="http://2.bp.blogspot.com/_X60ewjhV9Aw/S53sL5En2kI/AAAAAAAADaE/7Spgt5URueY/s400/IMG_1476%5B1%5D.jpg" vt="true" width="400" /&gt;&lt;/a&gt;&lt;/div&gt;&lt;strong&gt;&lt;span style="color: cyan;"&gt;"Don't hate bitter gourd. It's nutritious and delicious. Best to cook and have it at home with my &lt;em&gt;Secret Recipe&lt;/em&gt;!"&lt;/span&gt;&lt;/strong&gt;&lt;br /&gt;&lt;br /&gt;Hubby's favourite &lt;i&gt;'rice with dishes meal'&lt;/i&gt; will be such combinations of curry chicken, egg and bitter gourd dish to go with a large plate of steamed white rice. So, these few dishes have been my favourite dinner dishes to be cooked at home for years. Just because I cook these for many times, I have to vary the cooking method of these dishes with some new ways, sometimes. &lt;br /&gt;&lt;br /&gt;I cooked &lt;a href="http://www.mywoklife.com/2009/07/stir-fried-bitter-gourd-with-black.html"&gt;stir-fried bitter gourd with black beans&lt;/a&gt;, and now, I would like to introduce another fragrant and delicious bitter gourd dish here. Don't look at this bitter gourd dish that way, please~ This bitter gourd dish tasted so good and NOT bitter at all, even my girl liked it so much! This dish was delicious, soft and fragrant in the palate, with a secret addition, the raw salted duck egg. &lt;br /&gt;&lt;br /&gt;I did not use the usual chicken egg to create the egg drop effect in my bitter gourd dish. A '&lt;i&gt;preserved/ salted&lt;/i&gt;' duck egg was used. Need not to pre-boil the salted egg, but use it straight from raw egg, after washing away the layer of muddy salted charcoal coated on the shell. And no worries, this duck egg will not make the dish too salty like tasting the hard boiled salted duck egg. Instead, adding of duch egg makes the dish much more fragrant. Duck egg white was smoother, and its yolk was more moist and fragrant in the palate while chewing it together with the bitter gourd. &lt;br /&gt;&lt;br /&gt;This recipe was suggested by my parents. Thanks to dad and mum! &lt;br /&gt;&lt;br /&gt;And so, to avoid any disappointment by having very bitter-tasted bitter gourd in this dish, I will tell you how to choose bitter gourd which is less bitter taste (&lt;em&gt;smile&lt;/em&gt;), in case you are not sure..&lt;br /&gt;&lt;br /&gt;&lt;div class="separator" style="clear: both; text-align: center;"&gt;&lt;a href="http://1.bp.blogspot.com/_X60ewjhV9Aw/S53sJE-tkmI/AAAAAAAADZ8/_Mj8TmubWoM/s1600-h/IMG_1478%5B1%5D.jpg" imageanchor="1" style="margin-left: 1em; margin-right: 1em;"&gt;&lt;img border="0" height="400" src="http://1.bp.blogspot.com/_X60ewjhV9Aw/S53sJE-tkmI/AAAAAAAADZ8/_Mj8TmubWoM/s400/IMG_1478%5B1%5D.jpg" vt="true" width="371" /&gt;&lt;/a&gt;&lt;/div&gt;&lt;b&gt;Serves 3 - 4&lt;br /&gt;Ingredients&lt;br /&gt;1 arm-lengthed bitter gourd, washed, removed seeds and thinly sliced&lt;br /&gt;1 raw salted duck egg&lt;br /&gt;2 cloves of garlic, minced&lt;br /&gt;1 tablespoon of oyster sauce&lt;br /&gt;Pinch of salt and sugar&lt;br /&gt;&lt;br /&gt;½ cup of water&lt;br /&gt;1 tablespoon of cooking oil&lt;br /&gt;&lt;br /&gt;Method&lt;br /&gt;1) Soak whole bitter gourd with salted water for 15 minutes. Slice bitter gourd into halves, remove seeds using metal spoon, and thinly slice the halves, crosswise or diagonally.&lt;br /&gt;&lt;br /&gt;2) Heat wok with oil over high heat. Add garlic and stir-fry till golden. Reduce heat to medium fire. Add in bitter gourd and stir-fry for 3 minutes. Add water and cover wok with lid to simmer for 3. Remove lid, add salt, sugar and oyster sauce. Stir fry to mix well before cover wok with lid again. Simmer for another 5 minutes, or until water almost dries up (&lt;i&gt;bitter gourd should appear slightly darker green and softened now&lt;/i&gt;).&lt;br /&gt;&lt;br /&gt;3) Break raw salted duck egg in a bowl and pour on the bitter gourd in circular motion. Quickly stir-fry to combine egg and bitter gourd for 30 seconds and heat off. Let the remaining heat to cook the egg further before dish up. Serve.&lt;/b&gt;&lt;br /&gt;&lt;br /&gt;&lt;i&gt;&lt;b&gt;Tricks&lt;/b&gt;&lt;/i&gt;: How to choose less bitter taste of bitter gourd?&lt;br /&gt;Choose bitter gourd with pale green in colour and less wrinkles. &lt;br /&gt;&lt;br /&gt;&lt;em&gt;Tips:&lt;/em&gt; Turn the heat off when 80% of the egg white turns whitish (&lt;em&gt;some remain runny&lt;/em&gt;) and yolk is almost harden with a little runny and still moist.&lt;br /&gt;&lt;div class="blogger-post-footer"&gt;&lt;img width='1' height='1' src='https://blogger.googleusercontent.com/tracker/490982868559256368-9065561869143815221?l=www.mywoklife.com' alt='' /&gt;&lt;/div&gt;</content><link rel="replies" type="application/atom+xml" href="http://www.mywoklife.com/feeds/9065561869143815221/comments/default" title="Post Comments" /><link rel="replies" type="text/html" href="https://www.blogger.com/comment.g?blogID=490982868559256368&amp;postID=9065561869143815221" title="0 Comments" /><link rel="edit" type="application/atom+xml" href="http://www.blogger.com/feeds/490982868559256368/posts/default/9065561869143815221?v=2" /><link rel="self" type="application/atom+xml" href="http://www.blogger.com/feeds/490982868559256368/posts/default/9065561869143815221?v=2" /><link rel="alternate" type="text/html" href="http://www.mywoklife.com/2010/03/fragrant-stir-fried-bitter-gourd-with.html" title="Fragrant Stir-Fried Bitter Gourd with Duck Egg" /><author><name>PatriCa BB</name><uri>http://www.blogger.com/profile/15253488652628099847</uri><email>admin@mywoklife.com</email><gd:extendedProperty name="OpenSocialUserId" value="16712851664488271850" /></author><media:thumbnail xmlns:media="http://search.yahoo.com/mrss/" url="http://2.bp.blogspot.com/_X60ewjhV9Aw/S53sL5En2kI/AAAAAAAADaE/7Spgt5URueY/s72-c/IMG_1476%5B1%5D.jpg" height="72" width="72" /><thr:total xmlns:thr="http://purl.org/syndication/thread/1.0">0</thr:total></entry><entry gd:etag="W/&quot;D0MHQXc9eCp7ImA9WxBbE0o.&quot;"><id>tag:blogger.com,1999:blog-490982868559256368.post-4236685267437527124</id><published>2010-03-12T13:42:00.001+08:00</published><updated>2010-03-12T14:30:30.960+08:00</updated><app:edited xmlns:app="http://www.w3.org/2007/app">2010-03-12T14:30:30.960+08:00</app:edited><category scheme="http://www.blogger.com/atom/ns#" term="Seafood" /><category scheme="http://www.blogger.com/atom/ns#" term="Recipe" /><category scheme="http://www.blogger.com/atom/ns#" term="Fish" /><title>Steamed Whole Fish with Bean Paste Sauce (豆瓣酱蒸鱼)</title><content type="html">&lt;div class="separator" style="clear: both; text-align: center;"&gt;&lt;a href="http://3.bp.blogspot.com/_X60ewjhV9Aw/S5nUqZ1aT0I/AAAAAAAADZ0/bHqDo76ONks/s1600-h/IMG_1447%5B1%5D.jpg" imageanchor="1" style="margin-left: 1em; margin-right: 1em;"&gt;&lt;img border="0" height="292" src="http://3.bp.blogspot.com/_X60ewjhV9Aw/S5nUqZ1aT0I/AAAAAAAADZ0/bHqDo76ONks/s400/IMG_1447%5B1%5D.jpg" vt="true" width="400" /&gt;&lt;/a&gt;&lt;/div&gt;&lt;strong&gt;&lt;span style="color: cyan;"&gt;"Simple savoury steamed fish with fragrant steamed rice is good enough for simple dinner meal"&lt;/span&gt;&lt;/strong&gt;&lt;br /&gt;
&lt;br /&gt;
I like to cook more fish dishes, for my girl and hubby as fish contains high nutritional values for my girl, while it's also lowering cholestrol level which benefits hubby who was a little high in cholesterol level in the past. &lt;br /&gt;
&lt;br /&gt;
Well, steamed fish is the easiest way to fix a quick dinner meal if you are a working class. Simple, easy, yet healthy choice of cooking. Complete the meal with just a bowl of rice, we have its flavourful sauce here to pair it so perfectly.&lt;br /&gt;
&lt;br /&gt;
&lt;b&gt;Serves 3 - 4&lt;br /&gt;
Ingredients&lt;br /&gt;
1 tail of whole Red Snapper, scaled, removed internals and washed.&lt;br /&gt;
Few slices of ginger&lt;br /&gt;
Pinch of salt and pepper&lt;br /&gt;
3&amp;nbsp;tablespoons of minced bean paste (豆瓣酱)&lt;br /&gt;
1 tablespoon of sugar&lt;br /&gt;
1 tablespoon of minced garlic&lt;br /&gt;
1 tablespoon of Tamarind sauce (&lt;i&gt;made from 1 tablespoon of tamarind paste with pulps, dissolve in water&lt;/i&gt;)&lt;br /&gt;
&lt;br /&gt;
Method&lt;br /&gt;
1) Wash and pat dry whole fish gently with kitchen towel. Sprinkle pinch of salt and pepper to season both sides of the fish. Stuff ginger slices into the slit of fish stomach. Set aside to season for 10 minutes.&lt;br /&gt;
&lt;br /&gt;
2) Lay fish on a percelain dish. Spread bean paste, sprinkle sugar and top minced garlic on the fish. Lastly, drizzle tamarind sauce. &lt;br /&gt;
&lt;br /&gt;
3) Get ready the steamer or heat wok filled quarter-full of water over high heat. When water is boiling, place fish dish in the steamer, or on a steamer rack in the wok. Steam fish for 10 - 12 minutes. Serve hot.&lt;/b&gt; &lt;br /&gt;
&lt;br /&gt;
A large portion of steamed fish with bean paste counts about &lt;i&gt;180&lt;/i&gt;kcal.&lt;div class="blogger-post-footer"&gt;&lt;img width='1' height='1' src='https://blogger.googleusercontent.com/tracker/490982868559256368-4236685267437527124?l=www.mywoklife.com' alt='' /&gt;&lt;/div&gt;</content><link rel="replies" type="application/atom+xml" href="http://www.mywoklife.com/feeds/4236685267437527124/comments/default" title="Post Comments" /><link rel="replies" type="text/html" href="https://www.blogger.com/comment.g?blogID=490982868559256368&amp;postID=4236685267437527124" title="0 Comments" /><link rel="edit" type="application/atom+xml" href="http://www.blogger.com/feeds/490982868559256368/posts/default/4236685267437527124?v=2" /><link rel="self" type="application/atom+xml" href="http://www.blogger.com/feeds/490982868559256368/posts/default/4236685267437527124?v=2" /><link rel="alternate" type="text/html" href="http://www.mywoklife.com/2010/03/steamed-whole-fish-with-bean-paste.html" title="Steamed Whole Fish with Bean Paste Sauce (豆瓣酱蒸鱼)" /><author><name>PatriCa BB</name><uri>http://www.blogger.com/profile/15253488652628099847</uri><email>admin@mywoklife.com</email><gd:extendedProperty name="OpenSocialUserId" value="16712851664488271850" /></author><media:thumbnail xmlns:media="http://search.yahoo.com/mrss/" url="http://3.bp.blogspot.com/_X60ewjhV9Aw/S5nUqZ1aT0I/AAAAAAAADZ0/bHqDo76ONks/s72-c/IMG_1447%5B1%5D.jpg" height="72" width="72" /><thr:total xmlns:thr="http://purl.org/syndication/thread/1.0">0</thr:total></entry><entry gd:etag="W/&quot;DkMDRXw9cSp7ImA9WxBbEkQ.&quot;"><id>tag:blogger.com,1999:blog-490982868559256368.post-357903093751970579</id><published>2010-03-11T12:38:00.002+08:00</published><updated>2010-03-11T16:01:14.269+08:00</updated><app:edited xmlns:app="http://www.w3.org/2007/app">2010-03-11T16:01:14.269+08:00</app:edited><category scheme="http://www.blogger.com/atom/ns#" term="Sauce n' Condiments" /><category scheme="http://www.blogger.com/atom/ns#" term="Recipe" /><category scheme="http://www.blogger.com/atom/ns#" term="Vegetarian" /><category scheme="http://www.blogger.com/atom/ns#" term="Vegetables" /><category scheme="http://www.blogger.com/atom/ns#" term="Low-Fat" /><title>Fresh Vegetable Salad with Japanese Seasoned Vinegar</title><content type="html">&lt;div class="separator" style="clear: both; text-align: center;"&gt;&lt;a href="http://4.bp.blogspot.com/_X60ewjhV9Aw/S5iNbaWYcdI/AAAAAAAADZc/nzGA8mda8NY/s1600-h/532791008_6ETML-M.jpg" imageanchor="1" style="margin-left: 1em; margin-right: 1em;"&gt;&lt;img border="0" height="320" src="http://4.bp.blogspot.com/_X60ewjhV9Aw/S5iNbaWYcdI/AAAAAAAADZc/nzGA8mda8NY/s400/532791008_6ETML-M.jpg" vt="true" width="400" /&gt;&lt;/a&gt;&lt;/div&gt;&lt;strong&gt;&lt;span style="color: cyan;"&gt;"Fresh vegetable salad with delicious low-fat seasoned vinegar dressing"&lt;/span&gt;&lt;/strong&gt;&lt;br /&gt;
&lt;br /&gt;
I am on diet recently. After a long period of festive feast, I have to go on diet and exercise. Just signed up a 1-year fitness package together with two other female colleagues. We determined we'll stick to our plan, at least twice a week of work-out session at the gym. Eat lesser and healthier. I eat vegetable salad as a meal, sometimes. &lt;br /&gt;
&lt;br /&gt;
Many say eating veggie salad will surely light, but in fact, it's much depends on its dressing. Eating salad with full mayonnaise cream is surely not light. There are so many different kinds of salad dressing in the market. The tastier, the heavier, at large. &lt;br /&gt;
&lt;br /&gt;
&lt;div class="separator" style="clear: both; text-align: center;"&gt;&lt;a href="http://1.bp.blogspot.com/_X60ewjhV9Aw/S5iNV1IHeMI/AAAAAAAADZU/2dND2TC_kkc/s1600-h/IMG_1455%5B1%5D.jpg" imageanchor="1" style="clear: right; cssfloat: right; float: right; margin-bottom: 1em; margin-left: 1em;"&gt;&lt;img border="0" height="320" src="http://1.bp.blogspot.com/_X60ewjhV9Aw/S5iNV1IHeMI/AAAAAAAADZU/2dND2TC_kkc/s320/IMG_1455%5B1%5D.jpg" vt="true" width="138" /&gt;&lt;/a&gt;&lt;a href="http://2.bp.blogspot.com/_X60ewjhV9Aw/S5iiHKBTaLI/AAAAAAAADZs/3OUQC8SEr58/s1600-h/IMG_1456%5B1%5D.jpg" imageanchor="1" style="clear: right; cssfloat: right; float: right; margin-bottom: 1em; margin-left: 1em;"&gt;&lt;img border="0" height="200" src="http://2.bp.blogspot.com/_X60ewjhV9Aw/S5iiHKBTaLI/AAAAAAAADZs/3OUQC8SEr58/s200/IMG_1456%5B1%5D.jpg" vt="true" width="139" /&gt;&lt;/a&gt; &lt;/div&gt;However, the Japanese salad dressing, Seasoned Vinegar for salad apple taste, is light and tasty, to my liking. &lt;br /&gt;
&lt;br /&gt;
This watery based seasoned vinegar dressing makes the salad tastes&amp;nbsp;so refreshing. Without a single trace of sourish, I liked its pleasant sweet fruity flavour that refreshes taste bud. This is, of course, low fat with only &lt;i&gt;14&lt;/i&gt;kcal per 15gram of serving.&lt;br /&gt;
&lt;br /&gt;
Next time if you happen to shop at NTUC Fairprice, go to their Japanese products section to check this out. I got a bottle of 200ml at only S$4.90. &lt;br /&gt;
&lt;br /&gt;
To make a salad meal with this Japanese seasoned vinegar:&lt;br /&gt;
&lt;br /&gt;
&lt;b&gt;Serves 3 - 4&lt;br /&gt;
A packet of mixed fresh vegetables consists of:&lt;br /&gt;
Butterhead lettuce, cut&lt;br /&gt;
Red Leaf lettuce, cut&lt;br /&gt;
Japanese cucumber, thinly sliced&lt;br /&gt;
Cherry tomatoes, halved&lt;br /&gt;
&lt;br /&gt;
&lt;i&gt;Topping:&lt;/i&gt;&lt;br /&gt;
Sun flower seed&lt;br /&gt;
&lt;br /&gt;
&lt;i&gt;Dressing:&lt;/i&gt;&lt;br /&gt;
3 - 4 tablespoons of seasoned vinegar&lt;br /&gt;
&lt;br /&gt;
Method&lt;br /&gt;
1) Place all lettuce on a deep serving dish. Place sliced cucumbers, cherry tomatoes upon a bed of tossed lettuce, and then, top with sun flower seed. Chill in refrigerator.&lt;br /&gt;
&lt;br /&gt;
2) Drizzle salad dressing and toss well only before serving. &lt;/b&gt;&lt;br /&gt;
&lt;br /&gt;
&lt;em&gt;Tips&lt;/em&gt;: Get the ready packet mixed vegetables from supermarkets, for more convenience sake. Choose organic types for better choice of eating raw.&lt;div class="blogger-post-footer"&gt;&lt;img width='1' height='1' src='https://blogger.googleusercontent.com/tracker/490982868559256368-357903093751970579?l=www.mywoklife.com' alt='' /&gt;&lt;/div&gt;</content><link rel="replies" type="application/atom+xml" href="http://www.mywoklife.com/feeds/357903093751970579/comments/default" title="Post Comments" /><link rel="replies" type="text/html" href="https://www.blogger.com/comment.g?blogID=490982868559256368&amp;postID=357903093751970579" title="0 Comments" /><link rel="edit" type="application/atom+xml" href="http://www.blogger.com/feeds/490982868559256368/posts/default/357903093751970579?v=2" /><link rel="self" type="application/atom+xml" href="http://www.blogger.com/feeds/490982868559256368/posts/default/357903093751970579?v=2" /><link rel="alternate" type="text/html" href="http://www.mywoklife.com/2010/03/fresh-vegetable-salad-with-japanese.html" title="Fresh Vegetable Salad with Japanese Seasoned Vinegar" /><author><name>PatriCa BB</name><uri>http://www.blogger.com/profile/15253488652628099847</uri><email>admin@mywoklife.com</email><gd:extendedProperty name="OpenSocialUserId" value="16712851664488271850" /></author><media:thumbnail xmlns:media="http://search.yahoo.com/mrss/" url="http://4.bp.blogspot.com/_X60ewjhV9Aw/S5iNbaWYcdI/AAAAAAAADZc/nzGA8mda8NY/s72-c/532791008_6ETML-M.jpg" height="72" width="72" /><thr:total xmlns:thr="http://purl.org/syndication/thread/1.0">0</thr:total></entry><entry gd:etag="W/&quot;CU8CSXg5fSp7ImA9WxBbEUQ.&quot;"><id>tag:blogger.com,1999:blog-490982868559256368.post-2053818339801897037</id><published>2010-03-10T08:21:00.005+08:00</published><updated>2010-03-10T12:04:28.625+08:00</updated><app:edited xmlns:app="http://www.w3.org/2007/app">2010-03-10T12:04:28.625+08:00</app:edited><category scheme="http://www.blogger.com/atom/ns#" term="Recipe" /><category scheme="http://www.blogger.com/atom/ns#" term="Drinks" /><title>Homemade Water Chestnut and Sugar Cane Drink</title><content type="html">&lt;div class="separator" style="clear: both; text-align: center;"&gt;&lt;a href="http://4.bp.blogspot.com/_X60ewjhV9Aw/S5cWMzkH1yI/AAAAAAAADZE/JCKAyWBiX6I/s1600-h/IMG_1444.jpg" imageanchor="1" style="margin-left: 1em; margin-right: 1em;"&gt;&lt;img border="0" height="400" src="http://4.bp.blogspot.com/_X60ewjhV9Aw/S5cWMzkH1yI/AAAAAAAADZE/JCKAyWBiX6I/s400/IMG_1444.jpg" vt="true" width="232" /&gt;&lt;/a&gt;&lt;/div&gt;&lt;strong&gt;&lt;span style="color: cyan;"&gt;"The natural thirst quencher to rehydrate body,&amp;nbsp;flavourful and healthily"&lt;/span&gt;&lt;/strong&gt;&lt;br /&gt;
&lt;br /&gt;
Cooked some healthy drinks for the hot weekend, to quench our thirst as well as reduce heatiness in the body. &lt;br /&gt;
&lt;br /&gt;
Homemade version of water chestnet and sugar cane drink&amp;nbsp;has its natural and&amp;nbsp;smooth mouthfeel that sooths the throat wonderfully.&amp;nbsp;This homemade drink is&amp;nbsp;also&amp;nbsp;better in taste, not too strong flavour since it's&amp;nbsp;without additional flavouring. Simply loved its mild flavour, soothing&amp;nbsp;and cooling effects. &lt;br /&gt;
&lt;br /&gt;
My girl told me that she&amp;nbsp;wished to have it everyday. Well, it is&amp;nbsp;so simple&amp;nbsp;to cook this, actually.&amp;nbsp;10 minutes to prepare, and 30 minutes to cook this healthy beverage. You may keep this drink for a few days, simply store the unfinished portion in refrigerator for next days. &lt;br /&gt;
&lt;br /&gt;
&lt;div class="separator" style="clear: both; text-align: center;"&gt;&lt;a href="http://4.bp.blogspot.com/_X60ewjhV9Aw/S5cWPIIO45I/AAAAAAAADZM/o8H72oxt5u4/s1600-h/IMG_1438.jpg" imageanchor="1" style="margin-left: 1em; margin-right: 1em;"&gt;&lt;img border="0" height="277" src="http://4.bp.blogspot.com/_X60ewjhV9Aw/S5cWPIIO45I/AAAAAAAADZM/o8H72oxt5u4/s400/IMG_1438.jpg" vt="true" width="400" /&gt;&lt;/a&gt;&lt;/div&gt;&lt;b&gt;Serves 5 – 6 cups&lt;br /&gt;
Ingredients&lt;br /&gt;
15 -&amp;nbsp;20 pieces&amp;nbsp;of water chestnuts, with skin intact. &lt;em&gt;Trim off both ends, scrubbed its skin, washed and soaked in clean water for 1 hour or longer&lt;/em&gt;&lt;/b&gt;&lt;br /&gt;
&lt;b&gt;2 - 3 sticks of arm-length sugar cane, thin rods. &lt;em&gt;Scrubbed skin and chopped into shorter length to fit into pot&lt;/em&gt;&lt;br /&gt;
100 gram of&amp;nbsp;rock sugar, about the size of a fist&lt;br /&gt;
&lt;br /&gt;
A pot of water, about 1500ml &lt;br /&gt;
&lt;br /&gt;
Method&lt;br /&gt;
1) As abovementioned, trim off both ends of water chestnuts. Scrub skin with brush if it’s muddy (&lt;em&gt;Get those ready washed bundles from supermarket to save this step&lt;/em&gt;). Wash thoroughly and soak in the water for an hour or more. Drain and set aside. &lt;br /&gt;
&lt;br /&gt;
2) Use peeler or small knife to scrub the thick skin of sugar cane. Then, wash thoroughly. Set aside. &lt;br /&gt;
&lt;br /&gt;
3) Bring a pot of water to a boil over high heat. Add sugar cane and water chestnuts into the boiling water. Reduce heat to low fire to simmer for 20 minutes. Add rock sugar and let it slowly dissolve, simmer for another 10 – 15 minutes. Heat off and serve hot, or chilled.&lt;/b&gt; &lt;br /&gt;
&lt;br /&gt;
If prefer to have some crunchy bites of water chestnut in your drink, crush the chestnuts with one flat side of the chopper, before adding into the pot.&lt;br /&gt;
&lt;br /&gt;
A cup of water chestnuts and sugar cane drink counts about &lt;i&gt;100&lt;/i&gt;kcal.&lt;br /&gt;
&lt;br /&gt;
&lt;i&gt;Tips&lt;/i&gt;: You may choose to peel off the thick skin completely, using a proper tool to do this task, if desired. Otherwise, simply scrub a little will do as it’s no harm boiling with the skin intact. &lt;br /&gt;
*Same thing, you have the choice to keep the skin of chestnuts or peel off completely. To me, I like to keep skin intact as I personally believed all food skins contain valuable nutrients, too. **Important: Regardless chestnuts with skin intact or not, soak chestnuts in clean water for long hours to get rid of the bacteria/ micro worms hidden inside the chestnuts flesh, especially if it’s to be eaten raw. &lt;br /&gt;
* Both ingredients can be found in various supermarkets, e.g. NTUC Fairprice, Sheng Siong Supermarket, from&amp;nbsp;chilled compartment or vegetables section.&amp;nbsp;&amp;nbsp;Try to&amp;nbsp;request the service staff there to chop the sugar cane for you before bring home. Also available&amp;nbsp;vegetables stores in wet markets, in fact.&lt;div class="blogger-post-footer"&gt;&lt;img width='1' height='1' src='https://blogger.googleusercontent.com/tracker/490982868559256368-2053818339801897037?l=www.mywoklife.com' alt='' /&gt;&lt;/div&gt;</content><link rel="replies" type="application/atom+xml" href="http://www.mywoklife.com/feeds/2053818339801897037/comments/default" title="Post Comments" /><link rel="replies" type="text/html" href="https://www.blogger.com/comment.g?blogID=490982868559256368&amp;postID=2053818339801897037" title="0 Comments" /><link rel="edit" type="application/atom+xml" href="http://www.blogger.com/feeds/490982868559256368/posts/default/2053818339801897037?v=2" /><link rel="self" type="application/atom+xml" href="http://www.blogger.com/feeds/490982868559256368/posts/default/2053818339801897037?v=2" /><link rel="alternate" type="text/html" href="http://www.mywoklife.com/2010/03/homemade-water-chestnut-and-sugar-cane.html" title="Homemade Water Chestnut and Sugar Cane Drink" /><author><name>PatriCa BB</name><uri>http://www.blogger.com/profile/15253488652628099847</uri><email>admin@mywoklife.com</email><gd:extendedProperty name="OpenSocialUserId" value="16712851664488271850" /></author><media:thumbnail xmlns:media="http://search.yahoo.com/mrss/" url="http://4.bp.blogspot.com/_X60ewjhV9Aw/S5cWMzkH1yI/AAAAAAAADZE/JCKAyWBiX6I/s72-c/IMG_1444.jpg" height="72" width="72" /><thr:total xmlns:thr="http://purl.org/syndication/thread/1.0">0</thr:total></entry><entry gd:etag="W/&quot;CUQASH09eCp7ImA9WxBbEU8.&quot;"><id>tag:blogger.com,1999:blog-490982868559256368.post-6343082139502541334</id><published>2010-03-08T12:07:00.001+08:00</published><updated>2010-03-09T16:29:09.360+08:00</updated><app:edited xmlns:app="http://www.w3.org/2007/app">2010-03-09T16:29:09.360+08:00</app:edited><category scheme="http://www.blogger.com/atom/ns#" term="Recipe" /><category scheme="http://www.blogger.com/atom/ns#" term="Vegetables" /><category scheme="http://www.blogger.com/atom/ns#" term="Low-Fat" /><title>Stir-Fried Baby Kai Lan with Garlic (清炒小芥兰)</title><content type="html">&lt;div class="separator" style="clear: both; text-align: center;"&gt;&lt;a href="http://2.bp.blogspot.com/_X60ewjhV9Aw/S5Rey7MI2TI/AAAAAAAADY8/p5d9_iphP3I/s1600-h/IMG_1418.jpg" imageanchor="1" style="margin-left: 1em; margin-right: 1em;"&gt;&lt;img border="0" height="300" kt="true" src="http://2.bp.blogspot.com/_X60ewjhV9Aw/S5Rey7MI2TI/AAAAAAAADY8/p5d9_iphP3I/s400/IMG_1418.jpg" width="400" /&gt;&lt;/a&gt;&lt;/div&gt;&lt;strong&gt;&lt;span style="color: cyan;"&gt;"Simply delicious and healthy vegetable dish you should always cook at home"&lt;/span&gt;&lt;/strong&gt;&lt;br /&gt;
&lt;br /&gt;
If you like vegetables, you'll sure like&amp;nbsp;Baby Kailan (&lt;em&gt;Baby Kai Lan or known as&amp;nbsp;Chinese Broccoli or Chinese Kale&lt;/em&gt;). I've came across&amp;nbsp;some friends, told me that they loved this veggie, but could only eat it when dinning out. Cooking this at home was almost&amp;nbsp;impossible as they often found it tasted&amp;nbsp;bitter after cooked. So, they gave it up, in the end. &lt;br /&gt;
&lt;br /&gt;
So, I am going to share my cooking method of this baby kailan dish, and hope it may help a little,&amp;nbsp;to overcome&amp;nbsp;the fear of cooking baby kailan at home, after this (&lt;em&gt;smile&lt;/em&gt;). &lt;br /&gt;
&lt;br /&gt;
There are so many different&amp;nbsp;options to cook this delicious green and it's very simple and quick to complete as this veggie is young and light in taste. The more common ones should be the Oyster baby kailan (耗油小芥兰) and Stir-fried baby kailan with minced garlic (蒜蓉炒小芥兰). So, yes, I cooked it with the later option, and this method&amp;nbsp;is more commonly known&amp;nbsp;as 清炒小芥兰. 清炒 (&lt;em&gt;pronounced in Mandarin as: Qing Chao&lt;/em&gt;) refers to stir-fry&amp;nbsp;in plain.&amp;nbsp;Yes, this supposed to be plain (&lt;em&gt;with just some&amp;nbsp;garlic&lt;/em&gt;), but because I had some Pacific clams left in my refrigerator, I added it to my stir-fried (&lt;i&gt;laughing&lt;/i&gt;). No worries, both eating it plain or with addition of &lt;i&gt;'delicate flavoured&lt;/i&gt;' ingredients, such as, pacific clams, fish balls and fish cake slices, are good, as desired.&lt;br /&gt;
&lt;br /&gt;
&lt;b&gt;Serves 3 - 4&lt;br /&gt;
Ingredients&lt;br /&gt;
300 - 350&amp;nbsp;grams of Baby Kai-Lan, trimmed and rinsed&lt;br /&gt;
2 cloves of garlic, finely minced&lt;br /&gt;
Pinch of sugar&lt;br /&gt;
Pinch of salt and pepper&lt;br /&gt;
&lt;br /&gt;
1 tablespoon of cooking oil&lt;br /&gt;
&lt;br /&gt;
&lt;em&gt;Optional:&lt;/em&gt;&lt;br /&gt;
Handful of canned Pacific clams&lt;br /&gt;
2 teaspoons of oyster sauce&lt;br /&gt;
&lt;br /&gt;
Method&lt;br /&gt;
1) Heat wok with oil over high heat. Add garlic and stir-fry for about 10 seconds till fragrant, but not browned. &lt;br /&gt;
&lt;br /&gt;
2) Add baby kailan and sugar, stir fry with spatula in quick strokes. Then, add in pacific clams, if opted for. &lt;br /&gt;
&lt;br /&gt;
3) When veggie starts to soften, sprinkle salt and&amp;nbsp;pepper (&lt;i&gt;and oyster sauce, if added with pacific clams,&amp;nbsp;or if prefer more enhanced flavour&amp;nbsp;in the veggie&lt;/i&gt;). Stir-fry to combine well. Dish up and serve.&lt;/b&gt;&lt;br /&gt;
&lt;br /&gt;
&lt;i&gt;&lt;b&gt;Tricks to reduce/ eliminiate bitterness in baby kailan dish:&lt;/b&gt;&lt;/i&gt;&lt;br /&gt;
* If you not wish to eliminate the bitter taste of this dish (&lt;em&gt;if any&lt;/em&gt;), garlic is one of the key point. Do not fry garlic till browned or burnt, leave it pale with fragrance will do,&amp;nbsp;before adding baby kailan. &lt;br /&gt;
* Adding of sugar helps to reach the same effect as well as to enhance the overall taste of the dish. &lt;br /&gt;
&lt;br /&gt;
This veggie dish is definitely healty and low fat. A generous portion of such counts less than &lt;i&gt;150&lt;/i&gt;kcal. &lt;br /&gt;
&lt;br /&gt;
&lt;i&gt;&lt;strong&gt;Tips:&lt;/strong&gt;&lt;/i&gt; Do not need to add extra water as gravy is not necessary in this dish. Water from the baby kailan should be sufficient to moist the veggie till it's cooked. If really find it too dry while cooking, simply sprinkle some water with your fingers. &lt;br /&gt;
* Fry vegetables with high heat&amp;nbsp;in short cooking time in order to retain its nutrients and keep veggie fresh and grossy bright green looking&amp;nbsp;with more crunchy&amp;nbsp;bites.&lt;div class="blogger-post-footer"&gt;&lt;img width='1' height='1' src='https://blogger.googleusercontent.com/tracker/490982868559256368-6343082139502541334?l=www.mywoklife.com' alt='' /&gt;&lt;/div&gt;</content><link rel="replies" type="application/atom+xml" href="http://www.mywoklife.com/feeds/6343082139502541334/comments/default" title="Post Comments" /><link rel="replies" type="text/html" href="https://www.blogger.com/comment.g?blogID=490982868559256368&amp;postID=6343082139502541334" title="0 Comments" /><link rel="edit" type="application/atom+xml" href="http://www.blogger.com/feeds/490982868559256368/posts/default/6343082139502541334?v=2" /><link rel="self" type="application/atom+xml" href="http://www.blogger.com/feeds/490982868559256368/posts/default/6343082139502541334?v=2" /><link rel="alternate" type="text/html" href="http://www.mywoklife.com/2010/03/stir-fried-baby-kai-lan-with-garlic.html" title="Stir-Fried Baby Kai Lan with Garlic (清炒小芥兰)" /><author><name>PatriCa BB</name><uri>http://www.blogger.com/profile/15253488652628099847</uri><email>admin@mywoklife.com</email><gd:extendedProperty name="OpenSocialUserId" value="16712851664488271850" /></author><media:thumbnail xmlns:media="http://search.yahoo.com/mrss/" url="http://2.bp.blogspot.com/_X60ewjhV9Aw/S5Rey7MI2TI/AAAAAAAADY8/p5d9_iphP3I/s72-c/IMG_1418.jpg" height="72" width="72" /><thr:total xmlns:thr="http://purl.org/syndication/thread/1.0">0</thr:total></entry><entry gd:etag="W/&quot;CEAARXk7fyp7ImA9WxBbEEw.&quot;"><id>tag:blogger.com,1999:blog-490982868559256368.post-5356884402959989188</id><published>2010-03-05T08:38:00.004+08:00</published><updated>2010-03-08T09:45:44.707+08:00</updated><app:edited xmlns:app="http://www.w3.org/2007/app">2010-03-08T09:45:44.707+08:00</app:edited><category scheme="http://www.blogger.com/atom/ns#" term="1-dish Meal" /><category scheme="http://www.blogger.com/atom/ns#" term="Recipe" /><category scheme="http://www.blogger.com/atom/ns#" term="Noodles" /><title>Fuzhou-Style Noodle in Thick Broth Recipe (福州淋面)</title><content type="html">&lt;div class="separator" style="clear: both; text-align: center;"&gt;&lt;/div&gt;&lt;div class="separator" style="clear: both; text-align: center;"&gt;&lt;a href="http://3.bp.blogspot.com/_X60ewjhV9Aw/S5BwwkB-XqI/AAAAAAAADY0/J4JQsFl-9mQ/s1600-h/IMG_1353.jpg" imageanchor="1" style="margin-left: 1em; margin-right: 1em;"&gt;&lt;img border="0" height="300" kt="true" src="http://3.bp.blogspot.com/_X60ewjhV9Aw/S5BwwkB-XqI/AAAAAAAADY0/J4JQsFl-9mQ/s400/IMG_1353.jpg" width="400" /&gt;&lt;/a&gt;&lt;/div&gt;&lt;b&gt;&lt;span style="color: cyan;"&gt;"Don't mistaken, it's not the common Lu Mian that I've cooked. This is my home 'secret' recipe of savoury Fuzhou Noodle Dish!"&lt;/span&gt;&lt;/b&gt;&lt;br /&gt;
&lt;br /&gt;
I guess most of you heard or tasted Lu Mian (卤面) which commonly sold in many hawker stores and food courts in Singapore. Lu Mian (&lt;em&gt;Noodle in braised sauce&lt;/em&gt;)&amp;nbsp;is one of the Fujian (福建) cuisine, if I am not wrong. However, I am not going to introduce recipe of Lu Mian here, my recipe is more a traditional style of similar noodle dish, with its origins from Fuzhou (福州). &lt;br /&gt;
&lt;br /&gt;
So, what's the difference between Fujian and Fuzhou? I think Fujian is a Province of China, while Fuzhou is the capital of Fujian Province. What I am sure was both Fujian and Fuzhou dialect groups speak different dialects, they are not the same pronunciation at all! Most people in Singapore belong to Fujian dialect group instead of Fuzhou. So, Fuzhou cuisine might not be as familiar as Fujian cuisine, to us. And, my mum's dialect group, happened to be actually.. Fuzhou. So, I get to learn some special dishes from her/ or grandma (&lt;i&gt;smile&lt;/i&gt;). &lt;br /&gt;
&lt;br /&gt;
This Fuzhou noodle dish does not named as Lu Mian, though. It has its own name even though the look and texture of broth were similar (&lt;i&gt;but Fuzhou noodle dish has utterly different set of&amp;nbsp;ingredients&amp;nbsp;for broth&amp;nbsp;and side ingredients used as compared to Lu Mian dish&lt;/i&gt;). It's called 福州淋面 (&lt;i&gt;Pronounced in Mandarin as: Fu Zhou Lin Mian&lt;/i&gt;), with its direct translation as Fuzhou poured noodle or 'pouring on noodles'. I guess it was because this noodle is taken with the thick broth pouring on top, and hence, it's named as it, in tens, hundreds or maybe thousands years back. &lt;br /&gt;
&lt;br /&gt;
&lt;div class="separator" style="clear: both; text-align: center;"&gt;&lt;/div&gt;&lt;div class="separator" style="clear: both; text-align: center;"&gt;&lt;a href="http://2.bp.blogspot.com/_X60ewjhV9Aw/S5BwuAlrAyI/AAAAAAAADYs/SH0ne_d1h9Y/s1600-h/IMG_1354.jpg" imageanchor="1" style="margin-left: 1em; margin-right: 1em;"&gt;&lt;img border="0" kt="true" src="http://2.bp.blogspot.com/_X60ewjhV9Aw/S5BwuAlrAyI/AAAAAAAADYs/SH0ne_d1h9Y/s320/IMG_1354.jpg" /&gt;&lt;/a&gt;&lt;/div&gt;I loved this classic noodle dish, for its subtly rich-bodied broth which creates smooth mouthfeel in the palate. The Fuzhou stuffed fish balls (&lt;em&gt;fish ball stuffed with minced meat&lt;/em&gt;) I have added are unique and delicious, too. And, of course, cooking this Fuzhou noodles dish at home yields hearty atmosphere, also, warms the heart of our loved ones who get to appreciate the 'long lost' taste of such classic savory. &lt;br /&gt;
&lt;br /&gt;
For more tender, and not soggy bites, remember to blanch and add noodles just before serving. &lt;br /&gt;
&lt;br /&gt;
&lt;b&gt;Served 5 - 6&lt;br /&gt;
Ingredients&lt;/b&gt;&lt;br /&gt;
&lt;b&gt;For thick broth:&lt;br /&gt;
1 large bowl of prawn shells and heads&lt;br /&gt;
1 whole chicken bone&lt;br /&gt;
2 large eggs&lt;br /&gt;
3 tablespoons of fish sauce&lt;br /&gt;
2 tablespoons of dark soy sauce&lt;br /&gt;
4 tablespoons of plain flour or corn starch, mixed with water to make &lt;br /&gt;
into slurry&lt;br /&gt;
A pot of water, 50% filled (&lt;em&gt;about 2500ml&lt;/em&gt;)&lt;/b&gt;&lt;br /&gt;
&lt;b&gt;300 grams of cooked flat yellow noodles (&lt;em&gt;also called Hokkien noodle&lt;/em&gt;), blanched&lt;/b&gt;&lt;br /&gt;
&lt;b&gt;Side Ingredients:&lt;br /&gt;
1 pieces of chicken fillet, cooked and shredded &lt;em&gt;(*May replace with deli-thin shoulderbutt pork slices&lt;/em&gt;)&lt;br /&gt;
200 grams of prawns, shelled and deveined, blanched&lt;br /&gt;
10 - 12 Fuzhou fish balls (&lt;em&gt;stuffed fish ball&lt;/em&gt;), cooked&lt;br /&gt;
Handful of beansprout, trimmed and blanched&lt;br /&gt;
Handful of lettuce, shredded&lt;br /&gt;
&lt;br /&gt;
&lt;em&gt;Garnish:&lt;/em&gt;&lt;br /&gt;
Spring onion, julienned&lt;br /&gt;
Corriander, briefly chopped&lt;br /&gt;
&lt;br /&gt;
&lt;em&gt;Condiments:&lt;/em&gt;&lt;br /&gt;
Black vinegar (&lt;em&gt;Optional&lt;/em&gt;)&lt;br /&gt;
Sambal belacan chilli paste&lt;/b&gt;&lt;br /&gt;
&lt;br /&gt;
&lt;div class="separator" style="clear: both; text-align: center;"&gt;&lt;a href="http://3.bp.blogspot.com/_X60ewjhV9Aw/S5BwqkbWjLI/AAAAAAAADYk/TRb_VTKpOKg/s1600-h/IMG_1343.jpg" imageanchor="1" style="clear: right; cssfloat: right; float: right; margin-bottom: 1em; margin-left: 1em;"&gt;&lt;img border="0" height="146" kt="true" src="http://3.bp.blogspot.com/_X60ewjhV9Aw/S5BwqkbWjLI/AAAAAAAADYk/TRb_VTKpOKg/s200/IMG_1343.jpg" width="200" /&gt;&lt;/a&gt;&lt;/div&gt;&lt;b&gt;Method&lt;br /&gt;
1) Bring a pot of water (&lt;em&gt;in large deep pot&lt;/em&gt;) to a boil over high heat. While boiling, heat wok with oil. Add prawn shells and fry till pinked. Heat off and transfer fried prawn shells into pot of water once boiled (May put shells into a soup bag first before adding into soup). Then, add chicken bone. Reduce heat to low fire, and cover pot with lid to simmer for 1 - 2 hours.&lt;br /&gt;
&lt;br /&gt;
2) In the meantime, get all side ingredients ready. Heat another pot of water to blanch/ cook side ingredients e.g. Bean sprouts, chicken fillet (&lt;em&gt;or thin pork slices&lt;/em&gt;), prawns and stuffed fish balls (&lt;em&gt;Fuzhou fishballs&lt;/em&gt;). Reserve for later.&lt;br /&gt;
&lt;br /&gt;
3) Return to the simmering soup after 1 - 2 hours. Remove chicken bone and prawn shells. Add in fish sauce and dark soy sauce. Then, slowly stir in plain flour/ corn starch slurry till soup is thickened to the right texture. &lt;br /&gt;
&lt;br /&gt;
4) Break eggs in a bowl, briefly beat with serving fork (&lt;i&gt;beat no more than 5 strokes&lt;/i&gt;). Slowly swirl eggs into the soup (&lt;i&gt;in few stages&lt;/i&gt;). Stir constantly till egg-drop forms. Keep the thick broth in mild simmering stage.&lt;br /&gt;
&lt;br /&gt;
5) When it's about time to serve, blanch noodles, and divide into bowls. Add and arrange side ingredients and shredded lettuce nicely in each bowl. Laddle thick broth into each bowl. Garnish with spring onion juliennes and corriander, and top condiments by the side. Serve hot.&lt;/b&gt;&lt;br /&gt;
&lt;br /&gt;
&lt;i&gt;To enjoy better flavour&lt;/i&gt;: Mix the condiments together with all ingredients. Toss the noodles to combine well before digging in!&lt;br /&gt;
&lt;br /&gt;
A large serving of my homemade Fuzhou noodle dish (&lt;em&gt;with consumed of thick broth&lt;/em&gt;) counts about &lt;i&gt;500&lt;/i&gt;kcal.&lt;br /&gt;
&lt;br /&gt;
&lt;i&gt;Tips&lt;/i&gt;: Reason to use plain flour slurry than corn starch to thicken the soup is because the soup thickened with plain flour slurry may keep the broth remained thick in consistency, and will not turn watery so easily.&lt;br /&gt;
* &lt;em&gt;Noodle type&lt;/em&gt;: This dish supposed to use thick rounded noodles, but it is very difficult to buy that. So, I used Hokkien flat noodle type instead. However, choose any type of noodles, as desired. &lt;br /&gt;
* Fuzhou fish balls are available in major supermarkets. It usually comes in vacuum packed of 10 balls.&lt;div class="blogger-post-footer"&gt;&lt;img width='1' height='1' src='https://blogger.googleusercontent.com/tracker/490982868559256368-5356884402959989188?l=www.mywoklife.com' alt='' /&gt;&lt;/div&gt;</content><link rel="replies" type="application/atom+xml" href="http://www.mywoklife.com/feeds/5356884402959989188/comments/default" title="Post Comments" /><link rel="replies" type="text/html" href="https://www.blogger.com/comment.g?blogID=490982868559256368&amp;postID=5356884402959989188" title="1 Comments" /><link rel="edit" type="application/atom+xml" href="http://www.blogger.com/feeds/490982868559256368/posts/default/5356884402959989188?v=2" /><link rel="self" type="application/atom+xml" href="http://www.blogger.com/feeds/490982868559256368/posts/default/5356884402959989188?v=2" /><link rel="alternate" type="text/html" href="http://www.mywoklife.com/2010/03/fuzhou-noodle-in-thick-broth-recipe.html" title="Fuzhou-Style Noodle in Thick Broth Recipe (福州淋面)" /><author><name>PatriCa BB</name><uri>http://www.blogger.com/profile/15253488652628099847</uri><email>admin@mywoklife.com</email><gd:extendedProperty name="OpenSocialUserId" value="16712851664488271850" /></author><media:thumbnail xmlns:media="http://search.yahoo.com/mrss/" url="http://3.bp.blogspot.com/_X60ewjhV9Aw/S5BwwkB-XqI/AAAAAAAADY0/J4JQsFl-9mQ/s72-c/IMG_1353.jpg" height="72" width="72" /><thr:total xmlns:thr="http://purl.org/syndication/thread/1.0">1</thr:total></entry><entry gd:etag="W/&quot;CkAFSHw4eyp7ImA9WxBUFU0.&quot;"><id>tag:blogger.com,1999:blog-490982868559256368.post-8110587016031637423</id><published>2010-03-02T11:25:00.003+08:00</published><updated>2010-03-02T11:31:59.233+08:00</updated><app:edited xmlns:app="http://www.w3.org/2007/app">2010-03-02T11:31:59.233+08:00</app:edited><category scheme="http://www.blogger.com/atom/ns#" term="Festive Gourmet" /><title>Yu Sheng Dish for Lo-Hey Ceremony (鱼生捞起)</title><content type="html">&lt;div class="separator" style="clear: both; text-align: center;"&gt;&lt;a href="http://4.bp.blogspot.com/_X60ewjhV9Aw/S4yDygj_s2I/AAAAAAAADYc/FmFonUMn97M/s1600-h/IMG_1334.jpg" imageanchor="1" style="margin-left: 1em; margin-right: 1em;"&gt;&lt;img border="0" height="241" kt="true" src="http://4.bp.blogspot.com/_X60ewjhV9Aw/S4yDygj_s2I/AAAAAAAADYc/FmFonUMn97M/s400/IMG_1334.jpg" width="400" /&gt;&lt;/a&gt;&lt;/div&gt;&lt;span style="color: red;"&gt;&lt;strong&gt;"Yu Sheng, 鱼生 = 年年有余. Let's have surplus year after year!"&lt;/strong&gt;&lt;/span&gt;&lt;br /&gt;
&lt;br /&gt;
Yu Sheng (&lt;em&gt;Chinese raw fish salad dish&lt;/em&gt;) is my favourite festive dish. Last year, I have already blogged on &lt;a href="http://www.mywoklife.com/2009/01/new-moon-abalone-yu-sheng.html"&gt;Abalone Yu Sheng dish&lt;/a&gt;, and the right way to go about the topping (&lt;i&gt;of each ingredient&lt;/i&gt;) &amp;amp; tossing for Lo-Hey ceremony.&lt;br /&gt;
&lt;br /&gt;
I loved Yu Sheng, especially homemade kind. It's so convenient to get the prepack ingredients in majoy supermarkets in Singapore nowadays. And even the prepacked shreded carrots &amp;amp; radish were sold in many supermarkets. Even raw fish was easily obtainable from wet market, Japanese stores (for raw salmon) in supermarkets, or like me, got&amp;nbsp;a new type of&amp;nbsp;smoke salmon slices in olive oil,&amp;nbsp;specially packed for Yu Sheng dish&amp;nbsp;available in major supermarkets.&amp;nbsp;I got&amp;nbsp;a packet from &lt;em&gt;NTUC Fairprice Finest&lt;/em&gt;, costs about S$8, for more than 10 slices (&lt;em&gt;&lt;span style="font-size: x-small;"&gt;see above pic&lt;/span&gt;&lt;/em&gt;).&amp;nbsp;Taste of the smoke salmon in olive oil was great. It was not as briny taste as sual smoke salmon, but more moist with slight natural sweetness in it. &lt;br /&gt;
&lt;br /&gt;
Simply gathering all the ingredients and arrange it on a large flat serving dish, you can have your Lo-Hey ceremony at home, anytime during the festive. I have done this 3 - 4 times at home in this Lunar New Year! &lt;br /&gt;
&lt;br /&gt;
Beside using smoke salmon for the dish, I used also mock abalone to top the Yu Sheng dish due to vegetarian day on the 1st day of Lunar New Year (&lt;em&gt;Chu Yi 初一&lt;/em&gt;). For more photos of the rest of my Yu Sheng dishes, please log onto my Facebook Fan Club!&lt;br /&gt;
&lt;br /&gt;
Now that 15 days of Chinese Lunar New Year has officially ended this year. I am gonna wait for another year in order to enjoy this Yu Sheng dish again.. Anywa, hope we all 'Lo-Hei' (&lt;em&gt;Get rich! Get successful&lt;/em&gt;)!&lt;div class="blogger-post-footer"&gt;&lt;img width='1' height='1' src='https://blogger.googleusercontent.com/tracker/490982868559256368-8110587016031637423?l=www.mywoklife.com' alt='' /&gt;&lt;/div&gt;</content><link rel="replies" type="application/atom+xml" href="http://www.mywoklife.com/feeds/8110587016031637423/comments/default" title="Post Comments" /><link rel="replies" type="text/html" href="https://www.blogger.com/comment.g?blogID=490982868559256368&amp;postID=8110587016031637423" title="1 Comments" /><link rel="edit" type="application/atom+xml" href="http://www.blogger.com/feeds/490982868559256368/posts/default/8110587016031637423?v=2" /><link rel="self" type="application/atom+xml" href="http://www.blogger.com/feeds/490982868559256368/posts/default/8110587016031637423?v=2" /><link rel="alternate" type="text/html" href="http://www.mywoklife.com/2010/03/yu-sheng-dish-for-lo-hey-ceremony.html" title="Yu Sheng Dish for Lo-Hey Ceremony (鱼生捞起)" /><author><name>PatriCa BB</name><uri>http://www.blogger.com/profile/15253488652628099847</uri><email>admin@mywoklife.com</email><gd:extendedProperty name="OpenSocialUserId" value="16712851664488271850" /></author><media:thumbnail xmlns:media="http://search.yahoo.com/mrss/" url="http://4.bp.blogspot.com/_X60ewjhV9Aw/S4yDygj_s2I/AAAAAAAADYc/FmFonUMn97M/s72-c/IMG_1334.jpg" height="72" width="72" /><thr:total xmlns:thr="http://purl.org/syndication/thread/1.0">1</thr:total></entry><entry gd:etag="W/&quot;D0QAQHk5eSp7ImA9WxBUEEQ.&quot;"><id>tag:blogger.com,1999:blog-490982868559256368.post-4068623183158465470</id><published>2010-02-25T12:20:00.005+08:00</published><updated>2010-02-25T18:55:41.721+08:00</updated><app:edited xmlns:app="http://www.w3.org/2007/app">2010-02-25T18:55:41.721+08:00</app:edited><category scheme="http://www.blogger.com/atom/ns#" term="Recipe" /><category scheme="http://www.blogger.com/atom/ns#" term="Vegetarian" /><category scheme="http://www.blogger.com/atom/ns#" term="Vegetables" /><title>Deluxe Broccoli with Mock Abalone and Stewed Mushroom (花开富贵)</title><content type="html">&lt;div class="separator" style="clear: both; text-align: center;"&gt;&lt;a href="http://4.bp.blogspot.com/_X60ewjhV9Aw/S4YlwPsjI5I/AAAAAAAADYU/VoeqeQluMM0/s1600-h/IMG_1299.jpg" imageanchor="1" style="margin-left: 1em; margin-right: 1em;"&gt;&lt;img border="0" height="282" kt="true" src="http://4.bp.blogspot.com/_X60ewjhV9Aw/S4YlwPsjI5I/AAAAAAAADYU/VoeqeQluMM0/s400/IMG_1299.jpg" width="400" /&gt;&lt;/a&gt;&lt;/div&gt;&lt;strong&gt;&lt;span style="color: red;"&gt;"Broccoli floret so much resembling the blossom. So, it's named 花开富贵, simply refers to blossom&amp;nbsp;brings wealth.. This is my deluxe version of broccoli with mock abalone and stewed mushroom steak (素鲍片西兰花烩扒菇)."&lt;/span&gt;&lt;/strong&gt;&lt;br /&gt;
&lt;br /&gt;
I blogged on this &lt;a href="http://www.mywoklife.com/2008/06/yesterday-was-chinese-lunar-fifteenth.html"&gt;similar recipe&lt;/a&gt; two years ago. And, because of the 1st day of Lunar month of January, which means it was a &lt;i&gt;Chu Yi&lt;/i&gt; (初一), that was our vegetarian day, even if it’s Chinese New Year, I cooked this dish again, for dinner on the very 1st day of&amp;nbsp;CNY. However, to celebrate festive day better, I&amp;nbsp;made&amp;nbsp;my dishes more presentable than usual, trying to make its appearance look like restaurant standard (&lt;i&gt;laughing&lt;/i&gt;).. Well, at least I was certain that the taste of this dish was more or less comparable, with less money spent on its ingredients. &lt;br /&gt;
&lt;br /&gt;
&lt;b&gt;Serves 4 - 5&lt;br /&gt;
Ingredients:&lt;br /&gt;
1 mock abalone steak, thinly sliced&lt;br /&gt;
1 cup of broccoli florets (about 250g)&lt;br /&gt;
4 - 5 pieces of large dried Shitake mushrooms, soaked, trimmed and pat dry on clean towel&lt;br /&gt;
&lt;br /&gt;
150ml of vegetable broth &lt;br /&gt;
2 tablespoons of vegetarian oyster sauce&lt;br /&gt;
Sprinkle of sesame oil&lt;br /&gt;
Pinch of ground white pepper &lt;br /&gt;
Touch of sugar&lt;br /&gt;
2 - 3 teaspoons of cornstarch, mixed with water to make into slurry&lt;br /&gt;
&lt;br /&gt;
1 tablespoon of vegetable oil&lt;br /&gt;
&lt;br /&gt;
1 pot of water with 1 tablespoon of sugar (&lt;i&gt;to blanch mock abalone slices and broccoli&lt;/i&gt;)&lt;br /&gt;
&lt;br /&gt;
Optional (&lt;em&gt;If you are not particular&amp;nbsp;with religious belief&lt;/em&gt;): Minced garlic&lt;br /&gt;
&lt;br /&gt;
Method:&lt;br /&gt;
1) Boil a pot of water over high heat, dissolve sugar in it. Reduce heat to medium fire, and blanch deli-thin sliced of mock abalone in simmering water for just 5 seconds. Remove and drain on wire strainer. &lt;br /&gt;
&lt;br /&gt;
2) Then, with the same simmering pot, blanch broccoli florets for 2 - 3 minutes, or until softened and turned bright dark green. Remove from pot, plunge florets into iced water for few seconds, and then, return to hot water for few seconds. Remove and drain. Arrange florets nicely in full circle around the edges of a large serving dish. Then, place mock abalone slices nicely at the centre of the circle. Set aside.&lt;br /&gt;
&lt;br /&gt;
2) Heat wok with oil over medium fire. If opted: Add garlic. Fry 15 seconds, till fragrant. Otherwise, simply add mushrooms into the wok, stir-fry for few seconds. Reduce heat to low fire. Add vegetable broth and cover wok with lid to simmer mushrooms for 15 - 20 minutes. &lt;br /&gt;
&lt;br /&gt;
3) Mushrooms should be softened by now. Remove lid, add sesame oil, white pepper, sugar and vegetarian oyster sauce. Stir to mix well. Transfer mushrooms from wok to arrange on mock abalone slices placed on serving dish. &lt;br /&gt;
&lt;br /&gt;
4) Now, to thicken the stock in wok, stir-in cornstarch slurry. Ladle stock gravy on the dish. Serve.&lt;/b&gt;&lt;br /&gt;
&lt;br /&gt;
A portion of this broccoli dish counts about &lt;i&gt;100&lt;/i&gt;kcal. &lt;br /&gt;
&lt;br /&gt;
&lt;i&gt;Tips&lt;/i&gt;: To retain the fresh greenish color of the vegetables, add sugar into the boiled water to blanch vegetables. Please do not over-cook the vegetables, to keep its nutrients.&lt;br /&gt;
* If prefer stronger flavor of gravy, you may replace 50ml of vegetable broth with mock abalone brine from the same mock abalone packet. &lt;br /&gt;
* You may find this delicious mock abalone from selected NTUC Fairprice supermarkets or vegetarian stores, for about $6.80 per whole mock abalone (&lt;i&gt;palm-size big&lt;/i&gt;).&lt;div class="blogger-post-footer"&gt;&lt;img width='1' height='1' src='https://blogger.googleusercontent.com/tracker/490982868559256368-4068623183158465470?l=www.mywoklife.com' alt='' /&gt;&lt;/div&gt;</content><link rel="replies" type="application/atom+xml" href="http://www.mywoklife.com/feeds/4068623183158465470/comments/default" title="Post Comments" /><link rel="replies" type="text/html" href="https://www.blogger.com/comment.g?blogID=490982868559256368&amp;postID=4068623183158465470" title="0 Comments" /><link rel="edit" type="application/atom+xml" href="http://www.blogger.com/feeds/490982868559256368/posts/default/4068623183158465470?v=2" /><link rel="self" type="application/atom+xml" href="http://www.blogger.com/feeds/490982868559256368/posts/default/4068623183158465470?v=2" /><link rel="alternate" type="text/html" href="http://www.mywoklife.com/2010/02/deluxe-broccoli-with-mock-abalone-and.html" title="Deluxe Broccoli with Mock Abalone and Stewed Mushroom (花开富贵)" /><author><name>PatriCa BB</name><uri>http://www.blogger.com/profile/15253488652628099847</uri><email>admin@mywoklife.com</email><gd:extendedProperty name="OpenSocialUserId" value="16712851664488271850" /></author><media:thumbnail xmlns:media="http://search.yahoo.com/mrss/" url="http://4.bp.blogspot.com/_X60ewjhV9Aw/S4YlwPsjI5I/AAAAAAAADYU/VoeqeQluMM0/s72-c/IMG_1299.jpg" height="72" width="72" /><thr:total xmlns:thr="http://purl.org/syndication/thread/1.0">0</thr:total></entry><entry gd:etag="W/&quot;CUMGRn84fSp7ImA9WxBbEEw.&quot;"><id>tag:blogger.com,1999:blog-490982868559256368.post-4776828042952192724</id><published>2010-02-23T20:36:00.003+08:00</published><updated>2010-03-08T09:57:07.135+08:00</updated><app:edited xmlns:app="http://www.w3.org/2007/app">2010-03-08T09:57:07.135+08:00</app:edited><category scheme="http://www.blogger.com/atom/ns#" term="Recipe" /><category scheme="http://www.blogger.com/atom/ns#" term="Festive Gourmet" /><title>Hotpot - Recipe and Cooking Tips</title><content type="html">&lt;div class="separator" style="clear: both; text-align: center;"&gt;&lt;/div&gt;&lt;div class="separator" style="clear: both; text-align: center;"&gt;&lt;a href="http://4.bp.blogspot.com/_X60ewjhV9Aw/S4PUWbutMkI/AAAAAAAADXI/TVxw8ZrLooQ/s1600-h/794064586_Cvm4u-M.jpg" imageanchor="1" style="margin-left: 1em; margin-right: 1em;"&gt;&lt;img border="0" ct="true" height="300" src="http://4.bp.blogspot.com/_X60ewjhV9Aw/S4PUWbutMkI/AAAAAAAADXI/TVxw8ZrLooQ/s400/794064586_Cvm4u-M.jpg" width="400" /&gt;&lt;/a&gt;&lt;/div&gt;&lt;strong&gt;&lt;span style="color: red;"&gt;"Blissful hotpot meal for the family and friends!"&lt;/span&gt;&lt;/strong&gt;&lt;br /&gt;
&lt;br /&gt;
Hey hey!&amp;nbsp; Long time no see! Still within the 15 days of Lunar New Year. I wish all a Gong Xi Fa Cai!&lt;br /&gt;
&lt;br /&gt;
Guess we all are having elaborated meals so often during the season. Me, too, have been enjoying great sumptiuous food almost every other day for the past 2 weeks.. Well, I always repeat this statement: "&lt;i&gt;Ok.. will keep fit and go on diet after the 15th of Lunar New Year..&lt;/i&gt;" Wahaha..&lt;br /&gt;
&lt;br /&gt;
Anyway, I made hotpot/ steamboat meal at home, of course. Hotpot meal is almost a MUST in this Chinese festive, for several reasons. In winter countries, eating hotpot keeps the family warm, physically and heartedly. In my year-long-summer Singapore, we have hotpot during festive to symbolise togetherness of the family. Also, Chinese believed that hotpot meal, where a metal pot of soup stock base (&lt;i&gt;choices of spicy or non-spicy soup stock&lt;/i&gt;) is simmering at the center of the dining table, symbolises raising of wealth as liquid/ soup refers to money (风山水起), and the constant boiling motion of soup/ stock in the hotpot symbolises rolling of the ball of wealth (财源滚滚).. I loved hotpot where the family sits together surround the dining table to slowly enjoy such healthy hotpot meal, simply spoilt by the extensive choices of ingredients, pick and place whatever ingredients you like into the hotpot. &lt;br /&gt;
&lt;br /&gt;
Hotpot (火鍋, &lt;i&gt;Pronounced in Mandarin as Huo Guo&lt;/i&gt;, or 打邊爐, &lt;i&gt;Pronounced in Cantonese as Da Bin Low&lt;/i&gt;). &lt;br /&gt;
&lt;br /&gt;
&lt;div class="separator" style="clear: both; text-align: center;"&gt;&lt;/div&gt;&lt;div class="separator" style="clear: both; text-align: center;"&gt;&lt;a href="http://2.bp.blogspot.com/_X60ewjhV9Aw/S4PUYMfACFI/AAAAAAAADXQ/U8DaLNME_Jw/s1600-h/794066123_pnq7G-M.jpg" imageanchor="1" style="margin-left: 1em; margin-right: 1em;"&gt;&lt;img border="0" ct="true" height="300" src="http://2.bp.blogspot.com/_X60ewjhV9Aw/S4PUYMfACFI/AAAAAAAADXQ/U8DaLNME_Jw/s400/794066123_pnq7G-M.jpg" width="400" /&gt;&lt;/a&gt;&lt;/div&gt;&lt;div class="separator" style="clear: both; text-align: center;"&gt;&lt;a href="http://4.bp.blogspot.com/_X60ewjhV9Aw/S4PUZT3NTbI/AAAAAAAADXY/BHSj_lG4J0g/s1600-h/794066941_Rx22J-M.jpg" imageanchor="1" style="margin-left: 1em; margin-right: 1em;"&gt;&lt;img border="0" ct="true" height="300" src="http://4.bp.blogspot.com/_X60ewjhV9Aw/S4PUZT3NTbI/AAAAAAAADXY/BHSj_lG4J0g/s400/794066941_Rx22J-M.jpg" width="400" /&gt;&lt;/a&gt;&lt;/div&gt;&lt;b&gt;Serve 8 - 10&lt;br /&gt;
Recommended hotpot food items (&lt;i&gt;but not limited to&lt;/i&gt;):&lt;br /&gt;
&lt;i&gt;Handful of assorted leavy vegetables:&lt;/i&gt;&lt;br /&gt;
Chinese cabbage&lt;br /&gt;
Chinese lettuce&lt;br /&gt;
Garland chrysanthemum aka "Tong O", trimmed away sandy roots&lt;br /&gt;
Asparagus, halved crosswise&lt;br /&gt;
Raw sweet corn cob&lt;br /&gt;
Tora aka Yam, thickly sliced&lt;br /&gt;
&lt;br /&gt;
&lt;i&gt;Mushroom types:&lt;/i&gt;&lt;br /&gt;
12 - 15 large Button mushroom&lt;br /&gt;
6 large pieces of Abalone mushroom&lt;br /&gt;
1 stalk of Enokitake aka Golden needle mushroom, trimmed&amp;nbsp;away&amp;nbsp;sandy root ends&lt;br /&gt;
&lt;br /&gt;
1 block/ roll of tofu aka beancurd (&lt;i&gt;Plain/ Egg tofu&lt;/i&gt;), cut into cubes&lt;/b&gt;&lt;br /&gt;
&lt;br /&gt;
&lt;div class="separator" style="clear: both; text-align: center;"&gt;&lt;a href="http://1.bp.blogspot.com/_X60ewjhV9Aw/S4PUgNKr2NI/AAAAAAAADXw/Wkjkoa-Rjec/s1600-h/794069564_sz55K-M.jpg" imageanchor="1" style="margin-left: 1em; margin-right: 1em;"&gt;&lt;img border="0" ct="true" height="300" src="http://1.bp.blogspot.com/_X60ewjhV9Aw/S4PUgNKr2NI/AAAAAAAADXw/Wkjkoa-Rjec/s400/794069564_sz55K-M.jpg" width="400" /&gt;&lt;/a&gt;&lt;/div&gt;&lt;div class="separator" style="clear: both; text-align: center;"&gt;&lt;a href="http://1.bp.blogspot.com/_X60ewjhV9Aw/S4PXDzgUNXI/AAAAAAAADYA/AaJZfTk3TbU/s1600-h/794068924_uR54A-M.jpg" imageanchor="1" style="margin-left: 1em; margin-right: 1em;"&gt;&lt;img border="0" ct="true" height="216" src="http://1.bp.blogspot.com/_X60ewjhV9Aw/S4PXDzgUNXI/AAAAAAAADYA/AaJZfTk3TbU/s400/794068924_uR54A-M.jpg" width="400" /&gt;&lt;/a&gt;&lt;/div&gt;&lt;br /&gt;
&lt;i&gt;&lt;strong&gt;10 of each ball:&lt;/strong&gt;&lt;/i&gt;&lt;br /&gt;
&lt;strong&gt;Fish balls (Fried/ Raw)&lt;br /&gt;
Pork balls&lt;br /&gt;
Squid balls&lt;br /&gt;
Fish paste wanton&lt;br /&gt;
Hotdog/ Chipolata&lt;br /&gt;
Quail eggs, hard boiled&lt;br /&gt;
12 - 16 pieces&amp;nbsp;of homemade wanton (&lt;i&gt;See my &lt;a href="http://www.mywoklife.com/2009/08/wonton-soup-recipe.html"&gt;wanton recipe here&lt;/a&gt;&lt;/i&gt;) or dumplings (&lt;i&gt;See my &lt;a href="http://www.mywoklife.com/2008/12/fresh-prawn-dumpling.html"&gt;dumpling recipe here&lt;/a&gt;&lt;/i&gt;)&lt;/strong&gt;&lt;br /&gt;
&lt;div class="separator" style="clear: both; text-align: center;"&gt;&lt;a href="http://4.bp.blogspot.com/_X60ewjhV9Aw/S4PUSyWTIZI/AAAAAAAADXA/SIUlVo0ACKU/s1600-h/794053207_N4Ytv-M.jpg" imageanchor="1" style="margin-left: 1em; margin-right: 1em;"&gt;&lt;strong&gt;&lt;img border="0" ct="true" height="300" src="http://4.bp.blogspot.com/_X60ewjhV9Aw/S4PUSyWTIZI/AAAAAAAADXA/SIUlVo0ACKU/s400/794053207_N4Ytv-M.jpg" width="400" /&gt;&lt;/strong&gt;&lt;/a&gt;&lt;/div&gt;&lt;div class="separator" style="clear: both; text-align: center;"&gt;&lt;a href="http://2.bp.blogspot.com/_X60ewjhV9Aw/S4PUbvgKWhI/AAAAAAAADXg/QUiLhl8WHF4/s1600-h/794067981_joSq7-M.jpg" imageanchor="1" style="margin-left: 1em; margin-right: 1em;"&gt;&lt;strong&gt;&lt;img border="0" ct="true" height="300" src="http://2.bp.blogspot.com/_X60ewjhV9Aw/S4PUbvgKWhI/AAAAAAAADXg/QUiLhl8WHF4/s400/794067981_joSq7-M.jpg" width="400" /&gt;&lt;/strong&gt;&lt;/a&gt;&lt;/div&gt;&lt;strong&gt;&lt;i&gt;Meat &amp;amp; seafood:&lt;/i&gt;&lt;br /&gt;
150 - 200 grams of deli-thin sliced meat (&lt;i&gt;Beef/ Pork, usually frozen slices&lt;/i&gt;) &lt;br /&gt;
150 - 200 grams of chicken fillet, cut into bite size and seasoned with pinch of oyster sauce, soy sauce and pepper&lt;br /&gt;
200 grams of fish slices (*&lt;i&gt;I used Batang fish and Red Snapper&lt;/i&gt;)&lt;br /&gt;
12 - 16 tails of large prawns with shell remained intact, trimmed and deveined&lt;br /&gt;
12 - 16 pieces of large mussles&lt;br /&gt;
3 - 4 pieces of flower crabs, cut into pieces&lt;br /&gt;
3 - 4 pieces of sea cucumber, cut and soaked to soften&lt;br /&gt;
1 pack of or canned razor clams or&amp;nbsp;pacific clams or&amp;nbsp;the usual hard clams&lt;br /&gt;
1 canned of cooked abalone, thinly sliced&lt;/strong&gt;&lt;br /&gt;
&lt;div class="separator" style="clear: both; text-align: center;"&gt;&lt;strong&gt;&lt;/strong&gt;&lt;/div&gt;&lt;div class="separator" style="clear: both; text-align: center;"&gt;&lt;strong&gt;&lt;/strong&gt;&lt;/div&gt;&lt;strong&gt;Crabstick/ seafood stick&lt;/strong&gt;&lt;br /&gt;
&lt;div class="separator" style="clear: both; text-align: center;"&gt;&lt;a href="http://2.bp.blogspot.com/_X60ewjhV9Aw/S4PUjMMYG1I/AAAAAAAADX4/O3Lhzej3xF4/s1600-h/794071422_zFVF5-M.jpg" imageanchor="1" style="margin-left: 1em; margin-right: 1em;"&gt;&lt;strong&gt;&lt;img border="0" ct="true" height="300" src="http://2.bp.blogspot.com/_X60ewjhV9Aw/S4PUjMMYG1I/AAAAAAAADX4/O3Lhzej3xF4/s400/794071422_zFVF5-M.jpg" width="400" /&gt;&lt;/strong&gt;&lt;/a&gt;&lt;/div&gt;&lt;br /&gt;
&lt;strong&gt;&lt;i&gt;Choice of starchy food:&lt;/i&gt;&lt;br /&gt;
Cooked yellow noodles&lt;br /&gt;
Rice vercimilli aka Bee Hoon &lt;br /&gt;
Thin vercimilli aka Tong Fen&lt;br /&gt;
Udon&lt;br /&gt;
&lt;br /&gt;
&lt;i&gt;Ingredients for Herbal Chicken Soup Stock:&lt;/i&gt;&lt;br /&gt;
1 whole chicken back bone (&lt;em&gt;whole bone shell&lt;/em&gt;)&lt;br /&gt;
1 teaspoon of Fructus Lycii aka Wolfberry “Gou Qi Zi” (枸杞子)&lt;br /&gt;
1 tablespoon of dried longan (桂圆)&lt;br /&gt;
5 pieces of Codonopsis Pilosulae "Dang shen" (黨參)&lt;br /&gt;
6 - 8 pieces each of dried Chinese Yam Root/ "Huai Shan" (淮山)&lt;br /&gt;
Touch of salt&lt;br /&gt;
1 large pot of water, 70% filled (&lt;i&gt;about 3000ml&lt;/i&gt;)&lt;br /&gt;
&lt;br /&gt;
&lt;i&gt;Condiments to serve with:&lt;/i&gt;&lt;br /&gt;
Garlic chilli sauce&lt;br /&gt;
Light soy sauce&lt;br /&gt;
&lt;br /&gt;
&lt;i&gt;Method for Soup Stock:&lt;/i&gt;&lt;br /&gt;
Bring a large pot of water to a boil. Reduce heat when boiled, add chicken bones, wolfberries, dried longan, dried Huai Shan and Dang Sheng. Simmer for 30 minutes to an hour over low heat. Add pinch of salt and stir well, about 5 minutes before heat off. Leave it on stove till needed later.&lt;br /&gt;
&lt;br /&gt;
Just a touch of salt will do. Leave it more bland than usual as the flavour of soup will be enhanced once many food ingredients are added gradually.&lt;/strong&gt;&lt;br /&gt;
&lt;br /&gt;
&lt;div class="separator" style="clear: both; text-align: center;"&gt;&lt;a href="http://3.bp.blogspot.com/_X60ewjhV9Aw/S4PZbs_HPlI/AAAAAAAADYI/IwR2S7oFG_0/s1600-h/789707422_j8cZZ-M.jpg" imageanchor="1" style="margin-left: 1em; margin-right: 1em;"&gt;&lt;strong&gt;&lt;img border="0" ct="true" src="http://3.bp.blogspot.com/_X60ewjhV9Aw/S4PZbs_HPlI/AAAAAAAADYI/IwR2S7oFG_0/s320/789707422_j8cZZ-M.jpg" /&gt;&lt;/strong&gt;&lt;/a&gt;&lt;/div&gt;&lt;strong&gt;&lt;i&gt;Tips:&lt;/i&gt;&lt;br /&gt;
Arrange each food item ideally on separate dish or according to same food catogories. Never mix raw and cooked food together or serve in the same dish. Prepare and serve all on dining table. &lt;br /&gt;
&lt;br /&gt;
&lt;i&gt;When ready to start:&lt;/i&gt;&lt;br /&gt;
1) Prepare a pair of long-handled metal soup spoon and small wire basket for each diner. &lt;br /&gt;
&lt;br /&gt;
2) Pour soup stock (&lt;i&gt;half filled&lt;/i&gt;) into the eletrical hotpot or metal pot placed on a portable induction cooker/ stove, placed it at the centre of the dinning table. &lt;br /&gt;
&lt;br /&gt;
3) Let the soup boil for a while. When started to simmer, add raw food items, especially those take longer time to cook ones, for instances, meat/ ribs, sweet corn, crabs, sea cucmber, and etc, into the simmering soup. These types of ingredients are good to be added first to flavour the soup. However, do not crowd the hotpot.&lt;br /&gt;
&lt;br /&gt;
4) Cover pot with lid and bring the soup to a boil again, before reducing heat to let the food simmer a little while more to make sure food is well cooked. &lt;br /&gt;
&lt;br /&gt;
5) As for those easily cooked food or already cooked food, for instances, prawns, deli-thin sliced beef/ pork, crabsticks, vegetables, fishballs, razor clams, abalone slices and etc, simply put the food on the small wire basket to blanch for 1 - 2 minutes, before eating.&lt;/strong&gt; &lt;br /&gt;
&lt;br /&gt;
&lt;i&gt;Tips:&lt;/i&gt;&lt;br /&gt;
Refill soup stock whenever it runs low. If the soup base is thickened or tasted too salty, add water instead.&lt;br /&gt;
Amount and choice of food&amp;nbsp;are adjustable to your appetite.&lt;div class="blogger-post-footer"&gt;&lt;img width='1' height='1' src='https://blogger.googleusercontent.com/tracker/490982868559256368-4776828042952192724?l=www.mywoklife.com' alt='' /&gt;&lt;/div&gt;</content><link rel="replies" type="application/atom+xml" href="http://www.mywoklife.com/feeds/4776828042952192724/comments/default" title="Post Comments" /><link rel="replies" type="text/html" href="https://www.blogger.com/comment.g?blogID=490982868559256368&amp;postID=4776828042952192724" title="0 Comments" /><link rel="edit" type="application/atom+xml" href="http://www.blogger.com/feeds/490982868559256368/posts/default/4776828042952192724?v=2" /><link rel="self" type="application/atom+xml" href="http://www.blogger.com/feeds/490982868559256368/posts/default/4776828042952192724?v=2" /><link rel="alternate" type="text/html" href="http://www.mywoklife.com/2010/02/hotpot-recipe-and-cooking-tips.html" title="Hotpot - Recipe and Cooking Tips" /><author><name>PatriCa BB</name><uri>http://www.blogger.com/profile/15253488652628099847</uri><email>admin@mywoklife.com</email><gd:extendedProperty name="OpenSocialUserId" value="16712851664488271850" /></author><media:thumbnail xmlns:media="http://search.yahoo.com/mrss/" url="http://4.bp.blogspot.com/_X60ewjhV9Aw/S4PUWbutMkI/AAAAAAAADXI/TVxw8ZrLooQ/s72-c/794064586_Cvm4u-M.jpg" height="72" width="72" /><thr:total xmlns:thr="http://purl.org/syndication/thread/1.0">0</thr:total></entry><entry gd:etag="W/&quot;A0ICQX0-eip7ImA9WxBVEEw.&quot;"><id>tag:blogger.com,1999:blog-490982868559256368.post-3784803563766314685</id><published>2010-02-13T08:06:00.027+08:00</published><updated>2010-02-13T08:06:00.352+08:00</updated><app:edited xmlns:app="http://www.w3.org/2007/app">2010-02-13T08:06:00.352+08:00</app:edited><category scheme="http://www.blogger.com/atom/ns#" term="Seafood" /><category scheme="http://www.blogger.com/atom/ns#" term="Recipe" /><category scheme="http://www.blogger.com/atom/ns#" term="Festive Gourmet" /><title>Sweet Chilli Crayfish (龙马精神)</title><content type="html">&lt;div class="separator" style="clear: both; text-align: center;"&gt;&lt;a href="http://2.bp.blogspot.com/_X60ewjhV9Aw/S3TFvnZp7iI/AAAAAAAADWw/6LzrPteUSZo/s1600-h/IMG_0343.jpg" imageanchor="1" style="margin-left: 1em; margin-right: 1em;"&gt;&lt;img border="0" ct="true" height="300" src="http://2.bp.blogspot.com/_X60ewjhV9Aw/S3TFvnZp7iI/AAAAAAAADWw/6LzrPteUSZo/s400/IMG_0343.jpg" width="400" /&gt;&lt;/a&gt;&lt;/div&gt;&lt;span style="color: red;"&gt;&lt;strong&gt;"A savoury scrumptious crayfish dish to symbolise a life filled with strength and vitality!"&lt;/strong&gt;&lt;/span&gt;&lt;br /&gt;
&lt;br /&gt;
While it's true that sometimes nothing beats the convenience and festive atmosphere to dine-in at a restaurant during occasions, it can also set you back $100 - 200 or more for a festive meal which you may prepare by your own. Same festive mood, home cooked festive meal also warms the heart of your loved ones, too! Try re-creating the experience with this luxury savoury at home for less than half that amount.&lt;br /&gt;
&lt;br /&gt;
Crayfish, another symbolical dish for &lt;em&gt;CNY&lt;/em&gt;. Crayfish often represents smart dragons, and hence, crayfish dishes will then be related with dragon in our auspicious greetings, just like this, 龙马精神, simply means strong and full of vitality just like dragon and horse. &lt;br /&gt;
&lt;br /&gt;
&lt;div class="separator" style="clear: both; text-align: center;"&gt;&lt;a href="http://4.bp.blogspot.com/_X60ewjhV9Aw/S3TFyAkl5_I/AAAAAAAADW4/Bpb72bV1Gws/s1600-h/IMG_0347.jpg" imageanchor="1" style="margin-left: 1em; margin-right: 1em;"&gt;&lt;img border="0" ct="true" height="317" src="http://4.bp.blogspot.com/_X60ewjhV9Aw/S3TFyAkl5_I/AAAAAAAADW4/Bpb72bV1Gws/s400/IMG_0347.jpg" width="400" /&gt;&lt;/a&gt;&lt;/div&gt;&lt;br /&gt;
&lt;b&gt;Serves 4&lt;br /&gt;
Ingredients&lt;br /&gt;
4 tails of medium - large crayfish/ crawfish&amp;nbsp;(虾婆), halved crosswise&lt;br /&gt;
2 cloves of garlic, chopped&lt;br /&gt;
1 teaspoons of dried shrimps (虾米干), soaked, drained and dried with kitchen towel.&lt;br /&gt;
1 - 2 teaspoons of sambal chilli paste&lt;br /&gt;
2 tablespoons of chili sauce &lt;br /&gt;
5 - 6 heaping spoons of ketcup &lt;br /&gt;
1 teaspoon of white vinegar&lt;br /&gt;
½ cup of sugar&lt;br /&gt;
½ cup of water&lt;br /&gt;
2 medium eggs&lt;br /&gt;
&lt;br /&gt;
2 tablespoon of cooking oil/ butter&lt;br /&gt;
&lt;br /&gt;
1 tablespoon of corn starch (&lt;i&gt;mix with water to make into slurry&lt;/i&gt;)&lt;br /&gt;
&lt;br /&gt;
Method&lt;br /&gt;
1) Rinse the shell of each crayfish. Drain on kitchen towel and set aside.&lt;br /&gt;
&lt;br /&gt;
2) Heat a large wok with oil/ butter&amp;nbsp;over medium fire. Add garlic and dried shrimps, stir-fry till fragrant. Reduce heat to low fire. Add sambal chilli paste, and stir fry for few seconds (&lt;i&gt;beware of the pungent scent from the sambal paste&lt;/i&gt;).&lt;br /&gt;
&lt;br /&gt;
3) Add crayfish into wok, and stir-fry for 1 - 2 minutes. Add chili sauce, ketchup and water, stir-fry to combine well. Then, stir in vinegar, and sugar. &lt;br /&gt;
&lt;br /&gt;
4) Increase heat to medium fire, cover with lid for 2 minutes, or until the shell of crayfish are completed cooked and pinked (&lt;em&gt;its meat turns cream white&lt;/em&gt;). &lt;br /&gt;
&lt;br /&gt;
5) Break eggs into a small bowl, briefly beat the eggs. Then, stir-in eggs to form egg drop gravy. Lastly, stir-in corn starch slurry to thicken the gravy. Heat off. Serve hot.&lt;/b&gt;&lt;br /&gt;
&lt;br /&gt;
A portion of this dish (&lt;em&gt;crayfish consumed with thick gravy&lt;/em&gt;) counts about &lt;em&gt;300&lt;/em&gt;kcal.&lt;br /&gt;
&lt;br /&gt;
Today's the eve of &lt;em&gt;CNY&lt;/em&gt;.&amp;nbsp;Any better idea for the reunion dinner now (&lt;em&gt;smile&lt;/em&gt;)?&lt;br /&gt;
&lt;br /&gt;
Anyway, &lt;strong&gt;&lt;span style="color: #e06666;"&gt;&lt;em&gt;Gong Xi Fa Cai/ Gong Hey Fatt Choy/&lt;/em&gt; 恭喜发财!&lt;/span&gt;&lt;/strong&gt;&lt;br /&gt;
&lt;br /&gt;
&lt;i&gt;Tips&lt;/i&gt;: Do not over-cook the crayfish to retain its bouncy texture.&lt;br /&gt;
* Get the fish monger to half the crayfish for you, for easy consumption. Simply twist the meat out of the halved shell with a fork.&lt;div class="blogger-post-footer"&gt;&lt;img width='1' height='1' src='https://blogger.googleusercontent.com/tracker/490982868559256368-3784803563766314685?l=www.mywoklife.com' alt='' /&gt;&lt;/div&gt;</content><link rel="replies" type="application/atom+xml" href="http://www.mywoklife.com/feeds/3784803563766314685/comments/default" title="Post Comments" /><link rel="replies" type="text/html" href="https://www.blogger.com/comment.g?blogID=490982868559256368&amp;postID=3784803563766314685" title="1 Comments" /><link rel="edit" type="application/atom+xml" href="http://www.blogger.com/feeds/490982868559256368/posts/default/3784803563766314685?v=2" /><link rel="self" type="application/atom+xml" href="http://www.blogger.com/feeds/490982868559256368/posts/default/3784803563766314685?v=2" /><link rel="alternate" type="text/html" href="http://www.mywoklife.com/2010/02/sweet-chilli-crayfish.html" title="Sweet Chilli Crayfish (龙马精神)" /><author><name>PatriCa BB</name><uri>http://www.blogger.com/profile/15253488652628099847</uri><email>admin@mywoklife.com</email><gd:extendedProperty name="OpenSocialUserId" value="16712851664488271850" /></author><media:thumbnail xmlns:media="http://search.yahoo.com/mrss/" url="http://2.bp.blogspot.com/_X60ewjhV9Aw/S3TFvnZp7iI/AAAAAAAADWw/6LzrPteUSZo/s72-c/IMG_0343.jpg" height="72" width="72" /><thr:total xmlns:thr="http://purl.org/syndication/thread/1.0">1</thr:total></entry><entry gd:etag="W/&quot;D0IFR3Y4fip7ImA9WxBWGUk.&quot;"><id>tag:blogger.com,1999:blog-490982868559256368.post-728912034229057435</id><published>2010-02-12T08:10:00.004+08:00</published><updated>2010-02-12T11:31:56.836+08:00</updated><app:edited xmlns:app="http://www.w3.org/2007/app">2010-02-12T11:31:56.836+08:00</app:edited><category scheme="http://www.blogger.com/atom/ns#" term="Seafood" /><category scheme="http://www.blogger.com/atom/ns#" term="Recipe" /><category scheme="http://www.blogger.com/atom/ns#" term="Vegetables" /><category scheme="http://www.blogger.com/atom/ns#" term="Festive Gourmet" /><category scheme="http://www.blogger.com/atom/ns#" term="Prawns" /><title>Stir-Fried Aparagus &amp; Prawns with XO Sauce (锦上添花)</title><content type="html">&lt;div class="separator" style="clear: both; text-align: center;"&gt;&lt;a href="http://4.bp.blogspot.com/_X60ewjhV9Aw/S3TA_nx3WiI/AAAAAAAADWo/bEeoyDSUXJQ/s1600-h/IMG_0846.jpg" imageanchor="1" style="margin-left: 1em; margin-right: 1em;"&gt;&lt;img border="0" ct="true" height="300" src="http://4.bp.blogspot.com/_X60ewjhV9Aw/S3TA_nx3WiI/AAAAAAAADWo/bEeoyDSUXJQ/s400/IMG_0846.jpg" width="400" /&gt;&lt;/a&gt;&lt;/div&gt;&lt;strong&gt;&lt;span style="color: red;"&gt;"Make the perfection to even more perfect."&lt;/span&gt;&lt;/strong&gt;&lt;br /&gt;
&lt;br /&gt;
You don't want meals with just meat, meat and meat throughout the CNY. Vegetables are essential to our diets, too, even during the festive, of course! And there are many greens can still be symbolical, for instances, the asparagus I've cooked here. &lt;br /&gt;
&lt;br /&gt;
I named this dish as 锦上添花 (&lt;i&gt;Pronounced as 'Jin Shang Tian Hua'&lt;/i&gt;). Do you also find the appearance of this dish looks pretty much like the beautiful flowers (&lt;i&gt;the prawns&lt;/i&gt;) blooming on the strong branches (&lt;i&gt;the asparagus&lt;/i&gt;)? That's the direct translation of these Chinese characters, which&amp;nbsp;to be&amp;nbsp;deciphered as makes the perfection even more perfect.&lt;br /&gt;
&lt;br /&gt;
Moreover, this is a very simple-to-cook and delicious dish, with the use of such premium sauce (dried scallop sauce), the XO sauce. No worries, there isn't any alcohol content in it. It simply refers to its premium quality. See some of the details of XO sauce in my previous post where the same recipe was use with the variation of chicken meat instead: &lt;a href="http://www.mywoklife.com/2009/12/chicken-and-aparagus-with-xo-sauce.html"&gt;XO Sauce with Chicken &amp;amp; Asparagus&lt;/a&gt;&lt;br /&gt;
&lt;br /&gt;
&lt;div class="separator" style="clear: both; text-align: center;"&gt;&lt;a href="http://2.bp.blogspot.com/_X60ewjhV9Aw/S3S_50oIsHI/AAAAAAAADWg/n6y_67aqPSE/s1600-h/IMG_0847.jpg" imageanchor="1" style="margin-left: 1em; margin-right: 1em;"&gt;&lt;img border="0" ct="true" height="320" src="http://2.bp.blogspot.com/_X60ewjhV9Aw/S3S_50oIsHI/AAAAAAAADWg/n6y_67aqPSE/s320/IMG_0847.jpg" width="297" /&gt;&lt;/a&gt;&lt;/div&gt;&lt;b&gt;Serves 3 - 4&lt;br /&gt;
Ingredients&lt;br /&gt;
200 - 300 grams of medium prawns/ shrimps, shelled with tail intact, trimmed and deveined&lt;br /&gt;
Handful of asparagus (蘆筍), cut into 2" long crosswise (*&lt;em&gt;choose tender young shoots&lt;/em&gt;)&lt;br /&gt;
1½ tablespoons of XO sauce&lt;br /&gt;
Sprinkle of sugar&lt;br /&gt;
2 cloves of garlic, chopped&lt;br /&gt;
2 tablespoons of water&lt;br /&gt;
2 tablespoons of cooking oil&lt;br /&gt;
&lt;br /&gt;
&lt;i&gt;Seasoning&amp;nbsp;for prawns:&lt;/i&gt;&lt;br /&gt;
1 teaspoon of light soy sauce&lt;br /&gt;
&lt;br /&gt;
A pot of water (&lt;i&gt;for blanching of asparagus&lt;/i&gt;)&lt;br /&gt;
Pinch of sugar&lt;br /&gt;
&lt;br /&gt;
Method &lt;br /&gt;
1) Shell prawns with tail remained intact. Cut a slit on the back and devein. Season with light soy sauce. Set aside.&lt;br /&gt;
&lt;br /&gt;
2) Boil a pot of water over high heat, and add sugar when boiled. Then, add asparagus and blanch it for one minute. Remove from pot and drain. Set aside for later. &lt;br /&gt;
&lt;br /&gt;
3) Heat wok with oil over high fire. Add garlic and stir-fry till fragrant and lightly browned.&lt;br /&gt;
&lt;br /&gt;
4) Add prawns and water. Stir fry for two minutes, or until pinked. Add blanched asparagus and stir fry for one minute. Add in XO sauce, stir fry to combine all ingredients well. Sprinkle sugar and continue to stir fry for another minute.&lt;br /&gt;
&lt;br /&gt;
5) Transfer asparagus on a nice serving dish. Try to arrange in a way that the prawns are spreaded over the asparagus, resembling flowers on the branches, for better presentation. Serve. &lt;/b&gt;&lt;br /&gt;
&lt;br /&gt;
This dish takes only 20 minutes to prepare and cook. Quick and easy symbolical dish for the CNY celebration. &lt;br /&gt;
&lt;br /&gt;
A portion of this dish counts about &lt;i&gt;200&lt;/i&gt;kcal.&lt;br /&gt;
&lt;br /&gt;
&lt;i&gt;Tips:&lt;/i&gt; Get a bottle of XO sauce from major supermarkets. Find it at condiments section.&lt;div class="blogger-post-footer"&gt;&lt;img width='1' height='1' src='https://blogger.googleusercontent.com/tracker/490982868559256368-728912034229057435?l=www.mywoklife.com' alt='' /&gt;&lt;/div&gt;</content><link rel="replies" type="application/atom+xml" href="http://www.mywoklife.com/feeds/728912034229057435/comments/default" title="Post Comments" /><link rel="replies" type="text/html" href="https://www.blogger.com/comment.g?blogID=490982868559256368&amp;postID=728912034229057435" title="0 Comments" /><link rel="edit" type="application/atom+xml" href="http://www.blogger.com/feeds/490982868559256368/posts/default/728912034229057435?v=2" /><link rel="self" type="application/atom+xml" href="http://www.blogger.com/feeds/490982868559256368/posts/default/728912034229057435?v=2" /><link rel="alternate" type="text/html" href="http://www.mywoklife.com/2010/02/stir-fried-aparagus-prawns-with-xo.html" title="Stir-Fried Aparagus &amp; Prawns with XO Sauce (锦上添花)" /><author><name>PatriCa BB</name><uri>http://www.blogger.com/profile/15253488652628099847</uri><email>admin@mywoklife.com</email><gd:extendedProperty name="OpenSocialUserId" value="16712851664488271850" /></author><media:thumbnail xmlns:media="http://search.yahoo.com/mrss/" url="http://4.bp.blogspot.com/_X60ewjhV9Aw/S3TA_nx3WiI/AAAAAAAADWo/bEeoyDSUXJQ/s72-c/IMG_0846.jpg" height="72" width="72" /><thr:total xmlns:thr="http://purl.org/syndication/thread/1.0">0</thr:total></entry><entry gd:etag="W/&quot;DUcEQno9eyp7ImA9WxBWF0Q.&quot;"><id>tag:blogger.com,1999:blog-490982868559256368.post-1455147169369109756</id><published>2010-02-10T18:07:00.004+08:00</published><updated>2010-02-10T18:16:43.463+08:00</updated><app:edited xmlns:app="http://www.w3.org/2007/app">2010-02-10T18:16:43.463+08:00</app:edited><category scheme="http://www.blogger.com/atom/ns#" term="Poultry" /><category scheme="http://www.blogger.com/atom/ns#" term="Recipe" /><category scheme="http://www.blogger.com/atom/ns#" term="Festive Gourmet" /><title>Honey Sesame Chicken (甜蜜金凤 - 密糖芝麻鸡)</title><content type="html">&lt;div class="separator" style="clear: both; text-align: center;"&gt;&lt;a href="http://3.bp.blogspot.com/_X60ewjhV9Aw/S3KFkObaNoI/AAAAAAAADWY/DIHnQGSMfMk/s1600-h/IMG_0324.jpg" imageanchor="1" style="margin-left: 1em; margin-right: 1em;"&gt;&lt;img border="0" height="300" kt="true" src="http://3.bp.blogspot.com/_X60ewjhV9Aw/S3KFkObaNoI/AAAAAAAADWY/DIHnQGSMfMk/s400/IMG_0324.jpg" width="400" /&gt;&lt;/a&gt;&lt;/div&gt;&lt;span style="color: red;"&gt;&lt;strong&gt;"Meal for Chinese Lunar New Year vs Western Valentine's Day. "&lt;/strong&gt;&lt;/span&gt;&lt;br /&gt;
&lt;br /&gt;
So happen that this year’s Chinese Lunar New Year coincides with the Western Valentine’s Day. So, you might want to cook some sweet-hearted and auspicious with good symbolization dishes. Which condiment that first comes to your mind? The very first condiment I could think of to be used is… honey! No doubt, it has to be honey. &lt;br /&gt;
&lt;br /&gt;
The sweet savoury flavor from the use of honey gives us a feeling of happiness, when we taste it. Honey, symbolizes sweet and loving life. Just for this reason, cooking this honey sesame chicken would be one of my priority dishes during the season (&lt;em&gt;smile&lt;/em&gt;). &lt;br /&gt;
&lt;br /&gt;
&lt;b&gt;Serves 3 – 4&lt;br /&gt;
Ingredients&lt;br /&gt;
Half chicken, cut into pieces &lt;br /&gt;
2 cloves of garlic, minced&lt;br /&gt;
2 tablespoons of honey &lt;br /&gt;
1 tablespoons of ketchup&lt;br /&gt;
1 – 2 tablespoons of water&lt;br /&gt;
&lt;br /&gt;
&lt;i&gt;Seasoning&lt;/i&gt;&lt;br /&gt;
1 teaspoon of light soy sauce&lt;br /&gt;
Drizzle of sesame oil&lt;br /&gt;
&lt;br /&gt;
2 tablespoons of corn starch (&lt;i&gt;to coat chicken&lt;/i&gt;)&lt;br /&gt;
5 tablespoons of cooking oil (&lt;i&gt;to pre-fry chicken&lt;/i&gt;)&lt;br /&gt;
&lt;br /&gt;
Garnish&lt;br /&gt;
1 teaspoon of white sesame, lightly roasted (with wok)&lt;br /&gt;
&lt;br /&gt;
Method&lt;br /&gt;
1) Marinate chicken with light soy sauce and sesame oil for at least 15 minutes. &lt;br /&gt;
&lt;br /&gt;
2) Heat wok over low fire till wok is completely dry on the surface. Place white sesame into wok, and fry for 5 minutes, or until lightly roasted. Remove from wok, and reserve for later. &lt;br /&gt;
&lt;br /&gt;
3) Briefly coat chicken pieces with corn starch on all sides. Heat wok with oil over high fire. Place coated chicken into wok to fry till lightly crisped and browned. Remove from wok to drain on wire strainer. &lt;br /&gt;
&lt;br /&gt;
4) Remove excess oil in wok with just about 1 teaspoon of oil remains. Reduce heat to medium fire. Add garlic and stir-fry till fragrant. Return chicken into wok. Add in ketchup and water. Stir-fry a little, to mix. Then, drizzle honey in circular motion. Stir-fry to mix well, until honey sauce is thicken and well glazed on chicken. Dish up and garnish with roasted sesame before serve. &lt;/b&gt;&lt;br /&gt;
&lt;br /&gt;
This dish does not&amp;nbsp;serve with&amp;nbsp;much gravy, but more to a glazed chicken dish with thick gravy. &lt;br /&gt;
&lt;br /&gt;
A portion of my honey sesame chicken counts about &lt;i&gt;250&lt;/i&gt;kcal - &lt;i&gt;300&lt;/i&gt;kcal.&lt;br /&gt;
&lt;br /&gt;
&lt;i&gt;Tips&lt;/i&gt;: You may choose to add in roasted sesame into the wok to stir and toss with chicken to combine well, before dish up.&lt;div class="blogger-post-footer"&gt;&lt;img width='1' height='1' src='https://blogger.googleusercontent.com/tracker/490982868559256368-1455147169369109756?l=www.mywoklife.com' alt='' /&gt;&lt;/div&gt;</content><link rel="replies" type="application/atom+xml" href="http://www.mywoklife.com/feeds/1455147169369109756/comments/default" title="Post Comments" /><link rel="replies" type="text/html" href="https://www.blogger.com/comment.g?blogID=490982868559256368&amp;postID=1455147169369109756" title="3 Comments" /><link rel="edit" type="application/atom+xml" href="http://www.blogger.com/feeds/490982868559256368/posts/default/1455147169369109756?v=2" /><link rel="self" type="application/atom+xml" href="http://www.blogger.com/feeds/490982868559256368/posts/default/1455147169369109756?v=2" /><link rel="alternate" type="text/html" href="http://www.mywoklife.com/2010/02/honey-sesame-chicken.html" title="Honey Sesame Chicken (甜蜜金凤 - 密糖芝麻鸡)" /><author><name>PatriCa BB</name><uri>http://www.blogger.com/profile/15253488652628099847</uri><email>admin@mywoklife.com</email><gd:extendedProperty name="OpenSocialUserId" value="16712851664488271850" /></author><media:thumbnail xmlns:media="http://search.yahoo.com/mrss/" url="http://3.bp.blogspot.com/_X60ewjhV9Aw/S3KFkObaNoI/AAAAAAAADWY/DIHnQGSMfMk/s72-c/IMG_0324.jpg" height="72" width="72" /><thr:total xmlns:thr="http://purl.org/syndication/thread/1.0">3</thr:total></entry><entry gd:etag="W/&quot;D0IDRHc7eyp7ImA9WxBWFkQ.&quot;"><id>tag:blogger.com,1999:blog-490982868559256368.post-5574634018270745386</id><published>2010-02-09T08:41:00.010+08:00</published><updated>2010-02-09T14:06:15.903+08:00</updated><app:edited xmlns:app="http://www.w3.org/2007/app">2010-02-09T14:06:15.903+08:00</app:edited><category scheme="http://www.blogger.com/atom/ns#" term="Seafood" /><category scheme="http://www.blogger.com/atom/ns#" term="Recipe" /><category scheme="http://www.blogger.com/atom/ns#" term="Festive Gourmet" /><category scheme="http://www.blogger.com/atom/ns#" term="Egg" /><category scheme="http://www.blogger.com/atom/ns#" term="Prawns" /><title>Golden Shrimps (with Salted Egg Yolks) - 黄金笑虾虾</title><content type="html">&lt;div class="separator" style="clear: both; text-align: center;"&gt;&lt;a href="http://3.bp.blogspot.com/_X60ewjhV9Aw/S3DPBOdgUJI/AAAAAAAADWI/qIpU05E7VGE/s1600-h/IMG_1155.jpg" imageanchor="1" style="margin-left: 1em; margin-right: 1em;"&gt;&lt;img border="0" height="300" kt="true" src="http://3.bp.blogspot.com/_X60ewjhV9Aw/S3DPBOdgUJI/AAAAAAAADWI/qIpU05E7VGE/s400/IMG_1155.jpg" width="400" /&gt;&lt;/a&gt;&lt;/div&gt;&lt;strong&gt;&lt;span style="color: red;"&gt;"One of the important Chinese&amp;nbsp;festive seafood dishes. It helps to spread &lt;em&gt;laughters&lt;/em&gt; around!"&lt;/span&gt;&lt;/strong&gt;&lt;br /&gt;
&lt;br /&gt;
Chinese Lunar New Year, we (Chinese) emphasize on cooking symbolic dishes with auspicious dish names. Prawn, or called it shrimp, is one of the compulsory items to be used to cook &lt;em&gt;CNY&lt;/em&gt; dishes as shrimp, in Cantonese, is pronounced as &lt;strong&gt;&lt;em&gt;HA &lt;/em&gt;&lt;/strong&gt;(虾). Its pronunciation resembling the sound of laughters, ha ha! It represents happy life with lots of laughter ahead. Do you also notice? Even the curvy shape of each shrimp resembling smiley lips. So, eating shrimps&amp;nbsp;are&amp;nbsp;symbolical&amp;nbsp;during Chinese festive, especially to the Cantonese dialect group. &lt;br /&gt;
&lt;br /&gt;
Moreover, the shrimps in my recipe were cooked till golden appearance. Gold = wealth, it is not difficult to&amp;nbsp;decipher&amp;nbsp;its auspicious&amp;nbsp;defination here, isn't it&amp;nbsp;(&lt;em&gt;smile&lt;/em&gt;).&lt;br /&gt;
&lt;br /&gt;
&lt;div class="separator" style="clear: both; text-align: center;"&gt;&lt;a href="http://3.bp.blogspot.com/_X60ewjhV9Aw/S3DPMZu_NyI/AAAAAAAADWQ/ZKMaJCvOcec/s1600-h/IMG_1150.jpg" imageanchor="1" style="margin-left: 1em; margin-right: 1em;"&gt;&lt;img border="0" height="300" kt="true" src="http://3.bp.blogspot.com/_X60ewjhV9Aw/S3DPMZu_NyI/AAAAAAAADWQ/ZKMaJCvOcec/s400/IMG_1150.jpg" width="400" /&gt;&lt;/a&gt;&lt;/div&gt;&lt;b&gt;Serves 4&lt;br /&gt;
Ingredients&lt;br /&gt;
400 – 500 grams of medium shrimps (with shell), trimmed &lt;br /&gt;
3 pieces of salted duck egg yolk, cooked and crushed&lt;br /&gt;
1 clove of garlic, minced (*&lt;i&gt;Optional&lt;/i&gt;)&lt;br /&gt;
&lt;br /&gt;
&lt;i&gt;Seasoning:&lt;/i&gt;&lt;br /&gt;
Pinch of salt&lt;br /&gt;
&lt;br /&gt;
½ cup corn starch (&lt;em&gt;for coating&lt;/em&gt;)&lt;br /&gt;
1 cup of cooking oil (&lt;em&gt;for deep frying&lt;/em&gt;)&lt;br /&gt;
&lt;br /&gt;
Method&lt;br /&gt;
1) Trim, and also devein the shrimps, if you wished. Simply cut a slit at the back of the shrimp (with shell intact). Otherwise, remain whole complete shrimp as it is. Wash and drain. Season with pinch of salt.&lt;br /&gt;
&lt;br /&gt;
2) Briefly crush the cooked salted egg yolk, and set aside.&lt;br /&gt;
&lt;br /&gt;
3) Heat wok with oil over high heat. Coat each shrimps with corn starch, and deep fry in hot oil till shrimps just done with light golden in colour. Remove from wok and drain on kitchen towel. &lt;br /&gt;
&lt;br /&gt;
4) Remove excess oil and leaving only about 2 tablespoons of oil in wok, reduce heat to medium fire. [&lt;em&gt;*&lt;/em&gt;Add garlic and stir-fry till fragrant before adding salted yolk, if you prefer to add some garlical taste.] Otherwise, add in salted egg yolk straight, and stir-fry for 30 seconds. Return fried shrimps and toss them till well blended. Dish up, and serve with steamed white rice.&lt;/b&gt;&lt;br /&gt;
&lt;br /&gt;
This dish is very popular in Asia, and well knownly delicious. It may costs you a few tens dollars to order this seafood dish when dine out. And, it may also look&amp;nbsp;deceptively complicated to prepare or cook. So, you might not even&amp;nbsp;want&amp;nbsp;to try cooking&amp;nbsp;it by your own. However, this superlicious savoury is very simple to cook. It takes less than &lt;em&gt;20&lt;/em&gt; minutes to get it done, in fact. &lt;br /&gt;
&lt;br /&gt;
Calorie in 1 golden prawn with salted egg yolk counts about &lt;em&gt;70&lt;/em&gt;kcal.&lt;br /&gt;
&lt;br /&gt;
&lt;i&gt;Tips&lt;/i&gt;: If you are getting raw salted eggs coated with layers of black soil and dried hay. Remove and wash them till completely clean. The egg shells should now return to its yellowish white in colour. Then, steam the eggs, before separate its white and yolk. Use only the moist yolks. For convenience sake, get those instant ready-to-eat cooked salted egg yolks from supermarkets to save your effort handling the yolks. The texture of these nice readily packed instant yolks is moist enough without worries of over-steaming and become harden and dry. It is more ideal to be used to cook a dish like this one. If can’t find just the packed egg yolk, you may also get the cooked whole salted eggs, and separate its white and yolk at home. You may then keep the whites for other dishes.&lt;br /&gt;
* May drizzle a little rice wine, or simply water in the wok, if find the ingredients too dry, when half way cooking.&lt;div class="blogger-post-footer"&gt;&lt;img width='1' height='1' src='https://blogger.googleusercontent.com/tracker/490982868559256368-5574634018270745386?l=www.mywoklife.com' alt='' /&gt;&lt;/div&gt;</content><link rel="replies" type="application/atom+xml" href="http://www.mywoklife.com/feeds/5574634018270745386/comments/default" title="Post Comments" /><link rel="replies" type="text/html" href="https://www.blogger.com/comment.g?blogID=490982868559256368&amp;postID=5574634018270745386" title="0 Comments" /><link rel="edit" type="application/atom+xml" href="http://www.blogger.com/feeds/490982868559256368/posts/default/5574634018270745386?v=2" /><link rel="self" type="application/atom+xml" href="http://www.blogger.com/feeds/490982868559256368/posts/default/5574634018270745386?v=2" /><link rel="alternate" type="text/html" href="http://www.mywoklife.com/2010/02/golden-shrimps-with-salted-egg-yolks.html" title="Golden Shrimps (with Salted Egg Yolks) - 黄金笑虾虾" /><author><name>PatriCa BB</name><uri>http://www.blogger.com/profile/15253488652628099847</uri><email>admin@mywoklife.com</email><gd:extendedProperty name="OpenSocialUserId" value="16712851664488271850" /></author><media:thumbnail xmlns:media="http://search.yahoo.com/mrss/" url="http://3.bp.blogspot.com/_X60ewjhV9Aw/S3DPBOdgUJI/AAAAAAAADWI/qIpU05E7VGE/s72-c/IMG_1155.jpg" height="72" width="72" /><thr:total xmlns:thr="http://purl.org/syndication/thread/1.0">0</thr:total></entry><entry gd:etag="W/&quot;A0YHQnw4fyp7ImA9WxBWEUs.&quot;"><id>tag:blogger.com,1999:blog-490982868559256368.post-8935728283559397056</id><published>2010-02-02T08:36:00.006+08:00</published><updated>2010-02-03T11:52:13.237+08:00</updated><app:edited xmlns:app="http://www.w3.org/2007/app">2010-02-03T11:52:13.237+08:00</app:edited><category scheme="http://www.blogger.com/atom/ns#" term="Poultry" /><category scheme="http://www.blogger.com/atom/ns#" term="Recipe" /><title>Chicken Wing in Honeyed Char Siew Sauce (密糖叉烧汁鸡翼)</title><content type="html">&lt;div class="separator" style="clear: both; text-align: center;"&gt;&lt;a href="http://4.bp.blogspot.com/_X60ewjhV9Aw/S2eJTrBAJKI/AAAAAAAADWA/kN50I1oLmLE/s1600-h/IMG_1147.jpg" imageanchor="1" style="margin-left: 1em; margin-right: 1em;"&gt;&lt;img border="0" height="300" kt="true" src="http://4.bp.blogspot.com/_X60ewjhV9Aw/S2eJTrBAJKI/AAAAAAAADWA/kN50I1oLmLE/s400/IMG_1147.jpg" width="400" /&gt;&lt;/a&gt;&lt;/div&gt;&lt;br /&gt;
&lt;span style="color: cyan;"&gt;"&lt;strong&gt;Simply easy, simple savoury&lt;/strong&gt;"&lt;/span&gt;&lt;br /&gt;
&lt;br /&gt;
One of my readers was asking for a recipe of 密汁鸡 (&lt;em&gt;&lt;span style="font-size: x-small;"&gt;Pronounciation in&amp;nbsp;Mandarin&lt;/span&gt;&lt;/em&gt;&amp;nbsp;as "&lt;strong&gt;&lt;em&gt;Mi Zhi Ji"&lt;/em&gt;&lt;/strong&gt;) in my FB Fanclub. Without her further elaboration on the dish title, I assumed she&amp;nbsp;wanted the honeyed chicken. However, I had an urge of making the honey char siew flavour version instead, last weekend. So, I cooked this for this time, and I promised to cook the other honey chicken next time, ok (&lt;em&gt;smile&lt;/em&gt;)? &lt;br /&gt;
&lt;br /&gt;
Well, it's still worth cooking this recipe even if it's not the desired recipe as it was so delicious! For the sake of the appetite of your kids, cook this, anyway. They will certainly love the sweet savoury taste!&lt;br /&gt;
&lt;br /&gt;
&lt;strong&gt;Serve 4&lt;br /&gt;
Ingredients&lt;br /&gt;
8 pieces of 3-joint chicken wing, or just the mid joint part&lt;br /&gt;
&lt;br /&gt;
&lt;em&gt;Seasoning:&lt;/em&gt;&lt;br /&gt;
1 teaspoon of ground white pepper&lt;br /&gt;
1 - 2 tablespoons of honey&lt;br /&gt;
2 tablespoons of oyster sauce&lt;br /&gt;
1&amp;nbsp;tablespoon of dark soy sauce (thick soy sauce)&lt;br /&gt;
5 tablespoons of sugar (adjust amount of sugar by 1 tablespoon more or less depends on your desired sweetness)&lt;br /&gt;
2 teaspoons&amp;nbsp;of light soy sauce &lt;br /&gt;
1 teaspoon of Hua Diao Rice Wine&lt;br /&gt;
1 teaspoon of sesame oil&lt;br /&gt;
½&amp;nbsp;teaspoon of grounded Zedoary, or in&amp;nbsp;2 small pieces (&lt;em&gt;lightly mashed&lt;/em&gt;)&amp;nbsp;(&lt;em&gt;&lt;span style="font-size: x-small;"&gt;Chinese translation&lt;/span&gt;&lt;/em&gt;: 沙姜)&lt;br /&gt;
(&lt;em&gt;Or, replace with 1-2 teaspoon of ginger juice&lt;/em&gt;.)&lt;br /&gt;
&lt;br /&gt;
Method&lt;br /&gt;
Use Stove-cooking:&lt;br /&gt;
1) Rinse chicken wings. Place them in a large bowl.&amp;nbsp;Combine well with all seasoning ingredients. Dredge every wing with the seasoning mixture, and marinate for at least&amp;nbsp;2 hours. Or, do it the night before for overnight marinating (&lt;em&gt;But reduce 1 tablespoon of oyster sauce for overnight marinating to avoid over-briny taste&lt;/em&gt;).&lt;br /&gt;
&lt;br /&gt;
2) Preheat a large saucepan over medium fire, place wings into the hot frying pan, but do not over crowd the pan. Keep remaining sauce in the bowl for later.&lt;br /&gt;
&lt;br /&gt;
3) Sauté wings for 10 minutes each side, or until all sides are caramelized (&lt;em&gt;glazed&lt;/em&gt;) and well sautéed. Remove from pan and arrange on a serving dish.&lt;br /&gt;
&lt;br /&gt;
4) Put remaining sauce into the pan, and bring to a boil. Pour the sauce over the roasted wings. Serve.&lt;/strong&gt;&lt;br /&gt;
&lt;br /&gt;
However, sauté on frying pan might be difficult to achieve even roasting on whole joint wing, unless you don't really mind its appearance. Or, use only the mid joint part. Otherwise, you may consider the oven baking method instead.&lt;br /&gt;
&lt;br /&gt;
&lt;strong&gt;Use Oven-baking:&lt;br /&gt;
1) Preheat oven to 230°C.&amp;nbsp;Line baking dish with aluminum foil, and place wings on it.&lt;br /&gt;
&lt;br /&gt;
2) Place baking dish&amp;nbsp;at the&amp;nbsp;high rack of the preheated oven, and bake wings for&amp;nbsp;8 - 10&amp;nbsp;minutes.&lt;br /&gt;
&lt;br /&gt;
3) Then, do a check on the doneness on its surface. You might need to turn the wings over to bake for another&amp;nbsp;5 minutes&amp;nbsp;or until caramelized, in order to get even baking on both sides.&lt;br /&gt;
&lt;br /&gt;
4) Remove from oven. Thinly slice when strips are cooled. Serve with the sauce.&lt;/strong&gt;&lt;br /&gt;
&lt;br /&gt;
&lt;strong&gt;Note:&lt;/strong&gt; For oven baking method - If you prefer&amp;nbsp;more glazing on the surface of the wings, you may want to separate the addition of honey to the seasoning, and brush honey on one side of the wings only after abt 8 minutes bake. Bake for another 2 - 3 minutes, after brushing the honey. Flip over the wings and bake for 3 minutes before brushing honey on it and continue baking for another 2 minutes before heat off. This is also to avoid the wings from burning in case you do not have time to check on the baking constantly.&lt;br /&gt;
&lt;br /&gt;
Well, I could think if another good way to do this dish. The simplest and fun way..&lt;br /&gt;
&lt;br /&gt;
&lt;strong&gt;For Barbeque:&lt;/strong&gt;&lt;br /&gt;
&lt;strong&gt;Char it with direct charcoled fire during your barbeque party, simply roast it till browned and done. That's just so simple and delicious that way!&lt;/strong&gt;&lt;br /&gt;
&lt;br /&gt;
This honey sauced chicken wing yields &lt;i&gt;220&lt;/i&gt;kcal.&lt;br /&gt;
&lt;br /&gt;
&lt;i&gt;Tips&lt;/i&gt;: Get Zedoary (沙姜) from Traditional Chinese medical hall. Buy it either in grounded form or in small pieces, depends on availability. Both are good to be used.&lt;div class="blogger-post-footer"&gt;&lt;img width='1' height='1' src='https://blogger.googleusercontent.com/tracker/490982868559256368-8935728283559397056?l=www.mywoklife.com' alt='' /&gt;&lt;/div&gt;</content><link rel="replies" type="application/atom+xml" href="http://www.mywoklife.com/feeds/8935728283559397056/comments/default" title="Post Comments" /><link rel="replies" type="text/html" href="https://www.blogger.com/comment.g?blogID=490982868559256368&amp;postID=8935728283559397056" title="9 Comments" /><link rel="edit" type="application/atom+xml" href="http://www.blogger.com/feeds/490982868559256368/posts/default/8935728283559397056?v=2" /><link rel="self" type="application/atom+xml" href="http://www.blogger.com/feeds/490982868559256368/posts/default/8935728283559397056?v=2" /><link rel="alternate" type="text/html" href="http://www.mywoklife.com/2010/02/chicken-wing-in-honeyed-char-siew-sauce.html" title="Chicken Wing in Honeyed Char Siew Sauce (密糖叉烧汁鸡翼)" /><author><name>PatriCa BB</name><uri>http://www.blogger.com/profile/15253488652628099847</uri><email>admin@mywoklife.com</email><gd:extendedProperty name="OpenSocialUserId" value="16712851664488271850" /></author><media:thumbnail xmlns:media="http://search.yahoo.com/mrss/" url="http://4.bp.blogspot.com/_X60ewjhV9Aw/S2eJTrBAJKI/AAAAAAAADWA/kN50I1oLmLE/s72-c/IMG_1147.jpg" height="72" width="72" /><thr:total xmlns:thr="http://purl.org/syndication/thread/1.0">9</thr:total></entry><entry gd:etag="W/&quot;C0MMR38-fyp7ImA9WxBXGUQ.&quot;"><id>tag:blogger.com,1999:blog-490982868559256368.post-247566345401083499</id><published>2010-02-01T08:22:00.000+08:00</published><updated>2010-02-01T10:31:26.157+08:00</updated><app:edited xmlns:app="http://www.w3.org/2007/app">2010-02-01T10:31:26.157+08:00</app:edited><category scheme="http://www.blogger.com/atom/ns#" term="Seafood" /><category scheme="http://www.blogger.com/atom/ns#" term="Recipe" /><category scheme="http://www.blogger.com/atom/ns#" term="Prawns" /><title>Prawns in Thick Miso &amp; Tomato Gravy</title><content type="html">&lt;div class="separator" style="clear: both; text-align: center;"&gt;&lt;a href="http://3.bp.blogspot.com/_X60ewjhV9Aw/S2Y6Bd05PcI/AAAAAAAADVw/x3FEDTHQXnc/s1600-h/510663193_xhxZd-M.jpg" imageanchor="1" style="margin-left: 1em; margin-right: 1em;"&gt;&lt;img border="0" height="300" kt="true" src="http://3.bp.blogspot.com/_X60ewjhV9Aw/S2Y6Bd05PcI/AAAAAAAADVw/x3FEDTHQXnc/s400/510663193_xhxZd-M.jpg" width="400" /&gt;&lt;/a&gt;&lt;/div&gt;&lt;strong&gt;&lt;span style="color: cyan;"&gt;"You can never resist this beautiful and lips-smacking prawns with thick miso and (&lt;em&gt;chili&lt;/em&gt;) tomato gravy dish."&lt;/span&gt;&lt;/strong&gt;&lt;br /&gt;
&lt;br /&gt;
This dish was taught by one of hubby’s old friend years back. So, I envisioned and cooked this dish at home recently, with the ‘&lt;em&gt;recipe&lt;/em&gt;’ left in my memory. So, I guess this dish is more like an adaption of his original recipe which supposed to use prawn with shell intact, rather than my ‘ball-shaped’ prawns. I did it this way was to save me from peeling the prawn shells during the dinner, for hubby and girl who hate to dirty their hands on meals. And, with the shaped prawns, I think it makes the dish looks much more presentable, at least it was to me (&lt;em&gt;smile&lt;/em&gt;). Well, of course, some may prefer the whole prawns as it is believed to enhance the flavor of the dish with the fresh seafood taste. It’s up to you. &lt;br /&gt;
&lt;br /&gt;
Many children will love this dish as it has this sweet tomato and egg drop gravy which complements the rice so well. My girl loved the gravy! &lt;br /&gt;
&lt;br /&gt;
Omit the addition of bird’s eye chili, if you or your kids can’t take spicy food. As for me, I liked to add a little of it since all of us, including my girl, could handle spicy food pretty well. &lt;br /&gt;
&lt;br /&gt;
I have to emphasize that this dish is easy to cook. It takes less than 30 minutes to prepare and serve! &lt;br /&gt;
&lt;br /&gt;
&lt;div class="separator" style="clear: both; text-align: center;"&gt;&lt;a href="http://2.bp.blogspot.com/_X60ewjhV9Aw/S2Y6Cw1O9bI/AAAAAAAADV4/O7CE0L3TqAk/s1600-h/510663200_HSiBZ-M.jpg" imageanchor="1" style="margin-left: 1em; margin-right: 1em;"&gt;&lt;img border="0" height="272" kt="true" src="http://2.bp.blogspot.com/_X60ewjhV9Aw/S2Y6Cw1O9bI/AAAAAAAADV4/O7CE0L3TqAk/s400/510663200_HSiBZ-M.jpg" width="400" /&gt;&lt;/a&gt;&lt;/div&gt;&lt;b&gt;Serves 4 – 5&lt;br /&gt;
Ingredients&lt;br /&gt;
500 grams of medium prawns, shelled with tail intact and deveined&lt;br /&gt;
2 medium eggs, lightly beaten in a bowl&lt;br /&gt;
1 small tomato, cut into wedges&lt;br /&gt;
2 cloves of garlic, minced&lt;br /&gt;
1 teaspoon of lime juice, freshly squeezed from half of the small lime, seeded&lt;br /&gt;
Touch of salt and pepper (&lt;em&gt;for marinating the prawns later&lt;/em&gt;)&lt;br /&gt;
&lt;br /&gt;
1 tablespoon of cooking oil&lt;br /&gt;
&lt;br /&gt;
Sauce Ingredients&lt;em&gt; *Mix below condiments together in a small bowl:&lt;/em&gt;&lt;br /&gt;
4 - 5&amp;nbsp;tablespoons of ketchup/ tomato sauce&lt;br /&gt;
1 tablespoon of sweet chili sauce&lt;br /&gt;
2 tablespoons of sugar&lt;br /&gt;
1½&amp;nbsp;teaspoon of Miso paste (&lt;i&gt;with or without seaweed, to your preference&lt;/i&gt;)&lt;br /&gt;
1 bird’s eye chilli, julienned 指天椒 (&lt;i&gt;Optional, to your spicy preference&lt;/i&gt;) &lt;br /&gt;
3 - 4 tablespoons of water&lt;br /&gt;
&lt;br /&gt;
Method&lt;br /&gt;
1) Shell the prawn with its tail remains intact. Then, cut a very deep slit at the back of the prawn. Devein. Then, hold the tail and&amp;nbsp;bend it&amp;nbsp;forward to poke through the middle of its body and pull up till&amp;nbsp;the tail is pointed up (&lt;em&gt;through&amp;nbsp;its body&lt;/em&gt;). Repeat step till all prawns done. Season with just a touch of salt and pepper. Leave aside.&lt;br /&gt;
&lt;br /&gt;
2) Heat wok with oil over high fire. Add garlic and stir-fry till golden browned. Reduce heat to medium-low fire. Return prawns to the wok, and stir fry constantly for about 2 minutes, or until prawns are lightly pinked. Add tomatoes and condiments mixture into wok. Stir-fry to combine well. Squeeze/ add lime juice into wok in one circular motion. Stir fry a little to mix.&lt;br /&gt;
&lt;br /&gt;
3) Increase heat to high fire, now. Then, break egg into a bowl. Pour the unbeaten egg into the wok, and stir-fry all ingredients vigorously to mix well. Gravy should be thicken by now. Heat off. Serve with steamed rice.&lt;/b&gt;&lt;br /&gt;
&lt;br /&gt;
A portion of my prawns with thick gravy (&lt;i&gt;about 5 - 6 prawns&lt;/i&gt;) counts about &lt;i&gt;250&lt;/i&gt;kcal. &lt;br /&gt;
&lt;br /&gt;
&lt;i&gt;Tips&lt;/i&gt;: Get a tub of original miso paste from major supermarkets. If you do not intend to use the miso paste too often, get a packet of individual mini-sized packaging miso paste. I got mine from &lt;em&gt;NTUC Fairprice&lt;/em&gt; supermarket (&lt;i&gt;Japanese food/ products section&lt;/i&gt;).&lt;br /&gt;
* The texture of gravy is depend on how thick or watery you desired. Increase the amount of the condiments and water, if you prefer more watery base. If you want it to be even thicker than my version, or find your cooking is too watery for you, you may consider adding some cornstarch slurry to further thicken it. &lt;br /&gt;
* Bird's eye chili refers to the small chili. Very spicy and pungent type as compared to those larger red chili.&lt;div class="blogger-post-footer"&gt;&lt;img width='1' height='1' src='https://blogger.googleusercontent.com/tracker/490982868559256368-247566345401083499?l=www.mywoklife.com' alt='' /&gt;&lt;/div&gt;</content><link rel="replies" type="application/atom+xml" href="http://www.mywoklife.com/feeds/247566345401083499/comments/default" title="Post Comments" /><link rel="replies" type="text/html" href="https://www.blogger.com/comment.g?blogID=490982868559256368&amp;postID=247566345401083499" title="1 Comments" /><link rel="edit" type="application/atom+xml" href="http://www.blogger.com/feeds/490982868559256368/posts/default/247566345401083499?v=2" /><link rel="self" type="application/atom+xml" href="http://www.blogger.com/feeds/490982868559256368/posts/default/247566345401083499?v=2" /><link rel="alternate" type="text/html" href="http://www.mywoklife.com/2010/02/prawns-in-thick-miso-tomato-gravy.html" title="Prawns in Thick Miso &amp; Tomato Gravy" /><author><name>PatriCa BB</name><uri>http://www.blogger.com/profile/15253488652628099847</uri><email>admin@mywoklife.com</email><gd:extendedProperty name="OpenSocialUserId" value="16712851664488271850" /></author><media:thumbnail xmlns:media="http://search.yahoo.com/mrss/" url="http://3.bp.blogspot.com/_X60ewjhV9Aw/S2Y6Bd05PcI/AAAAAAAADVw/x3FEDTHQXnc/s72-c/510663193_xhxZd-M.jpg" height="72" width="72" /><thr:total xmlns:thr="http://purl.org/syndication/thread/1.0">1</thr:total></entry><entry gd:etag="W/&quot;AkcDSXw_fSp7ImA9WxBXGUU.&quot;"><id>tag:blogger.com,1999:blog-490982868559256368.post-2187017019222058615</id><published>2010-01-29T12:47:00.007+08:00</published><updated>2010-02-01T09:34:38.245+08:00</updated><app:edited xmlns:app="http://www.w3.org/2007/app">2010-02-01T09:34:38.245+08:00</app:edited><category scheme="http://www.blogger.com/atom/ns#" term="Tips n' Guides" /><title>A Place to Shop for Kitchen Utensils</title><content type="html">&lt;div class="separator" style="clear: both; text-align: center;"&gt;&lt;a href="http://1.bp.blogspot.com/_X60ewjhV9Aw/S2J2mNV0ugI/AAAAAAAADVA/Z7Dk7Xqlp8s/s1600-h/765650964_a2b4o-S.jpg" imageanchor="1" style="margin-left: 1em; margin-right: 1em;"&gt;&lt;img border="0" height="240" kt="true" src="http://1.bp.blogspot.com/_X60ewjhV9Aw/S2J2mNV0ugI/AAAAAAAADVA/Z7Dk7Xqlp8s/s320/765650964_a2b4o-S.jpg" width="320" /&gt;&lt;/a&gt;&lt;/div&gt;&lt;strong&gt;&lt;span style="color: lime;"&gt;"A hidden&amp;nbsp;&lt;em&gt;treasure&lt;/em&gt; in Eunos,&amp;nbsp;where I bought my kitchen precious with varieties, sizes, colours, designs, materials.. etc,&amp;nbsp;@&amp;nbsp;Kitchen.Mart"&lt;/span&gt;&lt;/strong&gt;&lt;br /&gt;
&lt;br /&gt;
I am not a spokeman for any of these shopping places, but if you are interested to know where to get cheap/ good/ varieties of kitchenware, I will tell you where I got some of my kitchen stuff. &lt;br /&gt;
&lt;br /&gt;
Kitchen.Mart is a big warehouse-like shop which meants for business users or wholesalers to buy their kitchenware and utensils in bulk. However, this place does accept walk-in customers, and hence, you won't see crowds here, even on a weekend. &lt;br /&gt;
&lt;br /&gt;
This place was found by my hubby, and he was certain that I will like this place to get my new wok. So, he brought me there few weeks ago. I ended up with a big bucket of kitchen wares home (&lt;em&gt;laughing&lt;/em&gt;)!&lt;br /&gt;
&lt;br /&gt;
&lt;a href="http://4.bp.blogspot.com/_X60ewjhV9Aw/S2J2fdTWzcI/AAAAAAAADUg/EkkIYPOHhkI/s1600-h/765648824_rbpQD-S.jpg" imageanchor="1" style="margin-left: 1em; margin-right: 1em;"&gt;&lt;img border="0" kt="true" src="http://4.bp.blogspot.com/_X60ewjhV9Aw/S2J2fdTWzcI/AAAAAAAADUg/EkkIYPOHhkI/s320/765648824_rbpQD-S.jpg" /&gt;&lt;/a&gt;&lt;a href="http://3.bp.blogspot.com/_X60ewjhV9Aw/S2J2gzx7VZI/AAAAAAAADUo/cuQKN8oaTes/s1600-h/765649209_jwUrA-S.jpg" imageanchor="1" style="margin-left: 1em; margin-right: 1em;"&gt;&lt;img border="0" kt="true" src="http://3.bp.blogspot.com/_X60ewjhV9Aw/S2J2gzx7VZI/AAAAAAAADUo/cuQKN8oaTes/s320/765649209_jwUrA-S.jpg" /&gt;&lt;/a&gt;&lt;br /&gt;
I was glad to find this place as it is so huge and complete with all the kitchenware you need, with reasonable price, too! Like I said, this place is meant for wholesalers or business users. If you intend to open your own food business, this will be the place for you! &lt;br /&gt;
&lt;br /&gt;
&lt;a href="http://4.bp.blogspot.com/_X60ewjhV9Aw/S2J2h7dYRhI/AAAAAAAADUw/pSkrC18KxeQ/s1600-h/765648945_yggSa-S.jpg" imageanchor="1" style="margin-left: 1em; margin-right: 1em;"&gt;&lt;img border="0" kt="true" src="http://4.bp.blogspot.com/_X60ewjhV9Aw/S2J2h7dYRhI/AAAAAAAADUw/pSkrC18KxeQ/s320/765648945_yggSa-S.jpg" /&gt;&lt;/a&gt;&lt;a href="http://4.bp.blogspot.com/_X60ewjhV9Aw/S2J2m900G6I/AAAAAAAADVI/KY20hD-pH78/s1600-h/765651686_ZrKc8-S.jpg" imageanchor="1" style="margin-left: 1em; margin-right: 1em;"&gt;&lt;img border="0" kt="true" src="http://4.bp.blogspot.com/_X60ewjhV9Aw/S2J2m900G6I/AAAAAAAADVI/KY20hD-pH78/s320/765651686_ZrKc8-S.jpg" /&gt;&lt;/a&gt;&lt;br /&gt;
You may find most of the items come in different sizes and colours. &lt;br /&gt;
&lt;br /&gt;
I bought a large tradition claypot as my existing one cracked. It costs only S$7.50 for a large one. I will use it to cook claypot chicken rice! &lt;br /&gt;
&lt;br /&gt;
&lt;div class="separator" style="clear: both; text-align: center;"&gt;&lt;a href="http://1.bp.blogspot.com/_X60ewjhV9Aw/S2J3CmySxMI/AAAAAAAADVo/BEVbcVsWHfs/s1600-h/765652002_JZfUK-S.jpg" imageanchor="1" style="margin-left: 1em; margin-right: 1em;"&gt;&lt;img border="0" height="240" kt="true" src="http://1.bp.blogspot.com/_X60ewjhV9Aw/S2J3CmySxMI/AAAAAAAADVo/BEVbcVsWHfs/s320/765652002_JZfUK-S.jpg" width="320" /&gt;&lt;/a&gt;&lt;/div&gt;I got the deep stew pot from here, too,&amp;nbsp;for double boiling use. I intend to steam my bird nest soup or sweet pear soup in due. As you can see, the large pot costs only S$4!&lt;br /&gt;
&lt;br /&gt;
&lt;div class="separator" style="clear: both; text-align: center;"&gt;&lt;a href="http://1.bp.blogspot.com/_X60ewjhV9Aw/S2J2qddDhNI/AAAAAAAADVY/lm159qa_fz8/s1600-h/765651265_zgmPL-S.jpg" imageanchor="1" style="margin-left: 1em; margin-right: 1em;"&gt;&lt;img border="0" height="240" kt="true" src="http://1.bp.blogspot.com/_X60ewjhV9Aw/S2J2qddDhNI/AAAAAAAADVY/lm159qa_fz8/s320/765651265_zgmPL-S.jpg" width="320" /&gt;&lt;/a&gt;&lt;/div&gt;Assorted stainless steel pots. I did not get any of these as I have enough pots, so far. But I got more baking pans here, though. &lt;br /&gt;
&lt;br /&gt;
&lt;div class="separator" style="clear: both; text-align: center;"&gt;&lt;a href="http://1.bp.blogspot.com/_X60ewjhV9Aw/S2J29Q-7sfI/AAAAAAAADVg/E4m5_YCQBvY/s1600-h/765651109_nhUsu-S.jpg" imageanchor="1" style="margin-left: 1em; margin-right: 1em;"&gt;&lt;img border="0" kt="true" src="http://1.bp.blogspot.com/_X60ewjhV9Aw/S2J29Q-7sfI/AAAAAAAADVg/E4m5_YCQBvY/s320/765651109_nhUsu-S.jpg" /&gt;&lt;/a&gt;&lt;/div&gt;And, most of all, the WOK, all kinds of materials and sizes!! They sell those modern wok/ large pan with single-handle at one side, too. However, I am bored with using that expensive kind of wok now. So, I chose a Chinese wok, but not the iron/ stainless steel kind. I got a black non-stick Chinese wok. It is indeed truely non-stick, and I find it good to use, so far. &lt;br /&gt;
&lt;br /&gt;
And guess what, for the usual $120 branded single-handle pan/ wok I have gotten from departmental stores all the time, I got this non-stick Chinese wok here for only $28 (&lt;i&gt;plus a $3 simple-looking metal lid which I matched it on the spot with the options they have it there&lt;/i&gt;). &lt;br /&gt;
&lt;br /&gt;
By and large, this place is good to shop for varieties of not-so-branded kitchen items with good prices. You have all your freedom to walk around this huge place and get all you wanted for your kitchen, from modern to traditional designs.. You can even find large eletronics, such as, food processor/ oven and fridges, here. &lt;br /&gt;
&lt;br /&gt;
We spent 2 hours here and got a load of kitchen items home, just $130 for the bill!&lt;br /&gt;
&lt;br /&gt;
Well, you must be anxious to know how to get there?&lt;br /&gt;
&lt;br /&gt;
&lt;div class="separator" style="clear: both; text-align: center;"&gt;&lt;a href="http://2.bp.blogspot.com/_X60ewjhV9Aw/S2J2kagQHFI/AAAAAAAADU4/SDpsP82GFA4/s1600-h/765650837_kYtPo-S.png" imageanchor="1" style="margin-left: 1em; margin-right: 1em;"&gt;&lt;img border="0" height="400" kt="true" src="http://2.bp.blogspot.com/_X60ewjhV9Aw/S2J2kagQHFI/AAAAAAAADU4/SDpsP82GFA4/s400/765650837_kYtPo-S.png" width="266" /&gt;&lt;/a&gt;&lt;/div&gt;As you could see my GPS location, the address is: &lt;br /&gt;
&lt;strong&gt;105 Eunos Ave 3, Eunos Industrial Estate, Singapore&lt;/strong&gt;. &lt;br /&gt;
&lt;b&gt;Tel: 6746 9919&lt;/b&gt;&lt;br /&gt;
&lt;b&gt;Retail operating hour:&lt;/b&gt; &lt;br /&gt;
Monday - Saturday, 10am - 7pm&lt;br /&gt;
Sunday &amp;amp; Public Holiday, 10am - 5pm&lt;br /&gt;
&lt;br /&gt;
This place&amp;nbsp;is more an industrial area where you may find many surrounding buildings. Kitchen.Mart is located at the ground floor in a building, not too far in. To get there by train, I think the nearest MRT station there should be Paya Lebar station. Take a cab, and it will not be too far from there. Sorry that I could not advise you more details on getting there, as hubby fetched us there during a weekend afternoon.&lt;div class="blogger-post-footer"&gt;&lt;img width='1' height='1' src='https://blogger.googleusercontent.com/tracker/490982868559256368-2187017019222058615?l=www.mywoklife.com' alt='' /&gt;&lt;/div&gt;</content><link rel="replies" type="application/atom+xml" href="http://www.mywoklife.com/feeds/2187017019222058615/comments/default" title="Post Comments" /><link rel="replies" type="text/html" href="https://www.blogger.com/comment.g?blogID=490982868559256368&amp;postID=2187017019222058615" title="6 Comments" /><link rel="edit" type="application/atom+xml" href="http://www.blogger.com/feeds/490982868559256368/posts/default/2187017019222058615?v=2" /><link rel="self" type="application/atom+xml" href="http://www.blogger.com/feeds/490982868559256368/posts/default/2187017019222058615?v=2" /><link rel="alternate" type="text/html" href="http://www.mywoklife.com/2010/01/place-to-shop-for-kitchen-utensils.html" title="A Place to Shop for Kitchen Utensils" /><author><name>PatriCa BB</name><uri>http://www.blogger.com/profile/15253488652628099847</uri><email>admin@mywoklife.com</email><gd:extendedProperty name="OpenSocialUserId" value="16712851664488271850" /></author><media:thumbnail xmlns:media="http://search.yahoo.com/mrss/" url="http://1.bp.blogspot.com/_X60ewjhV9Aw/S2J2mNV0ugI/AAAAAAAADVA/Z7Dk7Xqlp8s/s72-c/765650964_a2b4o-S.jpg" height="72" width="72" /><thr:total xmlns:thr="http://purl.org/syndication/thread/1.0">6</thr:total></entry><entry gd:etag="W/&quot;A08CRH84fyp7ImA9WxBQGUs.&quot;"><id>tag:blogger.com,1999:blog-490982868559256368.post-2147872993350716635</id><published>2010-01-20T12:24:00.017+08:00</published><updated>2010-01-20T14:44:25.137+08:00</updated><app:edited xmlns:app="http://www.w3.org/2007/app">2010-01-20T14:44:25.137+08:00</app:edited><category scheme="http://www.blogger.com/atom/ns#" term="Pork" /><category scheme="http://www.blogger.com/atom/ns#" term="1-dish Meal" /><category scheme="http://www.blogger.com/atom/ns#" term="Recipe" /><category scheme="http://www.blogger.com/atom/ns#" term="Egg" /><title>Chinese Braised (Pork Belly &amp; Egg) in the Croak Pot</title><content type="html">&lt;div class="separator" style="clear: both; text-align: center;"&gt;&lt;a href="http://4.bp.blogspot.com/_X60ewjhV9Aw/S1aFpqmZzTI/AAAAAAAADUY/Rfw6tbg5Kic/s1600-h/IMG_0934.jpg" imageanchor="1" style="margin-left: 1em; margin-right: 1em;"&gt;&lt;img border="0" height="300" mt="true" src="http://4.bp.blogspot.com/_X60ewjhV9Aw/S1aFpqmZzTI/AAAAAAAADUY/Rfw6tbg5Kic/s400/IMG_0934.jpg" width="400" /&gt;&lt;/a&gt;&lt;br /&gt;
&lt;/div&gt;&lt;strong&gt;&lt;span style="color: cyan;"&gt;"Hearty one-pot dinner, Braised Pork Belly and Braised Egg (卤五花肉&amp;amp;卤蛋), try this simple Chinese braise dish that whets appetite! Do it simple, with your slow cooker."&lt;/span&gt;&lt;/strong&gt; &lt;br /&gt;
&lt;br /&gt;
I braise often as I think this is the easiest 1-dish-meal as an express cooking for the working class, like myself. Braise or stew, they are both good cooking method that make your cooking less hassle, which you could have this robust 1-pot dinner packs in meat, mushrooms, tofu, and/ or eggs. The flavourful gravy from the braised pork dish truly whets your appetite, too. A plate of plain steamed rice or a few Chinese steamed bun is the only accompaniment you need for a complete meal. &lt;br /&gt;
&lt;br /&gt;
&lt;div class="separator" style="clear: both; text-align: center;"&gt;&lt;a href="http://1.bp.blogspot.com/_X60ewjhV9Aw/S1aFm7ExVpI/AAAAAAAADUQ/E1ovoYoysGY/s1600-h/IMG_0933.jpg" imageanchor="1" style="margin-left: 1em; margin-right: 1em;"&gt;&lt;img border="0" height="352" mt="true" src="http://1.bp.blogspot.com/_X60ewjhV9Aw/S1aFm7ExVpI/AAAAAAAADUQ/E1ovoYoysGY/s400/IMG_0933.jpg" width="400" /&gt;&lt;/a&gt;&lt;br /&gt;
&lt;/div&gt;My girl loved this braised dish so much, especially the egg! My girl seldom eat meat, and she took only the braised egg and refused to eat any meat, at first. I had to persuade her to take some. Finally, she tried. And guess what? She ended up eating more meat than usual, and even yearned for more. She told me that the meat was so tender, and she loved the flavourful gravy to go with her rice. Of course, we completed the whole pot of braise, at last (&lt;i&gt;smile&lt;/i&gt;).&lt;br /&gt;
&lt;br /&gt;
&lt;div class="separator" style="clear: both; text-align: center;"&gt;&lt;a href="http://1.bp.blogspot.com/_X60ewjhV9Aw/S1aD9TrrWXI/AAAAAAAADUA/NvHuIAAQ1Ns/s1600-h/IMG_0932.jpg" imageanchor="1" style="margin-left: 1em; margin-right: 1em;"&gt;&lt;img border="0" ps="true" src="http://1.bp.blogspot.com/_X60ewjhV9Aw/S1aD9TrrWXI/AAAAAAAADUA/NvHuIAAQ1Ns/s400/IMG_0932.jpg" /&gt;&lt;/a&gt;&lt;br /&gt;
&lt;/div&gt;I used pork meat to do the braising, usually, with addition of Chinese Shitake mushrooms, tofu, tau pok (&lt;i&gt;tofu puff&lt;/i&gt;), and/ or hard-boiled eggs. And, I have a few different braising methods with some variations on ingredients used, which posted previously. This, is another recipe of my braising dish. Simple, and delicious home cooked Chinese braise. This braised meat is also perfect to cook when hosting a small gathering at home, to stretch your dollar on the food ingredients and satisfy the crowd at the same time. It’s, too, simple to cook and presentable to serve. &lt;br /&gt;
&lt;br /&gt;
&lt;b&gt;Serves 3 – 4&lt;br /&gt;
Ingredients&lt;br /&gt;
300 - 400 grams of pork belly, thickly sliced&lt;br /&gt;
4 eggs, hard boiled&lt;br /&gt;
&lt;br /&gt;
&lt;i&gt;Seasoning for pork belly:&lt;/i&gt;&lt;br /&gt;
2 tablespoons of light soy sauce&lt;br /&gt;
Pinch of grounded white pepper &lt;br /&gt;
&lt;br /&gt;
2 tablespoons of cooking oil (*&lt;i&gt;for sautéing of pork belly&lt;/i&gt;) &lt;br /&gt;
&lt;br /&gt;
&lt;i&gt;Ingredients for braising sauce&lt;/i&gt; (卤水汁 "&lt;i&gt;Lu Shui Zhi&lt;/i&gt;"): &lt;br /&gt;
2 cups of water (&lt;i&gt;about 500ml&lt;/i&gt;)&lt;br /&gt;
3 star anise (八角)&lt;br /&gt;
&lt;a href="http://4.bp.blogspot.com/_X60ewjhV9Aw/S1aFj-b4gCI/AAAAAAAADUI/Wi78ICNc5ic/s1600-h/180px-ClovesDried.jpg" imageanchor="1" style="clear: right; cssfloat: right; float: right; margin-bottom: 1em; margin-left: 1em;"&gt;&lt;img border="0" height="160" mt="true" src="http://4.bp.blogspot.com/_X60ewjhV9Aw/S1aFj-b4gCI/AAAAAAAADUI/Wi78ICNc5ic/s200/180px-ClovesDried.jpg" width="200" /&gt;&lt;/a&gt;4 dried cloves aka Syzygium aromaticum (丁香) *&lt;span style="font-size: x-small;"&gt;&lt;em&gt;see right pic&lt;br /&gt;
&lt;/em&gt;&lt;/span&gt;1 cinnamon stick (桂皮)&lt;br /&gt;
2 cloves of garlic, lightly crushed and coarsely chopped&lt;br /&gt;
2 tablespoons of fish sauce&lt;br /&gt;
1 tablespoon of light soy sauce&lt;br /&gt;
2 tablespoons of dark soy sauce&lt;br /&gt;
1 tablespoon of rice wine or *Mirin (&lt;em&gt;Japanese rice wine, preferred&lt;/em&gt;) &lt;br /&gt;
1 tablespoon of sugar&lt;br /&gt;
1 teaspoon of sesame oil&lt;br /&gt;
Dash of grounded white pepper&lt;br /&gt;
&lt;br /&gt;
Pinch of salt (&lt;i&gt;Optional&lt;/i&gt;)&lt;br /&gt;
&lt;br /&gt;
Method&lt;br /&gt;
1) Slice pork belly into chunks, rinse and season with the listed condiments. Marinate overnight (&lt;i&gt;if you are going to cook before going off work in the morning&lt;/i&gt;), or at least 1 hour on the same day. Keep it in the refrigerator before use.&lt;br /&gt;
&lt;br /&gt;
2) Boil a pot of water to cook the eggs for 10 minutes, or till it turns completed solid as hard-boiled eggs. Let it cool before peeling the shell. Reserve for later. If you have time, do this in the morning. Boil the egg while sautéing the pork. Then, do the peeling after settling the pork belly in slow cooker. Otherwise, pre-boil the eggs the night before and place it in the refrigerator, if you don’t mind.&lt;br /&gt;
&lt;br /&gt;
3) Heat wok with oil over medium-high fire. Pat dry marinated pork belly a little, using kitchen towel, to minimize the splashing of oil when place it into heated oil. Sauté pork belly on both sides till lightly browned. Remove from wok and drain on wire strainer.&lt;br /&gt;
&lt;br /&gt;
3) Return sautéed pork belly and place into the croak pot, followed by adding of all listed ingredients of braising sauce. Then, place the croak pot into the slow cooker, cover with lid, and turn on auto/ low shift mode. Then, go peel the shell of the hard-boiled eggs now (&lt;i&gt;if you did not prepare it in advance&lt;/i&gt;), and then, place the eggs into the croak pot to braise it together with the pork belly. Now, you can off to work. Or, braise it in slow cooker for at least 5 hours, or until pork belly turns soften and both pork and eggs are ‘colored’ brown (&lt;i&gt;fully coated with the braising sauce&lt;/i&gt;).&lt;br /&gt;
&lt;br /&gt;
4) Do a taste check. Add some salt, if more briny flavor preferred. Otherwise, ladle into a large serving bowl to serve it hot, with steamed rice or bun. &lt;/b&gt;&lt;br /&gt;
&lt;br /&gt;
A portion of Chinese braised pork belly with a braised egg counts about &lt;i&gt;420&lt;/i&gt;kcal. Skip the pre-sautéing may save some calories intake. If prefer it with Shitake mushroom, choose this recipe: &lt;a href="http://www.mywoklife.com/2008/07/braised-pork-with-shitake-mushroom.html"&gt;Braised Pork &amp;amp; Shitake Mushroom&lt;/a&gt;. As for spicy braised, choose this recipe: &lt;a href="http://www.mywoklife.com/2009/06/braised-knuckles-with-dried-chillies-in.html"&gt;Braised knuckles&lt;/a&gt;.&lt;br /&gt;
&lt;br /&gt;
&lt;em&gt;Variation&lt;/em&gt;: Add also some tofu puff (&lt;i&gt;tao pok&lt;/i&gt;), as desired. &lt;br /&gt;
&lt;br /&gt;
&lt;i&gt;Tips:&lt;/i&gt; Using pork belly for braising is the best option as pork belly will be very tender and full of flavor. Choose leaner belly, for less greasy choice.&lt;br /&gt;
*The purpose of sautéing the pork belly is to enhance the texture and flavor of the meat. Leave it, if you do not wish to do so.&lt;br /&gt;
* Make sure the braising sauce covers all the meat and eggs while simmering in slow cooker.&lt;br /&gt;
* Chinese braise is supposed to use Chinese rice wine, but I chose and preferred Mirin because it has a hint of sweetness which helps to enhance the braised. I think it makes good addition to my recipe. If you have Mirin, add it instead. Otherwise, use rice wine.&lt;div class="blogger-post-footer"&gt;&lt;img width='1' height='1' src='https://blogger.googleusercontent.com/tracker/490982868559256368-2147872993350716635?l=www.mywoklife.com' alt='' /&gt;&lt;/div&gt;</content><link rel="replies" type="application/atom+xml" href="http://www.mywoklife.com/feeds/2147872993350716635/comments/default" title="Post Comments" /><link rel="replies" type="text/html" href="https://www.blogger.com/comment.g?blogID=490982868559256368&amp;postID=2147872993350716635" title="3 Comments" /><link rel="edit" type="application/atom+xml" href="http://www.blogger.com/feeds/490982868559256368/posts/default/2147872993350716635?v=2" /><link rel="self" type="application/atom+xml" href="http://www.blogger.com/feeds/490982868559256368/posts/default/2147872993350716635?v=2" /><link rel="alternate" type="text/html" href="http://www.mywoklife.com/2010/01/chinese-braise-pork-belly-egg-in-croak.html" title="Chinese Braised (Pork Belly &amp; Egg) in the Croak Pot" /><author><name>PatriCa BB</name><uri>http://www.blogger.com/profile/15253488652628099847</uri><email>admin@mywoklife.com</email><gd:extendedProperty name="OpenSocialUserId" value="16712851664488271850" /></author><media:thumbnail xmlns:media="http://search.yahoo.com/mrss/" url="http://4.bp.blogspot.com/_X60ewjhV9Aw/S1aFpqmZzTI/AAAAAAAADUY/Rfw6tbg5Kic/s72-c/IMG_0934.jpg" height="72" width="72" /><thr:total xmlns:thr="http://purl.org/syndication/thread/1.0">3</thr:total></entry><entry gd:etag="W/&quot;CEMDQXw8eyp7ImA9WxBQGUw.&quot;"><id>tag:blogger.com,1999:blog-490982868559256368.post-2660980326806828703</id><published>2010-01-19T22:34:00.005+08:00</published><updated>2010-01-19T22:47:50.273+08:00</updated><app:edited xmlns:app="http://www.w3.org/2007/app">2010-01-19T22:47:50.273+08:00</app:edited><category scheme="http://www.blogger.com/atom/ns#" term="Cakes and Bread" /><category scheme="http://www.blogger.com/atom/ns#" term="Recipe" /><category scheme="http://www.blogger.com/atom/ns#" term="Festive Gourmet" /><category scheme="http://www.blogger.com/atom/ns#" term="Tips n' Guides" /><title>Homebaked Mango Cake for Birthday Celebration</title><content type="html">&lt;div class="separator" style="clear: both; text-align: center;"&gt;&lt;a href="http://4.bp.blogspot.com/_X60ewjhV9Aw/S1XDm9DRWEI/AAAAAAAADTo/VpchTT50o5k/s1600-h/Foody2+009.JPG" imageanchor="1" style="margin-left: 1em; margin-right: 1em;"&gt;&lt;img border="0" ps="true" src="http://4.bp.blogspot.com/_X60ewjhV9Aw/S1XDm9DRWEI/AAAAAAAADTo/VpchTT50o5k/s400/Foody2+009.JPG" /&gt;&lt;/a&gt;&lt;br /&gt;
&lt;/div&gt;&lt;strong&gt;&lt;span style="color: lime;"&gt;"Making of round-shaped Fresh Mango Cake as birthday cake."&lt;/span&gt;&lt;/strong&gt;&lt;br /&gt;
&lt;br /&gt;
&lt;a href="http://2.bp.blogspot.com/_X60ewjhV9Aw/S1XD57PP5lI/AAAAAAAADTw/XB3DS-Gn5lg/s1600-h/DSCN1472.JPG" imageanchor="1" style="clear: right; cssfloat: right; float: right; margin-bottom: 1em; margin-left: 1em;"&gt;&lt;img border="0" ps="true" src="http://2.bp.blogspot.com/_X60ewjhV9Aw/S1XD57PP5lI/AAAAAAAADTw/XB3DS-Gn5lg/s200/DSCN1472.JPG" /&gt;&lt;/a&gt;I first baked this mango cake (&lt;em&gt;in square shape&lt;/em&gt;)&amp;nbsp;as &lt;em&gt;'tea cake'&lt;/em&gt; for my hubby's meeting at office. And, I had readers would like to bake this for the birthday celebration. And, I am sure this will be a good choice, for a easy baking, and yet, impressive enough to surprise and make the loved one happy!&lt;br /&gt;
&lt;br /&gt;
So, I would like to share this mango cake, but in round shape, which tends to be more&amp;nbsp; like&amp;nbsp;a birthday cake, traditionally and personally think, too. Yes, I baked this for special occasion. So, I am sharing the pictures of my round shape mango cake now, just to give you an idea how your round shape&amp;nbsp;mango cake&amp;nbsp;will look like, as compared to the square one which I have posted previously, even though the recipe is the same. &lt;br /&gt;
&lt;br /&gt;
See recipe here: &lt;a href="http://www.mywoklife.com/2009/04/mango-cake-recipe.html"&gt;Mango Cake Recipe&lt;/a&gt;&lt;br /&gt;
&lt;br /&gt;
And, some photos of the round mango cake in steps:&lt;br /&gt;
&lt;br /&gt;
Trim away the brown layer on top of the cake, for easier creaming and better mouthfeel later. May also trim away the sides, if desired.&lt;br /&gt;
&lt;div class="separator" style="clear: both; text-align: center;"&gt;&lt;a href="http://3.bp.blogspot.com/_X60ewjhV9Aw/S1W4I8WkQ4I/AAAAAAAADSY/nstMImRcciM/s1600-h/Foody2+001.JPG" imageanchor="1" style="margin-left: 1em; margin-right: 1em;"&gt;&lt;img border="0" ps="true" src="http://3.bp.blogspot.com/_X60ewjhV9Aw/S1W4I8WkQ4I/AAAAAAAADSY/nstMImRcciM/s400/Foody2+001.JPG" /&gt;&lt;/a&gt;&lt;br /&gt;
&lt;/div&gt;&lt;br /&gt;
Gently slice the cake, horizontally, into two layers. Place them on a flat surface. &lt;br /&gt;
&lt;div class="separator" style="clear: both; text-align: center;"&gt;&lt;a href="http://2.bp.blogspot.com/_X60ewjhV9Aw/S1W4NLcucDI/AAAAAAAADSg/n7nFj2sWEfM/s1600-h/Foody2+002.JPG" imageanchor="1" style="margin-left: 1em; margin-right: 1em;"&gt;&lt;img border="0" ps="true" src="http://2.bp.blogspot.com/_X60ewjhV9Aw/S1W4NLcucDI/AAAAAAAADSg/n7nFj2sWEfM/s400/Foody2+002.JPG" /&gt;&lt;/a&gt;&lt;br /&gt;
&lt;/div&gt;&lt;br /&gt;
Spread mango filling on a layer. Leave some space around the edges.&lt;br /&gt;
&lt;div class="separator" style="clear: both; text-align: center;"&gt;&lt;a href="http://2.bp.blogspot.com/_X60ewjhV9Aw/S1W4Q9ur5TI/AAAAAAAADSo/t_xStZ_x3Co/s1600-h/Foody2+003.JPG" imageanchor="1" style="margin-left: 1em; margin-right: 1em;"&gt;&lt;img border="0" ps="true" src="http://2.bp.blogspot.com/_X60ewjhV9Aw/S1W4Q9ur5TI/AAAAAAAADSo/t_xStZ_x3Co/s400/Foody2+003.JPG" /&gt;&lt;/a&gt;&lt;br /&gt;
&lt;/div&gt;&lt;br /&gt;
Place the top layer of cake on the filling.&lt;br /&gt;
&lt;div class="separator" style="clear: both; text-align: center;"&gt;&lt;a href="http://3.bp.blogspot.com/_X60ewjhV9Aw/S1W4Uj8180I/AAAAAAAADSw/MItUrUjsPg0/s1600-h/Foody2+004.JPG" imageanchor="1" style="margin-left: 1em; margin-right: 1em;"&gt;&lt;img border="0" ps="true" src="http://3.bp.blogspot.com/_X60ewjhV9Aw/S1W4Uj8180I/AAAAAAAADSw/MItUrUjsPg0/s400/Foody2+004.JPG" /&gt;&lt;/a&gt;&lt;br /&gt;
&lt;/div&gt;&lt;br /&gt;
Do the creaming now. Creaming will be easier, if you have a revolving cake base. Well, if you can't smoothen it just like the professional work, it's OK as it will covered up with mango slices and almond flakes, anyway (&lt;em&gt;winking smile&lt;/em&gt;). Design the cake, as you wished.&lt;br /&gt;
&lt;div class="separator" style="clear: both; text-align: center;"&gt;&lt;a href="http://2.bp.blogspot.com/_X60ewjhV9Aw/S1W4ghGQKNI/AAAAAAAADS4/-z9ASu54o4A/s1600-h/Foody2+005.JPG" imageanchor="1" style="margin-left: 1em; margin-right: 1em;"&gt;&lt;img border="0" ps="true" src="http://2.bp.blogspot.com/_X60ewjhV9Aw/S1W4ghGQKNI/AAAAAAAADS4/-z9ASu54o4A/s400/Foody2+005.JPG" /&gt;&lt;/a&gt;&lt;br /&gt;
&lt;/div&gt;&lt;br /&gt;
As for my cake, I decorated&amp;nbsp;it with thin mango slices on top (&lt;em&gt;Just slice it with peeler&lt;/em&gt;). And, please get some toasted almond flakes to decorate the sides. Get a packet of almond flakes, off the shelves. &lt;i&gt;Method&lt;/i&gt;: Toast flakes in oven at 150°C, for 8 - 10 minutes, before use (&lt;em&gt;Watch out the toasting constantly, to avoid&amp;nbsp;burning&lt;/em&gt;). Otherwise, leave the sides as it is, if creaming design preferred. Actually, you may also&amp;nbsp;glaze the surface of mango slices with apricot gel, for more shinny effect. Get a small tub of apricot gel from baking supplier. &lt;i&gt;Method:&lt;/i&gt; Mix 100 gram of apricot jam and 25ml of water in a saucepan and stir well until it is thoroughly blended and mixture is smooth. Boil for 10 to 15 minutes, and then, press boiled mixture through a fine wire sieve. Let it cool a little, and brush warm glaze over the cake.&lt;br /&gt;
&lt;div class="separator" style="clear: both; text-align: center;"&gt;&lt;a href="http://2.bp.blogspot.com/_X60ewjhV9Aw/S1W4mtRs-nI/AAAAAAAADTA/_vg226yVvHA/s1600-h/Foody2+007.JPG" imageanchor="1" style="margin-left: 1em; margin-right: 1em;"&gt;&lt;img border="0" ps="true" src="http://2.bp.blogspot.com/_X60ewjhV9Aw/S1W4mtRs-nI/AAAAAAAADTA/_vg226yVvHA/s400/Foody2+007.JPG" /&gt;&lt;/a&gt;&lt;br /&gt;
&lt;/div&gt;&lt;br /&gt;
Remember to get honey mangoes, really sweet ones. Otherwise, it will ruin the overall taste of the birthday cake. Choose more yellowish flesh for better looking appearance. &lt;br /&gt;
&lt;div class="separator" style="clear: both; text-align: center;"&gt;&lt;a href="http://2.bp.blogspot.com/_X60ewjhV9Aw/S1W4r0hXZuI/AAAAAAAADTI/-TLk6ZX071w/s1600-h/Foody2+023.JPG" imageanchor="1" style="margin-left: 1em; margin-right: 1em;"&gt;&lt;img border="0" ps="true" src="http://2.bp.blogspot.com/_X60ewjhV9Aw/S1W4r0hXZuI/AAAAAAAADTI/-TLk6ZX071w/s400/Foody2+023.JPG" /&gt;&lt;/a&gt;&lt;br /&gt;
&lt;/div&gt;&lt;br /&gt;
See, it looks pretty nice, isn't it? Ok.. not very perfect looking, but the taste of my cake was delicious! Mango was sweet, cake was soft, and cream was smooth and tasty.&lt;br /&gt;
&lt;div class="separator" style="clear: both; text-align: center;"&gt;&lt;a href="http://3.bp.blogspot.com/_X60ewjhV9Aw/S1W4uZFCRMI/AAAAAAAADTQ/p17vivnIAiU/s1600-h/Foody2+021.JPG" imageanchor="1" style="margin-left: 1em; margin-right: 1em;"&gt;&lt;img border="0" ps="true" src="http://3.bp.blogspot.com/_X60ewjhV9Aw/S1W4uZFCRMI/AAAAAAAADTQ/p17vivnIAiU/s400/Foody2+021.JPG" /&gt;&lt;/a&gt;&lt;br /&gt;
&lt;/div&gt;&lt;br /&gt;
I am sure this is simple enough to bake by your own at home, and good enough to impress and serve for an occassion.&lt;br /&gt;
&lt;div class="separator" style="clear: both; text-align: center;"&gt;&lt;a href="http://3.bp.blogspot.com/_X60ewjhV9Aw/S1W41D1nSRI/AAAAAAAADTg/JyqgnGJf2mY/s1600-h/Foody2+022.JPG" imageanchor="1" style="margin-left: 1em; margin-right: 1em;"&gt;&lt;img border="0" ps="true" src="http://3.bp.blogspot.com/_X60ewjhV9Aw/S1W41D1nSRI/AAAAAAAADTg/JyqgnGJf2mY/s400/Foody2+022.JPG" /&gt;&lt;/a&gt;&lt;br /&gt;
&lt;/div&gt;&lt;br /&gt;
Happy Baking!&lt;div class="blogger-post-footer"&gt;&lt;img width='1' height='1' src='https://blogger.googleusercontent.com/tracker/490982868559256368-2660980326806828703?l=www.mywoklife.com' alt='' /&gt;&lt;/div&gt;</content><link rel="replies" type="application/atom+xml" href="http://www.mywoklife.com/feeds/2660980326806828703/comments/default" title="Post Comments" /><link rel="replies" type="text/html" href="https://www.blogger.com/comment.g?blogID=490982868559256368&amp;postID=2660980326806828703" title="5 Comments" /><link rel="edit" type="application/atom+xml" href="http://www.blogger.com/feeds/490982868559256368/posts/default/2660980326806828703?v=2" /><link rel="self" type="application/atom+xml" href="http://www.blogger.com/feeds/490982868559256368/posts/default/2660980326806828703?v=2" /><link rel="alternate" type="text/html" href="http://www.mywoklife.com/2010/01/mango-cake-for-birthday-celebration.html" title="Homebaked Mango Cake for Birthday Celebration" /><author><name>PatriCa BB</name><uri>http://www.blogger.com/profile/15253488652628099847</uri><email>admin@mywoklife.com</email><gd:extendedProperty name="OpenSocialUserId" value="16712851664488271850" /></author><media:thumbnail xmlns:media="http://search.yahoo.com/mrss/" url="http://4.bp.blogspot.com/_X60ewjhV9Aw/S1XDm9DRWEI/AAAAAAAADTo/VpchTT50o5k/s72-c/Foody2+009.JPG" height="72" width="72" /><thr:total xmlns:thr="http://purl.org/syndication/thread/1.0">5</thr:total></entry><entry gd:etag="W/&quot;DkYDQnY5fip7ImA9WxBQGEs.&quot;"><id>tag:blogger.com,1999:blog-490982868559256368.post-3977642629689340869</id><published>2010-01-18T08:13:00.004+08:00</published><updated>2010-01-19T09:22:53.826+08:00</updated><app:edited xmlns:app="http://www.w3.org/2007/app">2010-01-19T09:22:53.826+08:00</app:edited><category scheme="http://www.blogger.com/atom/ns#" term="Ways to Keep Fit" /><category scheme="http://www.blogger.com/atom/ns#" term="Nutrition n' Diet" /><title>Effective Ways for Mother to Slim Down</title><content type="html">&lt;a href="http://1.bp.blogspot.com/_X60ewjhV9Aw/S1AX27gjGdI/AAAAAAAADR4/UzW9o3acX0g/s1600-h/IMG_0555.jpg" imageanchor="1" style="clear: right; cssfloat: right; float: right; margin-bottom: 1em; margin-left: 1em;"&gt;&lt;img border="0" ps="true" src="http://1.bp.blogspot.com/_X60ewjhV9Aw/S1AX27gjGdI/AAAAAAAADR4/UzW9o3acX0g/s320/IMG_0555.jpg" /&gt;&lt;/a&gt;&lt;strong&gt;&lt;span style="color: lime;"&gt;“Mummy, how do you keep your waistline in shape?”&lt;/span&gt;&lt;/strong&gt; &lt;br /&gt;
&lt;br /&gt;
I had &lt;em&gt;talked&lt;/em&gt; about &lt;strong&gt;&lt;a href="http://www.facebook.com/pages/My-Wok-Life/76217406417#/pages/My-Wok-Life/76217406417?v=app_2347471856"&gt;10 Diet Mistakes&lt;/a&gt;&lt;/strong&gt; in my &lt;em&gt;Note&lt;/em&gt;&amp;nbsp;of my &lt;em&gt;FaceBook Fan Club &lt;/em&gt;which you already read, or probably like to read about it (*&lt;em&gt;Go log in to join me at my&lt;/em&gt; &lt;a href="http://www.facebook.com/pages/My-Wok-Life/76217406417"&gt;FB fan club&lt;/a&gt;!). These 10 Diet Mistakes which I have shared were highlights&amp;nbsp;which have to be&amp;nbsp;avoided, in order to make&amp;nbsp;ourselves more healthy and enhance the effectiveness of&amp;nbsp;any work-out sessions or slimming programme. &lt;br /&gt;
&lt;br /&gt;
This time, I came across&amp;nbsp;an article which I would like to talk about, about eating home more often! I am, truly&amp;nbsp;a strong &lt;em&gt;believer&lt;/em&gt; in home cooking, and hence, this article &lt;em&gt;adores&lt;/em&gt; me very much! &lt;br /&gt;
&lt;br /&gt;
It’s true about the theory, and that’s what I believed and am practicing, still. &lt;br /&gt;
&lt;br /&gt;
Why eat at home more? Correct, it’s one of the ways to slim down and get healthy with no more excuses about being &lt;em&gt;fat&lt;/em&gt; due to being too busy to having work out like crazy in order to slim down. &lt;br /&gt;
&lt;br /&gt;
&lt;strong&gt;COOK &amp;amp; EAT AT HOME MORE OFTEN&lt;/strong&gt;&lt;br /&gt;
When cooking at home, you tend to control the amount of oil used in your cooking. For using less oil in your cooking, and limit deep-fried food to once or twice a week, it helps to reduce your oil intake by &lt;span style="font-size: large;"&gt;&lt;em&gt;50%&lt;/em&gt;&lt;/span&gt;, as compared to by eating out! You may put less salt and no MSG in your cooking which will further improve your health. With a healthy body, slimming down will then be an easier task to be achieved, in long run. &lt;br /&gt;
&lt;br /&gt;
Try to cook more vegetable dishes than meaty stuff. For instances, for family of 3 – 4,&amp;nbsp;it's normally 2 dishes and 1 soup in a dinner meal. So, cook 1 meat + 1 vegetable + 1 veggie soup, or 2 vegetables dishes + 1 meat soup. Always have more or larger portion of vegetables than meat dish. &lt;br /&gt;
&lt;br /&gt;
If you can't cook or eat all 3 meals at home (&lt;em&gt;of course&lt;/em&gt;), eat at least one meal says dinner, would it be fine?&lt;br /&gt;
&lt;br /&gt;
&lt;a href="http://2.bp.blogspot.com/_X60ewjhV9Aw/S1AZCX5-DHI/AAAAAAAADSA/ihfRl1W7Tbc/s1600-h/DSCN0828.JPG" imageanchor="1" style="clear: left; cssfloat: left; float: left; margin-bottom: 1em; margin-right: 1em;"&gt;&lt;img border="0" ps="true" src="http://2.bp.blogspot.com/_X60ewjhV9Aw/S1AZCX5-DHI/AAAAAAAADSA/ihfRl1W7Tbc/s200/DSCN0828.JPG" /&gt;&lt;/a&gt;Cook a vegetables medley may further allure your kids to have more vegetables as there will be varieties of vegetables in different colors that make the dish looks much more appealing than others. My girl loved my“Chap Chye” dish (&lt;a href="http://www.mywoklife.com/2009/01/mixed-vegetables-with-shitake-mushrooms.html"&gt;Stir-fried assorted&amp;nbsp;vegetables dish&lt;/a&gt;). &lt;br /&gt;
&lt;br /&gt;
And, as parents, we are always the role model for our kids. When mummy and/ or daddy is eating healthy, they will tend to follow the same, gradually. It works for my girl who loves vegetables more than meat.&lt;br /&gt;
&lt;br /&gt;
&lt;strong&gt;SAY NO TO&amp;nbsp;LEFTOVERS!&lt;/strong&gt; &lt;br /&gt;
&lt;a href="http://1.bp.blogspot.com/_X60ewjhV9Aw/S1AZDBBmENI/AAAAAAAADSI/GzZh91y5ilY/s1600-h/1117_185909.jpg" imageanchor="1" style="clear: right; cssfloat: right; float: right; margin-bottom: 1em; margin-left: 1em;"&gt;&lt;img border="0" ps="true" src="http://1.bp.blogspot.com/_X60ewjhV9Aw/S1AZDBBmENI/AAAAAAAADSI/GzZh91y5ilY/s200/1117_185909.jpg" /&gt;&lt;/a&gt;One more thing to highlight here! Don’t eat children’s leftovers, please. Discard&amp;nbsp;any leftovers. And, cook less next time, or give the children less, if they always have trouble finishing their food. Alternatively, save the ‘&lt;em&gt;keepable&lt;/em&gt;’ leftovers and ‘&lt;em&gt;transform&lt;/em&gt;’ it to a ‘&lt;em&gt;brand new&lt;/em&gt;’ dish by adding some new ingredients into it to cook for subsequent meals, if it makes you feel better. I do this sometimes, too. See one of my recipes &lt;a href="http://www.mywoklife.com/2008/12/roast-duck-congee.html"&gt;cooked with leftovers&lt;/a&gt;!&lt;br /&gt;
&lt;br /&gt;
So, you like&amp;nbsp;these ideas, don’t you (&lt;em&gt;smile&lt;/em&gt;)?&lt;div class="blogger-post-footer"&gt;&lt;img width='1' height='1' src='https://blogger.googleusercontent.com/tracker/490982868559256368-3977642629689340869?l=www.mywoklife.com' alt='' /&gt;&lt;/div&gt;</content><link rel="replies" type="application/atom+xml" href="http://www.mywoklife.com/feeds/3977642629689340869/comments/default" title="Post Comments" /><link rel="replies" type="text/html" href="https://www.blogger.com/comment.g?blogID=490982868559256368&amp;postID=3977642629689340869" title="0 Comments" /><link rel="edit" type="application/atom+xml" href="http://www.blogger.com/feeds/490982868559256368/posts/default/3977642629689340869?v=2" /><link rel="self" type="application/atom+xml" href="http://www.blogger.com/feeds/490982868559256368/posts/default/3977642629689340869?v=2" /><link rel="alternate" type="text/html" href="http://www.mywoklife.com/2010/01/effective-ways-for-mother-to-slim-down.html" title="Effective Ways for Mother to Slim Down" /><author><name>PatriCa BB</name><uri>http://www.blogger.com/profile/15253488652628099847</uri><email>admin@mywoklife.com</email><gd:extendedProperty name="OpenSocialUserId" value="16712851664488271850" /></author><media:thumbnail xmlns:media="http://search.yahoo.com/mrss/" url="http://1.bp.blogspot.com/_X60ewjhV9Aw/S1AX27gjGdI/AAAAAAAADR4/UzW9o3acX0g/s72-c/IMG_0555.jpg" height="72" width="72" /><thr:total xmlns:thr="http://purl.org/syndication/thread/1.0">0</thr:total></entry><entry gd:etag="W/&quot;D0cMSHgyfSp7ImA9WxBQGEs.&quot;"><id>tag:blogger.com,1999:blog-490982868559256368.post-7026345956309320296</id><published>2010-01-15T08:37:00.005+08:00</published><updated>2010-01-19T09:38:09.695+08:00</updated><app:edited xmlns:app="http://www.w3.org/2007/app">2010-01-19T09:38:09.695+08:00</app:edited><category scheme="http://www.blogger.com/atom/ns#" term="Cakes and Bread" /><category scheme="http://www.blogger.com/atom/ns#" term="Recipe" /><category scheme="http://www.blogger.com/atom/ns#" term="Low-Fat" /><category scheme="http://www.blogger.com/atom/ns#" term="Tips n' Guides" /><category scheme="http://www.blogger.com/atom/ns#" term="Snacks" /><category scheme="http://www.blogger.com/atom/ns#" term="Egg" /><title>Poached Egg</title><content type="html">&lt;div class="separator" style="clear: both; text-align: center;"&gt;&lt;a href="http://3.bp.blogspot.com/_X60ewjhV9Aw/S07aVKjy7dI/AAAAAAAADRg/hImLSE9RKkc/s1600-h/IMG_1021.jpg" imageanchor="1" style="margin-left: 1em; margin-right: 1em;"&gt;&lt;img border="0" ps="true" src="http://3.bp.blogspot.com/_X60ewjhV9Aw/S07aVKjy7dI/AAAAAAAADRg/hImLSE9RKkc/s400/IMG_1021.jpg" /&gt;&lt;/a&gt;&lt;br /&gt;
&lt;/div&gt;&lt;strong&gt;&lt;span style="color: cyan;"&gt;“How to poach a perfect&amp;nbsp;egg? Here are the steps to obtain good&amp;nbsp;egg poaching result.. And, I poach egg to make sandwich with cheese for breakfast.”&lt;/span&gt;&lt;/strong&gt;&lt;br /&gt;
&lt;br /&gt;
Eating poached egg is better than sunny-side-up egg, in a way, as you don’t need to add oil to cook the egg. I personally preferred poached egg for healthier diet choice as well as less hassle of cooking it. What you need is just a pot of water and vinegar to do the job without worries of resulting an oily stove&amp;nbsp;or table top after cooking (&lt;i&gt;smile&lt;/i&gt;). &lt;br /&gt;
&lt;br /&gt;
Poaching an egg is not a difficult chore, but some might need a few practices to get&amp;nbsp;the poaching done&amp;nbsp;perfectly and beautifully. A poached egg that considers good should have consistency of springy cooked egg white (&lt;em&gt;without any remaining of raw albumen&lt;/em&gt;)&amp;nbsp;and yolk&amp;nbsp;should be&amp;nbsp;soft&amp;nbsp;with&amp;nbsp;slight runny (&lt;em&gt;but slightly harden around the edges&lt;/em&gt;), but the&amp;nbsp;doneness of the yolk can be tailored to your preference, simply by adjusting the duration of poaching. &lt;br /&gt;
&lt;br /&gt;
I think poached egg makes a good breakfast. Simply eat it with plain bread or&amp;nbsp;make the Egg Benedict (&lt;em&gt;see my&lt;/em&gt; &lt;a href="http://www.mywoklife.com/2009/10/hollandaise-sauce.html"&gt;Hollandaise Sauce&lt;/a&gt;, &lt;em&gt;if wish to make Egg Benedict&lt;/em&gt;) for a good breakfast to start our bright day ahead! I made a poached egg and cheese sandwich for hubby’s breakfast this time. Let’s see the steps and how to go about it.&lt;br /&gt;
&lt;br /&gt;
&lt;a href="http://1.bp.blogspot.com/_X60ewjhV9Aw/S1UHvihTUZI/AAAAAAAADSQ/PTpZmKx4gdQ/s1600-h/674685299_Xpfou-M.jpg" imageanchor="1" style="clear: right; cssfloat: right; float: right; margin-bottom: 1em; margin-left: 1em;"&gt;&lt;img border="0" ps="true" src="http://1.bp.blogspot.com/_X60ewjhV9Aw/S1UHvihTUZI/AAAAAAAADSQ/PTpZmKx4gdQ/s200/674685299_Xpfou-M.jpg" /&gt;&lt;/a&gt;&lt;b&gt;Serves 1&lt;br /&gt;
Ingredients&lt;br /&gt;
&lt;em&gt;For poaching egg:&lt;br /&gt;
&lt;/em&gt;1 large egg&lt;br /&gt;
Pinch of grounded white pepper&lt;br /&gt;
Just a touch of salt&lt;br /&gt;
&lt;br /&gt;
1 pot of water, about 700 - 800ml&lt;br /&gt;
1 tablespoon of vinegar&lt;br /&gt;
&lt;br /&gt;
&lt;em&gt;For sandwich making:&lt;br /&gt;
&lt;/em&gt;2 - 3 slices of plain bread&lt;br /&gt;
1 slice of Cheddar cheese&lt;br /&gt;
Butter/ Margarine spread&lt;br /&gt;
&lt;br /&gt;
Method:&lt;br /&gt;
1) Heat a pot of water over medium-high fire. When boiled, reduce heat to low fire&amp;nbsp;and bring to&amp;nbsp;a gentle simmering. Add in vinegar. &lt;br /&gt;
&lt;br /&gt;
2) Swirl the simmering water first, and then, break an egg into the whirlpool. Hold on for 3 seconds to let&amp;nbsp;the albumen&amp;nbsp;set a little to cook and&amp;nbsp;form initial shape, before stirring the water again (&lt;em&gt;in quick one-direction motion&lt;/em&gt;) to set the egg further, using the back handle of a metal spatula or a large fork to do it. Do not hit the egg while stirring to form shape and let it swirl together with the water for about&amp;nbsp;2 minutes. If prefer firmer yolk, let it boil for another minute, before scoping up gently with a large&amp;nbsp;slotted spoon, and place on a dish. &lt;/b&gt;&lt;br /&gt;
&lt;br /&gt;
&lt;b&gt;If for sandwich making, you might want to drain it&amp;nbsp;on kitchen towel on a flat dish instead. &lt;br /&gt;
&lt;br /&gt;
3) &lt;i&gt;Sandwich&lt;/i&gt;: Trim the edges of bread slices (*&lt;em&gt;For more crunchy bites, toast the bread. Otherwise, just leave it plain&lt;/em&gt;). Spread butter on each slice. Place a slice of cheese on a slice of bread, and then, top with another slice of bread. Place poached egg on it, sprinkle white pepper and salt (&lt;i&gt;just a touch of it using two finger tips&lt;/i&gt;). Or, you may also choose to top another slice of bread on the egg, if desired. Serve.&lt;/b&gt;&lt;br /&gt;
&lt;br /&gt;
&lt;div class="separator" style="clear: both; text-align: center;"&gt;&lt;a href="http://3.bp.blogspot.com/_X60ewjhV9Aw/S07aZsgs9zI/AAAAAAAADRw/0Md83_KfREs/s1600-h/IMG_1026.jpg" imageanchor="1" style="margin-left: 1em; margin-right: 1em;"&gt;&lt;img border="0" ps="true" src="http://3.bp.blogspot.com/_X60ewjhV9Aw/S07aZsgs9zI/AAAAAAAADRw/0Md83_KfREs/s400/IMG_1026.jpg" /&gt;&lt;/a&gt;&lt;br /&gt;
&lt;/div&gt;A poached egg counts about &lt;i&gt;75&lt;/i&gt;kcal, while making it into sandwich with cheese, it counts about &lt;i&gt;330&lt;/i&gt;kcal.&lt;br /&gt;
&lt;br /&gt;
&lt;i&gt;Tips&lt;/i&gt;: Choose white wine vinegar or simply use the Chinese white vinegar for the poaching.&lt;div class="blogger-post-footer"&gt;&lt;img width='1' height='1' src='https://blogger.googleusercontent.com/tracker/490982868559256368-7026345956309320296?l=www.mywoklife.com' alt='' /&gt;&lt;/div&gt;</content><link rel="replies" type="application/atom+xml" href="http://www.mywoklife.com/feeds/7026345956309320296/comments/default" title="Post Comments" /><link rel="replies" type="text/html" href="https://www.blogger.com/comment.g?blogID=490982868559256368&amp;postID=7026345956309320296" title="0 Comments" /><link rel="edit" type="application/atom+xml" href="http://www.blogger.com/feeds/490982868559256368/posts/default/7026345956309320296?v=2" /><link rel="self" type="application/atom+xml" href="http://www.blogger.com/feeds/490982868559256368/posts/default/7026345956309320296?v=2" /><link rel="alternate" type="text/html" href="http://www.mywoklife.com/2010/01/poached-egg-sandwiches.html" title="Poached Egg" /><author><name>PatriCa BB</name><uri>http://www.blogger.com/profile/15253488652628099847</uri><email>admin@mywoklife.com</email><gd:extendedProperty name="OpenSocialUserId" value="16712851664488271850" /></author><media:thumbnail xmlns:media="http://search.yahoo.com/mrss/" url="http://3.bp.blogspot.com/_X60ewjhV9Aw/S07aVKjy7dI/AAAAAAAADRg/hImLSE9RKkc/s72-c/IMG_1021.jpg" height="72" width="72" /><thr:total xmlns:thr="http://purl.org/syndication/thread/1.0">0</thr:total></entry><entry gd:etag="W/&quot;Dk8BQno6cSp7ImA9WxBQFk4.&quot;"><id>tag:blogger.com,1999:blog-490982868559256368.post-191645860396243100</id><published>2010-01-13T08:10:00.032+08:00</published><updated>2010-01-16T17:40:53.419+08:00</updated><app:edited xmlns:app="http://www.w3.org/2007/app">2010-01-16T17:40:53.419+08:00</app:edited><category scheme="http://www.blogger.com/atom/ns#" term="Fruits" /><category scheme="http://www.blogger.com/atom/ns#" term="Cakes and Bread" /><category scheme="http://www.blogger.com/atom/ns#" term="Recipe" /><title>Homemade Savoury Durian Cake Recipe</title><content type="html">&lt;div class="separator" style="clear: both; text-align: center;"&gt;&lt;a href="http://2.bp.blogspot.com/_X60ewjhV9Aw/S03Ff3RzULI/AAAAAAAADRQ/JO476x85Jak/s1600-h/IMG_1010.jpg" imageanchor="1" style="margin-left: 1em; margin-right: 1em;"&gt;&lt;img border="0" ps="true" src="http://2.bp.blogspot.com/_X60ewjhV9Aw/S03Ff3RzULI/AAAAAAAADRQ/JO476x85Jak/s400/IMG_1010.jpg" /&gt;&lt;/a&gt;&lt;br /&gt;
&lt;/div&gt;&lt;strong&gt;&lt;span style="color: cyan;"&gt;"Singapore's All-Time-Favourite Durian Cake"&lt;/span&gt;&lt;/strong&gt;&lt;br /&gt;
&lt;br /&gt;
If you have not came across &lt;em&gt;durian&lt;/em&gt;, let me tell you briefly about it. Durian is a seasonal tropical fruit in Southest Asia which we regard it as the "&lt;em&gt;King of Fruit&lt;/em&gt;". Durian has this very distinctive and penetrating scent which you either love it, or disgust by it. However, you might not like to scent when smell it, but love its taste in the palate. I don't know, it is to me, to find&amp;nbsp;the&amp;nbsp;scent&amp;nbsp;quite&amp;nbsp;disturbing when first got&amp;nbsp;the durian smell,&amp;nbsp;but it yields a complete opposite effect when comes to the palate as the same scent of durian&amp;nbsp;has&amp;nbsp;becoming&amp;nbsp;so fragrant and tasty when eat it! &lt;br /&gt;
&lt;br /&gt;
&lt;a href="http://2.bp.blogspot.com/_X60ewjhV9Aw/S0w6PXkCnlI/AAAAAAAADPw/qR68Hz_bWGg/s1600-h/0819_201137.jpg" imageanchor="1" style="clear: right; cssfloat: right; float: right; margin-bottom: 1em; margin-left: 1em;"&gt;&lt;img border="0" ps="true" src="http://2.bp.blogspot.com/_X60ewjhV9Aw/S0w6PXkCnlI/AAAAAAAADPw/qR68Hz_bWGg/s200/0819_201137.jpg" /&gt;&lt;/a&gt;Texture of good durian flesh should be felt dry on your finger tip when lightly&amp;nbsp;touch/ press on&amp;nbsp;the most outer layer of the flesh, with soft and creamy texture as a whole. Some durians tasted sweet while some are bitter-sweet, all depending on its species. I preferred bitter-sweet durian, if&amp;nbsp;I were to eat it direct, but to use it as cake filling, it's better to request for pure sweet taste (&lt;em&gt;more yellowish flesh.. *&lt;span style="font-size: x-small;"&gt;see picture on right..&lt;/span&gt;&lt;/em&gt;) instead of bitter-sweet type (&lt;em&gt;more pale flesh&lt;/em&gt;)&amp;nbsp;when selecting durians from the durian store, as sweet ones make&amp;nbsp;better flavor as cake filling.&lt;br /&gt;
&lt;br /&gt;
&lt;a href="http://1.bp.blogspot.com/_X60ewjhV9Aw/S0w6KWK59XI/AAAAAAAADPg/R0UKFyGu4uo/s1600-h/CA7HF473CAWQE3MRCAD0U8GSCAZ8FY0QCA4OTGKMCAEOZEZ5CAQ0GYIDCAEMWUL4CAM4OPHQCAIY3FNICAUOMUA4CACND2J0CAP30U6FCA7VZ0Z6CAB7ZKDDCAJF0DAACAT1K25FCAMFQC4WCAPGY7JY.jpg" imageanchor="1" style="clear: left; cssfloat: right; float: left; margin-bottom: 1em; margin-right: 1em;"&gt;&lt;img border="0" ps="true" src="http://1.bp.blogspot.com/_X60ewjhV9Aw/S0w6KWK59XI/AAAAAAAADPg/R0UKFyGu4uo/s200/CA7HF473CAWQE3MRCAD0U8GSCAZ8FY0QCA4OTGKMCAEOZEZ5CAQ0GYIDCAEMWUL4CAM4OPHQCAIY3FNICAUOMUA4CACND2J0CAP30U6FCA7VZ0Z6CAB7ZKDDCAJF0DAACAT1K25FCAMFQC4WCAPGY7JY.jpg" /&gt;&lt;/a&gt;Get a better type of durian since it's for own consumption. I got the&amp;nbsp;mid-level kind which is D24, imported&amp;nbsp;from Malaysia, it costs about S$10 per kilogramme. You need only about 1 kg of durian (&lt;em&gt;total weight includes husk&lt;/em&gt;) for the cake filling of my recipe. Hence, it ends up&amp;nbsp;much more economical to make your own durian cake, instead of buying from the cake shop where 1kg of durian cake may easily cost you S$40 - 50. &lt;br /&gt;
&lt;br /&gt;
I loved durians, fresh ones, especially. So, I used purely fresh durian flesh to make durian cake, without mixing with any sugar, cream or artificial flavouring. Durian from Malaysia tastes much more &lt;em&gt;fragrant&lt;/em&gt; and delicious and it has more intensive flavour than those imported from Thailand. Hence, I recommend using Malaysia durians as the cake filling, because I am not too sure if you need an addition of airtificial flavour or sugar to enhance the taste of your cake filling, if you are getting the &lt;em&gt;'subtle-tasted'&lt;/em&gt; Thailand durian.. I am serious (&lt;em&gt;winking&lt;/em&gt;).&lt;br /&gt;
&lt;br /&gt;
Hubby and my girl loved durians, too. However, they hardly eat&amp;nbsp;the fresh durian&amp;nbsp;with their bare hand which it should be the usual way, as they worried about leaving strong odour on their hands for quite awhile (&lt;em&gt;a day or so&lt;/em&gt;). Hence, making durian into cake is the best alternative for them to enjoy this favourite fruit without what the considered a &lt;em&gt;hassle&lt;/em&gt;. And so, I'll be the one who do all the job, because I love them (&lt;em&gt;smile&lt;/em&gt;).&lt;br /&gt;
&lt;br /&gt;
&lt;div class="separator" style="clear: both; text-align: center;"&gt;&lt;a href="http://3.bp.blogspot.com/_X60ewjhV9Aw/S03GFcJW1XI/AAAAAAAADRY/wBdR9zBIqbc/s1600-h/IMG_1016.jpg" imageanchor="1" style="margin-left: 1em; margin-right: 1em;"&gt;&lt;img border="0" ps="true" src="http://3.bp.blogspot.com/_X60ewjhV9Aw/S03GFcJW1XI/AAAAAAAADRY/wBdR9zBIqbc/s400/IMG_1016.jpg" /&gt;&lt;/a&gt;&lt;br /&gt;
&lt;/div&gt;Anyway, it worths all the effort, to see them indulge in such a good sweet savoury. I, too, get to satisfy my sweet tooth, with both my favourites, the durian and cake. This homemade durian cake is very good, indeed!&amp;nbsp;Most of all,&amp;nbsp;it's the&amp;nbsp;effort that counts.&lt;br /&gt;
&lt;br /&gt;
&lt;a href="http://2.bp.blogspot.com/_X60ewjhV9Aw/S00hoh5co1I/AAAAAAAADQI/rLqImU672hs/s1600-h/IMG_1003.jpg" imageanchor="1" style="clear: right; cssfloat: right; float: right; margin-bottom: 1em; margin-left: 1em;"&gt;&lt;img border="0" ps="true" src="http://2.bp.blogspot.com/_X60ewjhV9Aw/S00hoh5co1I/AAAAAAAADQI/rLqImU672hs/s200/IMG_1003.jpg" /&gt;&lt;/a&gt;One more point I would like to bring up here,&amp;nbsp;I&amp;nbsp;did not blend the durian flesh, but merely used a fork to briefly mash it before using&amp;nbsp;it for the filling. I liked&amp;nbsp;its firmer mouthfeel. If you prefer smoother and more creamy mouthfeel, blend the durian before use, then. It will give you more a cream-like consistency, as desired.&lt;br /&gt;
&lt;br /&gt;
&lt;b&gt;Yields 8"/ 9" cake (&lt;em&gt;about 800 - 900 grams per whole cake&lt;/em&gt;) &lt;br /&gt;
Ingredients&lt;br /&gt;
250 grams of sponge cake premix (&lt;em&gt;Optima Ready Mix from Bake King brand&lt;/em&gt;)&lt;br /&gt;
3&amp;nbsp;medium eggs (&lt;em&gt;about 200gram&lt;/em&gt;)&lt;br /&gt;
50ml water (&lt;em&gt;about 1/4 small cup&lt;/em&gt;)&lt;br /&gt;
1 teaspoon of vanilla essence&lt;br /&gt;
&lt;/b&gt;&lt;br /&gt;
&lt;b&gt;&lt;em&gt;Filling:&lt;/em&gt;&lt;/b&gt;&lt;br /&gt;
&lt;b&gt;6 – 8 seeds of fresh and sweet durian, seeded and mashed into durian paste with a fork (&lt;em&gt;or blender, for smoother cream-like texture&lt;/em&gt;)&lt;br /&gt;
&lt;br /&gt;
&lt;em&gt;Creaming:&lt;/em&gt;&lt;br /&gt;
200ml of whipped cream (&lt;em&gt;get the ready-to-use instant whipped cream or click for my&lt;a href="http://www.mywoklife.com/2009/04/homemade-whipped-cream-recipe.html"&gt; Homemade Whipped Cream Recipe&lt;/a&gt;&lt;/em&gt;)&lt;br /&gt;
&lt;br /&gt;
&lt;em&gt;Utensil&lt;/em&gt;:&lt;br /&gt;
Lightly greased (&lt;em&gt;with olive oil or butter&lt;/em&gt;) 8" or 9” round baking pan&lt;br /&gt;
&lt;br /&gt;
Method&lt;br /&gt;
1) Extract durian flesh and place in a medium container. Use a fork to briefly mash and stir it till paste-like texture. Cover durian paste and keep refrigerator, reserve for later. &lt;br /&gt;
&lt;br /&gt;
2) Pre-heat oven for 15 minutes, set temperature to 180°C (&lt;em&gt;top and bottom heat on&lt;/em&gt;). &lt;br /&gt;
&lt;br /&gt;
3) Break eggs into large mixing bowl. Then, add in cake premix flour, water and vanilla essence. Beat mixture with electrical mixer at medium speed (&lt;em&gt;No. 2 or 3&lt;/em&gt;), for 10 minutes. Texture of the end-result of mixture (&lt;em&gt;after beaten&lt;/em&gt;) should&amp;nbsp;look light fluffy and creamy with some resistance. &lt;br /&gt;
&lt;br /&gt;
&lt;a href="http://3.bp.blogspot.com/_X60ewjhV9Aw/S00hq2ggvlI/AAAAAAAADQQ/t0tGY3ydL7c/s1600-h/IMG_1004.jpg" imageanchor="1" style="clear: left; cssfloat: left; float: left; margin-bottom: 1em; margin-right: 1em;"&gt;&lt;img border="0" ps="true" src="http://3.bp.blogspot.com/_X60ewjhV9Aw/S00hq2ggvlI/AAAAAAAADQQ/t0tGY3ydL7c/s200/IMG_1004.jpg" /&gt;&lt;/a&gt;3) Pour cake batter into the greased baking pan. Place baking pan at centre rack. Bake for 40 minutes, or until toothpick inserted in the centre comes out completely clean. The top of the cake baked should appear slightly &lt;em&gt;bloated&lt;/em&gt;/ rounded instead of flat surfaced. &lt;br /&gt;
&lt;br /&gt;
4) Allow cake to completely cool in the pan on wire rack, for about an hour, before removing from pan.&lt;br /&gt;
&lt;br /&gt;
5) In the meantime, you may whip the fresh cream. Store whipped cream in the refrigerator before use.&lt;/b&gt;&lt;br /&gt;
&lt;br /&gt;
&lt;a href="http://3.bp.blogspot.com/_X60ewjhV9Aw/S00hvrptCtI/AAAAAAAADQY/iMdBTB_zj4A/s1600-h/IMG_1005.jpg" imageanchor="1" style="clear: right; cssfloat: right; float: right; margin-bottom: 1em; margin-left: 1em;"&gt;&lt;img border="0" ps="true" src="http://3.bp.blogspot.com/_X60ewjhV9Aw/S00hvrptCtI/AAAAAAAADQY/iMdBTB_zj4A/s200/IMG_1005.jpg" /&gt;&lt;/a&gt;&lt;b&gt;6) When cake is cooled, gently slice it into 3 layers, horizontally. For easy spreading of whipped cream on the sponge cake, you may also remove the very top&amp;nbsp;brown (&lt;em&gt;baked&lt;/em&gt;) layer of the cake, with knife or gently peel with bare hand. Then, place the bottom layer of cake gently on a flat surface/ flat cake board, spread a thick layer of durian filling evenly on the layer of cake. Leave some space around the edges. Repeat the same for second layer. Then, top the most top (slightly rounded surfaced) layer of cake on the second layer cake. Lightly press the layers for a&amp;nbsp;better hold of the cake in 3 tiers. &lt;/b&gt;&lt;br /&gt;
&lt;br /&gt;
&lt;a href="http://4.bp.blogspot.com/_X60ewjhV9Aw/S00hx2nZfHI/AAAAAAAADQg/2sOpw3x2iBs/s1600-h/IMG_1007.jpg" imageanchor="1" style="clear: left; cssfloat: left; float: left; margin-bottom: 1em; margin-right: 1em;"&gt;&lt;img border="0" ps="true" src="http://4.bp.blogspot.com/_X60ewjhV9Aw/S00hx2nZfHI/AAAAAAAADQg/2sOpw3x2iBs/s200/IMG_1007.jpg" /&gt;&lt;/a&gt;&lt;strong&gt;7) Creaming: Spread whipped cream on the entire cake, and decorate cake with&amp;nbsp;some poky and sharp edgy patterns, resembling the durian thorns, all over the cake. &lt;/strong&gt;&lt;br /&gt;
&lt;br /&gt;
&lt;strong&gt;And, the purpose of baking the sponge cake slightly rounded on top is also to create a better shaping&amp;nbsp;of durian&amp;nbsp;husk design (&lt;em&gt;You may even find green food coloring to mix into whipped cream for making even real-looking durian designed cake.&lt;/em&gt;). &lt;/strong&gt;&lt;strong&gt;&lt;/strong&gt;&lt;br /&gt;
&lt;br /&gt;
&lt;strong&gt;Chill decorated cake in the refrigerator till ready to serve.&lt;/strong&gt;&lt;br /&gt;
&lt;br /&gt;
&lt;div class="separator" style="clear: both; text-align: center;"&gt;&lt;a href="http://4.bp.blogspot.com/_X60ewjhV9Aw/S00h24Y1eeI/AAAAAAAADQ4/dET_v72Dj0A/s1600-h/IMG_1018.jpg" imageanchor="1" style="margin-left: 1em; margin-right: 1em;"&gt;&lt;img border="0" ps="true" src="http://4.bp.blogspot.com/_X60ewjhV9Aw/S00h24Y1eeI/AAAAAAAADQ4/dET_v72Dj0A/s400/IMG_1018.jpg" /&gt;&lt;/a&gt;&lt;br /&gt;
&lt;/div&gt;Actually, I&amp;nbsp;thought my sponge cake was slightly too&amp;nbsp;thick as I used a 7.5" round pan, even though I didn't mind to have thick layers as I loved the softness of my sponge cake which goes&amp;nbsp;so well with its durian filling, but what I'll suggest, if you do prefer&amp;nbsp;thinner layers, is to use a bigger baking&amp;nbsp;pan to bake the sponge cake, for instances,&amp;nbsp;a 9" or 10"&amp;nbsp;baking pan, so that you cake will be baked wider but thinner (&lt;em&gt;in term of height&lt;/em&gt;) in whole.&amp;nbsp;Alternatively, use a smaller,&amp;nbsp;7" pan, to bake a thick cake, and then, slice it into 4 layers, to make two separate&amp;nbsp;2-tier cakes instead. You should have&amp;nbsp;enough durian flesh for&amp;nbsp;its fillings.&amp;nbsp;Otherwise, remain as how my recipe&amp;nbsp;does. &lt;br /&gt;
&lt;br /&gt;
And, I hope you don't mind, frankly speaking, I am no expert in cake creaming. Perhaps, this durian cake is not pretty to you at all. Well, you know, I emphasize mainly on the quality and taste of my food, cake as well. My baking is purely for own consumption, and sometimes, as a treat to close friends. So, they won't mind if my cake does not look so pretty, as long as it's still appealing and taste genuinely delicious (&lt;em&gt;laughing&lt;/em&gt;)! &lt;br /&gt;
&lt;br /&gt;
&lt;a href="http://4.bp.blogspot.com/_X60ewjhV9Aw/S00kfGa05DI/AAAAAAAADRA/TSNz5X-SGw0/s1600-h/IMG_1014.jpg" imageanchor="1" style="clear: right; cssfloat: right; float: right; margin-bottom: 1em; margin-left: 1em;"&gt;&lt;img border="0" ps="true" src="http://4.bp.blogspot.com/_X60ewjhV9Aw/S00kfGa05DI/AAAAAAAADRA/TSNz5X-SGw0/s200/IMG_1014.jpg" /&gt;&lt;/a&gt;A thick slice of creamy durian cake counts about &lt;em&gt;450&lt;/em&gt;kcal. I have already used only pure durian and reduced&amp;nbsp;sugar amount in the sponge cake. Anyway, do enjoy the durian cake, if you are one of the durian lovers, like&amp;nbsp;us (&lt;em&gt;smile&lt;/em&gt;).&lt;br /&gt;
&lt;br /&gt;
&lt;a href="http://1.bp.blogspot.com/_X60ewjhV9Aw/S0w8qrUU8zI/AAAAAAAADQA/k3ki5qTWdx8/s1600-h/0729_200933.jpg" imageanchor="1" style="clear: left; cssfloat: right; float: left; margin-bottom: 1em; margin-right: 1em;"&gt;&lt;img border="0" ps="true" src="http://1.bp.blogspot.com/_X60ewjhV9Aw/S0w8qrUU8zI/AAAAAAAADQA/k3ki5qTWdx8/s200/0729_200933.jpg" /&gt;&lt;/a&gt;Though durian is&amp;nbsp;delicious and too hard to resist, but eat durian (&lt;em&gt;or durian cake&lt;/em&gt;) moderately. It is&amp;nbsp;not only about keeping&amp;nbsp;your&amp;nbsp;waistline in&amp;nbsp;shape (&lt;em&gt;as durian is high GI fruit&lt;/em&gt;), it's to also&amp;nbsp;avoid increasing of &lt;em&gt;body heat,&lt;/em&gt; as Chinese believes that durian is a&amp;nbsp;'&lt;em&gt;heaty&lt;/em&gt;' fruit which may cause heatiness in our body after taking too much of durian. So, to balance up&amp;nbsp;body coolness, drink more water, herbal tea or eat some mangosteens (&lt;em&gt;which&amp;nbsp;it's, on contrary,&amp;nbsp;regards as cooling fruit.. *&lt;span style="font-size: x-small;"&gt;See picture on left&lt;/span&gt;&lt;/em&gt;), after eating durians. I believed in drinking some salted water right after eating, for more effective cooling result.&lt;br /&gt;
&lt;br /&gt;
&lt;i&gt;P/S:&lt;/i&gt; My &lt;em&gt;durian cakie&lt;/em&gt; was ended up a big hit to my family, and even colleagues.. Brought to work today to share with some close colleagues, and we rushed to eat it so that the office pantry would not smelt too strong (&lt;em&gt;laughing&lt;/em&gt;).. They were pretty impressed and well-commented the cake.. Oishi! :D&lt;br /&gt;
&lt;br /&gt;
&lt;i&gt;Tips&lt;/i&gt;: Smaller baking pan used will&amp;nbsp;make the top part of the bake &lt;i&gt;'pops up' &lt;/i&gt;slightly,&amp;nbsp;it was&amp;nbsp;for me to create &lt;i&gt;semi&lt;/i&gt; durian husk-like cake design. It's OK if you sponge cake turns out flat on top, if you are using larger pan for a thinner cake,&amp;nbsp;simply cream and decorate it with your&amp;nbsp;some fresh&amp;nbsp;ideas of your own. You have all freedom on your own cake (&lt;em&gt;smile&lt;/em&gt;).&lt;br /&gt;
* This is an express &amp;amp; hassle free cake baking. So, go get&amp;nbsp;the sponge cake pre-mix off the shelves. I've gotten it from NTUC Fairprice Extra (&lt;em&gt;at their baking section&lt;/em&gt;).&lt;div class="blogger-post-footer"&gt;&lt;img width='1' height='1' src='https://blogger.googleusercontent.com/tracker/490982868559256368-191645860396243100?l=www.mywoklife.com' alt='' /&gt;&lt;/div&gt;</content><link rel="replies" type="application/atom+xml" href="http://www.mywoklife.com/feeds/191645860396243100/comments/default" title="Post Comments" /><link rel="replies" type="text/html" href="https://www.blogger.com/comment.g?blogID=490982868559256368&amp;postID=191645860396243100" title="4 Comments" /><link rel="edit" type="application/atom+xml" href="http://www.blogger.com/feeds/490982868559256368/posts/default/191645860396243100?v=2" /><link rel="self" type="application/atom+xml" href="http://www.blogger.com/feeds/490982868559256368/posts/default/191645860396243100?v=2" /><link rel="alternate" type="text/html" href="http://www.mywoklife.com/2010/01/savoury-homemade-durian-cake.html" title="Homemade Savoury Durian Cake Recipe" /><author><name>PatriCa BB</name><uri>http://www.blogger.com/profile/15253488652628099847</uri><email>admin@mywoklife.com</email><gd:extendedProperty name="OpenSocialUserId" value="16712851664488271850" /></author><media:thumbnail xmlns:media="http://search.yahoo.com/mrss/" url="http://2.bp.blogspot.com/_X60ewjhV9Aw/S03Ff3RzULI/AAAAAAAADRQ/JO476x85Jak/s72-c/IMG_1010.jpg" height="72" width="72" /><thr:total xmlns:thr="http://purl.org/syndication/thread/1.0">4</thr:total></entry><entry gd:etag="W/&quot;DU8FQnk5fyp7ImA9WxBQEko.&quot;"><id>tag:blogger.com,1999:blog-490982868559256368.post-4471855866740655069</id><published>2010-01-12T10:50:00.007+08:00</published><updated>2010-01-12T14:30:13.727+08:00</updated><app:edited xmlns:app="http://www.w3.org/2007/app">2010-01-12T14:30:13.727+08:00</app:edited><category scheme="http://www.blogger.com/atom/ns#" term="Recipe" /><category scheme="http://www.blogger.com/atom/ns#" term="Vegetables" /><category scheme="http://www.blogger.com/atom/ns#" term="Egg" /><title>Fried Egg with French Bean (豆角炒蛋)</title><content type="html">&lt;div class="separator" style="clear: both; text-align: center;"&gt;&lt;a href="http://1.bp.blogspot.com/_X60ewjhV9Aw/S0srRxSAaeI/AAAAAAAADPQ/YLmGyAq_LvY/s1600-h/DSCN2162+-+Copy.JPG" imageanchor="1" style="margin-left: 1em; margin-right: 1em;"&gt;&lt;img border="0" ps="true" src="http://1.bp.blogspot.com/_X60ewjhV9Aw/S0srRxSAaeI/AAAAAAAADPQ/YLmGyAq_LvY/s400/DSCN2162+-+Copy.JPG" /&gt;&lt;/a&gt;&lt;br /&gt;
&lt;/div&gt;&lt;strong&gt;&lt;span style="color: cyan;"&gt;“Fragrant and delicious egg dish with French bean, easy cooking for both the seasoned and beginner cooks”&lt;/span&gt;&lt;/strong&gt;&lt;br /&gt;
&lt;br /&gt;
There are more reasons for me to resist heavy food for now as Chinese New Year is approaching, and further more, I will be going on vacation soon. I've to cut down on food amount for the next two weeks in order for me to feel less &lt;em&gt;guilty&lt;/em&gt; for&amp;nbsp;&lt;em&gt;pigging out&lt;/em&gt;&amp;nbsp;during those two occasions (&lt;em&gt;smile&lt;/em&gt;). &lt;br /&gt;
&lt;br /&gt;
I&amp;nbsp;tried&amp;nbsp;to cook light&amp;nbsp;plain rice porridge for dinner more often, but for the sake of my family who need not to &lt;em&gt;'suffer'&lt;/em&gt; with me,&amp;nbsp;I will cook more dishes,&amp;nbsp;but healthier ones to go along with the rice porridge. One of the dishes I could think of, is this fried-egg with French bean (String bean), which imaginably delicious and matched to put them together. Unlike long bean which will be softened after long-enough cooking, French bean, by nature, has its crunchy texture, even after cooked, which makes the biting more interesting. And, without much greenish taste from the bean itself, it will never affect the fragrance of the egg, naturally. &lt;br /&gt;
&lt;br /&gt;
See, my egg dish, too, fulfills the need of balanced diet with the addition of vegetable, isn’t it? And, for its very low in fat nature, this has&amp;nbsp;become one of my reasons for liking&amp;nbsp;French bean&amp;nbsp;so much. &lt;br /&gt;
&lt;br /&gt;
This dish is very&amp;nbsp;easy to prepare and cook, actually. I will also cook this dish even if we aren’t taking porridge, but the steamed rice. Its pleasant briny taste complements both the porridge and steamed rice. Moreover, it will never go wrong with cooking egg dish as it will always suit the taste bud of both my hubby and my girl. They both are &lt;em&gt;egg lover&lt;/em&gt;! &lt;br /&gt;
&lt;br /&gt;
&lt;a href="http://1.bp.blogspot.com/_X60ewjhV9Aw/S0sr8hWh4kI/AAAAAAAADPY/bkcPQ7k7JZs/s1600-h/89464821.jpg" imageanchor="1" style="clear: right; cssfloat: right; float: right; margin-bottom: 1em; margin-left: 1em;"&gt;&lt;img border="0" ps="true" src="http://1.bp.blogspot.com/_X60ewjhV9Aw/S0sr8hWh4kI/AAAAAAAADPY/bkcPQ7k7JZs/s200/89464821.jpg" /&gt;&lt;/a&gt;&lt;b&gt;Serves 3 – 4&lt;br /&gt;
1 small bunch of French bean (&lt;em&gt;about 4 – 5&lt;/em&gt;), sliced diagonally into 1cm long, crosswise&lt;br /&gt;
3 large eggs&lt;br /&gt;
Pinch of salt&lt;br /&gt;
1 clove of garlic, finely minced&lt;br /&gt;
1 – 2 tablespoon of cooking oil&lt;br /&gt;
&lt;br /&gt;
&lt;em&gt;Seasoning for eggs:&lt;/em&gt;&lt;br /&gt;
1 teaspoon of light soy sauce&lt;br /&gt;
1 - 2&amp;nbsp;teaspoons of oyster sauce&lt;br /&gt;
Drops of sesame oil&lt;br /&gt;
Dash of grounded white pepper&lt;br /&gt;
&lt;br /&gt;
1) Break eggs into a medium bowl and add in the listed seasoning. Beat with a fork till all mixed well and lightly foamy on the surface of the egg solution. &lt;br /&gt;
&lt;br /&gt;
2) Heat wok with oil over high heat. Reduce heat to medium fire, add in garlic and stir fry till fragrant. Add French bean and sprinkle some salt. Stir-fry for few minutes, till it appears darker green in colour which means it’s cooked. Then, briefly spread the French bean on the entire wok evenly.&lt;br /&gt;
&lt;br /&gt;
3) Pour egg on the French bean. Let it fry for 1 – 2 minutes to have it slightly set and lightly browned, before stirring it gently with a wooden spatula (&lt;em&gt;or you may just leave the egg as one large piece size instead of breaking it&lt;/em&gt;). Flip the egg over to brown the other side of it. Do not cook the egg for too long, in order to retain the moist in the egg. Serve with plain rice porridge or hot steamed rice. &lt;/b&gt;&lt;br /&gt;
&lt;br /&gt;
A portion of fried egg with French bean counts about &lt;em&gt;100&lt;/em&gt;kcal. &lt;br /&gt;
&lt;br /&gt;
&lt;i&gt;Tips&lt;/i&gt;: For better mouthfeel, try to tear away the thin fiber along the sides of the French bean, if possible.&lt;br /&gt;
* If you do not wish to have too saltish taste, omit or reduce the amount of salt which to be added in while frying the French bean.&lt;div class="blogger-post-footer"&gt;&lt;img width='1' height='1' src='https://blogger.googleusercontent.com/tracker/490982868559256368-4471855866740655069?l=www.mywoklife.com' alt='' /&gt;&lt;/div&gt;</content><link rel="replies" type="application/atom+xml" href="http://www.mywoklife.com/feeds/4471855866740655069/comments/default" title="Post Comments" /><link rel="replies" type="text/html" href="https://www.blogger.com/comment.g?blogID=490982868559256368&amp;postID=4471855866740655069" title="0 Comments" /><link rel="edit" type="application/atom+xml" href="http://www.blogger.com/feeds/490982868559256368/posts/default/4471855866740655069?v=2" /><link rel="self" type="application/atom+xml" href="http://www.blogger.com/feeds/490982868559256368/posts/default/4471855866740655069?v=2" /><link rel="alternate" type="text/html" href="http://www.mywoklife.com/2010/01/fried-egg-with-french-beans.html" title="Fried Egg with French Bean (豆角炒蛋)" /><author><name>PatriCa BB</name><uri>http://www.blogger.com/profile/15253488652628099847</uri><email>admin@mywoklife.com</email><gd:extendedProperty name="OpenSocialUserId" value="16712851664488271850" /></author><media:thumbnail xmlns:media="http://search.yahoo.com/mrss/" url="http://1.bp.blogspot.com/_X60ewjhV9Aw/S0srRxSAaeI/AAAAAAAADPQ/YLmGyAq_LvY/s72-c/DSCN2162+-+Copy.JPG" height="72" width="72" /><thr:total xmlns:thr="http://purl.org/syndication/thread/1.0">0</thr:total></entry><entry gd:etag="W/&quot;CU4AQXo-fCp7ImA9WxBQE0g.&quot;"><id>tag:blogger.com,1999:blog-490982868559256368.post-1289732990584139420</id><published>2010-01-08T11:12:00.032+08:00</published><updated>2010-01-13T11:39:00.454+08:00</updated><app:edited xmlns:app="http://www.w3.org/2007/app">2010-01-13T11:39:00.454+08:00</app:edited><category scheme="http://www.blogger.com/atom/ns#" term="Recipe" /><category scheme="http://www.blogger.com/atom/ns#" term="Soup" /><category scheme="http://www.blogger.com/atom/ns#" term="Low-Fat" /><title>Lung Nourishing Chinese Tonic Soup (止咳润肺汤)</title><content type="html">&lt;div class="separator" style="clear: both; text-align: center;"&gt;&lt;a href="http://1.bp.blogspot.com/_X60ewjhV9Aw/S0ajpU5HyvI/AAAAAAAADO4/tD5H1fOLito/s1600-h/IMG_0336.jpg" imageanchor="1" style="margin-left: 1em; margin-right: 1em;"&gt;&lt;img border="0" ps="true" src="http://1.bp.blogspot.com/_X60ewjhV9Aw/S0ajpU5HyvI/AAAAAAAADO4/tD5H1fOLito/s400/IMG_0336.jpg" /&gt;&lt;/a&gt;&lt;br /&gt;
&lt;/div&gt;&lt;b&gt;&lt;span style="color: cyan;"&gt;"Delicious lung nourishing soup with mild sweet taste that makes it so good to drink in normal days, even if you are not having cough or so"&lt;/span&gt;&lt;/b&gt;&lt;br /&gt;
&lt;br /&gt;
I am sorry to hear that one of my reader’s dad had suffered from pneumonia (肺炎). And, she asked me for a good soup to be taken by his dad who had now discharged from hospital. I knew I wouldn’t able to help much or certain that this Chinese tonic soup is helpful in such recovery, but I promised her to post a soup recipe that is good to be taken, if her dad wishes to take this&amp;nbsp;soup on the&amp;nbsp;usual days as&amp;nbsp;it nourishes lungs and strengthens function of respiratory system. &lt;br /&gt;
&lt;br /&gt;
I&amp;nbsp;hope she will be able to find the soup ingredients in USA and try to cook it for her dad and even for&amp;nbsp;other family members, if they do like Chinese tonic soup (&lt;i&gt;smile&lt;/i&gt;).&lt;br /&gt;
&lt;br /&gt;
I cooked this soup, whenever my family suffers from cough as it helps in relieving cough. I will even cook this soup as and when I feel like, just to drink it for nourishing purposes. It’s fine. And, we all liked this soup as it tastes mild sweet in the palate. I&amp;nbsp;enjoyed chewing&amp;nbsp;the almonds as they appeared so&amp;nbsp;crunchy to be eaten, just like nuts, even after long boiling hours. Besides the crunch that makes the biting so interesting, these almonds are almost tasteless, while the figs were tasted sweet inside. As for the "&lt;em&gt;Chuan Bei Mu&lt;/em&gt;" (&lt;em&gt;main lung nourishing herb&lt;/em&gt;), though it&amp;nbsp;has more green taste and not so crunchy, but still alright to eat it, if desired. Other than the abovementioned and the common wolfberries, the rest of the Chinese herbs were mainly to be cooked&amp;nbsp;to extract&amp;nbsp;its essence and nutrients. And, there's no need to laddle&amp;nbsp;all the&amp;nbsp;herbs ingredients&amp;nbsp;when served. The bowlful of herbs in my soup was for illustration purposes only. I discarded&amp;nbsp;and left only those&amp;nbsp;I wanted to eat in the bowl, when&amp;nbsp;served the soup&amp;nbsp;to my family during our dinner&amp;nbsp;meal (&lt;em&gt;laughing&lt;/em&gt;).&lt;br /&gt;
&lt;br /&gt;
&lt;b&gt;Serves 4&lt;br /&gt;
Ingredients&lt;br /&gt;
&lt;a href="http://4.bp.blogspot.com/_X60ewjhV9Aw/S0aj7VzGybI/AAAAAAAADPI/I0khpEdST70/s1600-h/CAGR085JCAZS9Q8OCAPW69VACA0C08W3CAT2BRI5CA1SVIP1CA0ZVFD5CAYUZ3CMCASDLQJTCAR8F5JSCAIEUJYYCAN74R8ACAFMZP2UCA3L820SCA9SBI9FCA1J11RICACSQK7PCAY2USSSCAS4VBJQ.jpg" imageanchor="1" style="clear: right; cssfloat: right; float: right; margin-bottom: 1em; margin-left: 1em;"&gt;&lt;em&gt;&lt;img border="0" ps="true" src="http://4.bp.blogspot.com/_X60ewjhV9Aw/S0aj7VzGybI/AAAAAAAADPI/I0khpEdST70/s320/CAGR085JCAZS9Q8OCAPW69VACA0C08W3CAT2BRI5CA1SVIP1CA0ZVFD5CAYUZ3CMCASDLQJTCAR8F5JSCAIEUJYYCAN74R8ACAFMZP2UCA3L820SCA9SBI9FCA1J11RICACSQK7PCAY2USSSCAS4VBJQ.jpg" /&gt;&lt;/em&gt;&lt;/a&gt;&lt;em&gt;10 - 15 grams each of the following Chinese herbs&lt;/em&gt; (*&lt;i&gt;amount each about 1 tablespoon&lt;/i&gt;):&lt;br /&gt;
Fritillaria Bulbs “Chuan Bei Mu” (川贝母) *&lt;em&gt;&lt;span style="font-size: x-small;"&gt;see pic on right&lt;br /&gt;
&lt;/span&gt;&lt;/em&gt;Glehniae Root “Sha Shen” (沙参)&lt;br /&gt;
Solomon's Seal Rhizome “Yu Zhu” (玉竹)&lt;br /&gt;
Liquorice Root "Gan Cao" (甘草)&lt;br /&gt;
Sweet Almond/ Southern Almond “Nan Xing” (南杏) &lt;br /&gt;
Bitter Almond/ Northern Almond or Chinese Almond “Bei Xing” (北杏) &lt;br /&gt;
&lt;br /&gt;
1 teaspoon of Fructus Lycii aka Wolfberry “Gou Qi Zi” (枸杞子)&lt;/b&gt;&lt;br /&gt;
&lt;br /&gt;
&lt;b&gt;1 small Dried (S&lt;em&gt;ugar Coated&lt;/em&gt;) Tangerine “Gan Ju Bing” (干桔饼) &lt;br /&gt;
8 – 10 Dried Figs “Wu Hua Guo” (无花果)&lt;br /&gt;
&lt;/b&gt;&lt;b&gt;&lt;br /&gt;
1 pot of water, 50% filled (&lt;i&gt;about 800ml&lt;/i&gt;)&lt;/b&gt;&lt;br /&gt;
&lt;br /&gt;
&lt;b&gt;&lt;em&gt;Optional:&lt;/em&gt;&lt;/b&gt;&lt;br /&gt;
&lt;b&gt;200 grams of lean pork meat or&amp;nbsp;ribs, blanched &lt;br /&gt;
Pinch of salt to taste&lt;br /&gt;
**If&amp;nbsp;opted for adding&amp;nbsp;these, you may wish to reduce the dried tangerine to half a piece instead, depending on how sweet you want the soup to taste.&lt;/b&gt;&lt;br /&gt;
&lt;b&gt;&lt;br /&gt;
Method:&lt;br /&gt;
&lt;em&gt;Boil soup in slow cooker&lt;/em&gt;:&lt;br /&gt;
Add water, blanched lean meat/ ribs (&lt;em&gt;if opted&lt;/em&gt;) and all ingredients into a croak pot. Then, place croak pot back to its slow cooker. Turn into auto shift mode and simmer for hours. At least 5 hours in low/ auto shift, or keep it simmer from morning before work, till evening after work. Do a taste check before adding salt, 10 minutes before serve. &lt;br /&gt;
&lt;br /&gt;
Or, &lt;em&gt;boil soup on stove:&lt;/em&gt;&lt;br /&gt;
Heat a pot of water over high fire. When boiled, reduce heat to low fire. Add blanch lena meat/ ribs (if opted) and all ingredients into the pot. Simmer for 2 - 3 hours. Do a taste check to see if salt is needed. Serve warm.&lt;/b&gt;&lt;br /&gt;
&lt;br /&gt;
&lt;div class="separator" style="clear: both; text-align: center;"&gt;&lt;a href="http://1.bp.blogspot.com/_X60ewjhV9Aw/S0ajs6ntMkI/AAAAAAAADPA/KgcPARstX2E/s1600-h/IMG_0341.jpg" imageanchor="1" style="margin-left: 1em; margin-right: 1em;"&gt;&lt;img border="0" ps="true" src="http://1.bp.blogspot.com/_X60ewjhV9Aw/S0ajs6ntMkI/AAAAAAAADPA/KgcPARstX2E/s400/IMG_0341.jpg" /&gt;&lt;/a&gt;&lt;br /&gt;
&lt;/div&gt;My&amp;nbsp;soup&amp;nbsp;(&lt;em&gt;shown in the picture&lt;/em&gt;) was added&amp;nbsp;with ribs and salt, but also reduced the amount of dried tangerine to just adding half a piece instead of one whole piece of dried tangerine as I preferred&amp;nbsp;a briny-flavoured soup, with just&amp;nbsp;subtle sweetness&amp;nbsp;to bring up the flavour even better, for dinner. &lt;br /&gt;
&lt;br /&gt;
However, it's fine to cook with or without adding meat/ ribs. Addition of salt is, thus, optional.&amp;nbsp;Moreover, this soup is already&amp;nbsp;sweetened, and originally tasteful enough&amp;nbsp;by the dried (&lt;em&gt;sugar coated&lt;/em&gt;) tangerine and sweet figs. I&amp;nbsp;cooked it this sweet&amp;nbsp;way, too, sometimes..&amp;nbsp;I also heard that it’s best try to&amp;nbsp;abstain from&amp;nbsp;meaty stuff during the process of recovery from lung related illnesses. Hence, the choice is yours.&lt;br /&gt;
&lt;br /&gt;
This is a low-fat soup with merely &lt;i&gt;100&lt;/i&gt;kcal for a serving of regular bowl, if without addition of meat.&lt;br /&gt;
&lt;br /&gt;
&lt;i&gt;Tips&lt;/i&gt;: If you are unable to find dried tangerine, replace with 3 – 4 honey dates (蜜枣).&lt;br /&gt;
* You may do&amp;nbsp;a taste check to determine if you need to add salt or not. &lt;br /&gt;
* &lt;em&gt;Variation&amp;nbsp;in choice of meat&lt;/em&gt;: If you do take pig's lung, add it instead of pork ribs. Thickly slice pig's lung, rinse and steep in water for 30 minutes. Blanch in boiling water and drain, before&amp;nbsp;puting to simmer in the soup.&lt;div class="blogger-post-footer"&gt;&lt;img width='1' height='1' src='https://blogger.googleusercontent.com/tracker/490982868559256368-1289732990584139420?l=www.mywoklife.com' alt='' /&gt;&lt;/div&gt;</content><link rel="replies" type="application/atom+xml" href="http://www.mywoklife.com/feeds/1289732990584139420/comments/default" title="Post Comments" /><link rel="replies" type="text/html" href="https://www.blogger.com/comment.g?blogID=490982868559256368&amp;postID=1289732990584139420" title="3 Comments" /><link rel="edit" type="application/atom+xml" href="http://www.blogger.com/feeds/490982868559256368/posts/default/1289732990584139420?v=2" /><link rel="self" type="application/atom+xml" href="http://www.blogger.com/feeds/490982868559256368/posts/default/1289732990584139420?v=2" /><link rel="alternate" type="text/html" href="http://www.mywoklife.com/2010/01/lung-nourishing-chinese-tonic-soup.html" title="Lung Nourishing Chinese Tonic Soup (止咳润肺汤)" /><author><name>PatriCa BB</name><uri>http://www.blogger.com/profile/15253488652628099847</uri><email>admin@mywoklife.com</email><gd:extendedProperty name="OpenSocialUserId" value="16712851664488271850" /></author><media:thumbnail xmlns:media="http://search.yahoo.com/mrss/" url="http://1.bp.blogspot.com/_X60ewjhV9Aw/S0ajpU5HyvI/AAAAAAAADO4/tD5H1fOLito/s72-c/IMG_0336.jpg" height="72" width="72" /><thr:total xmlns:thr="http://purl.org/syndication/thread/1.0">3</thr:total></entry><entry gd:etag="W/&quot;CEIERX8-eip7ImA9WxBRF0g.&quot;"><id>tag:blogger.com,1999:blog-490982868559256368.post-8660699612204840128</id><published>2010-01-06T11:53:00.002+08:00</published><updated>2010-01-06T12:35:04.152+08:00</updated><app:edited xmlns:app="http://www.w3.org/2007/app">2010-01-06T12:35:04.152+08:00</app:edited><category scheme="http://www.blogger.com/atom/ns#" term="Pork" /><category scheme="http://www.blogger.com/atom/ns#" term="Recipe" /><category scheme="http://www.blogger.com/atom/ns#" term="Tips n' Guides" /><title>Stir-Fried Pig's Liver with Spring Onion and Ginger (姜葱豬肝)</title><content type="html">&lt;div class="separator" style="clear: both; text-align: center;"&gt;&lt;a href="http://4.bp.blogspot.com/_X60ewjhV9Aw/S0My7ehFxfI/AAAAAAAADOg/PVXFKJonyvQ/s1600-h/19948_266436741417_76217406417_4782528_6978537_n.jpg" imageanchor="1" style="margin-left: 1em; margin-right: 1em;"&gt;&lt;img border="0" ps="true" src="http://4.bp.blogspot.com/_X60ewjhV9Aw/S0My7ehFxfI/AAAAAAAADOg/PVXFKJonyvQ/s400/19948_266436741417_76217406417_4782528_6978537_n.jpg" /&gt;&lt;/a&gt;&lt;br /&gt;
&lt;/div&gt;&lt;span style="color: cyan;"&gt;"&lt;strong&gt;Stir-fried pig's liver with scallion and Hua Diao rice wine. You will like this, if you like livers, but if you don't vary the dish with other meat types and adapt the recipe, it's still perfectly fine though!&lt;/strong&gt;"&lt;/span&gt;&lt;br /&gt;
&lt;br /&gt;
Of course, I was following up with the the other "&lt;em&gt;&lt;a href="http://www.mywoklife.com/2010/01/scholar-dishes.html"&gt;Scholar dish&lt;/a&gt;&lt;/em&gt;", or perhaps, it's just the usual stir-fried pig's liver dish, I shall called it now (&lt;em&gt;smile&lt;/em&gt;). &lt;br /&gt;
&lt;br /&gt;
I wanted to recommend this dish as I think having the best and freshest pig's organs is to have it dealt and cooked by your own! I have never tasted any fresher pig's livers from outside stores/ food centres than those I cooked at home, seriously. It's simply because you will choose the best liver, probably bought it freshly from the market first thing in the early morning, then store and chill&amp;nbsp;it perfectly. Then, cook it almost immediately to retain its freshness, with the best cooking method you've learnt. &lt;br /&gt;
&lt;br /&gt;
Hubby liked pig's liver more than I do. I did not really eat pig's organs, especially liver, due to its '&lt;em&gt;strong&lt;/em&gt;' smell and &lt;em&gt;powdery&lt;/em&gt; texture in the palate which I have tasted from&amp;nbsp;many food stores. However, I came to know that I won't get that kind of &lt;em&gt;powdery&lt;/em&gt; &lt;em&gt;&lt;/em&gt;texture and strong smell was lessen so much, if I cook it by my own at home. &lt;br /&gt;
&lt;br /&gt;
Follow my cooking steps in my &lt;a href="http://www.mywoklife.com/2010/01/scholar-dishes.html"&gt;recipe&lt;/a&gt; posted previously. And, just take note of the following tips, I guess it's not hard to achieve what I meant, freshest and tastier dish of pig's liver (&lt;em&gt;winking smile&lt;/em&gt;). &lt;br /&gt;
&lt;br /&gt;
&lt;em&gt;When you handle pig's liver:&lt;/em&gt;&lt;br /&gt;
1)&amp;nbsp;Get the bright red liver instead of dark red or purplish one from the market or ensure the packing date is on the even date, if you got it from supermarket.&lt;br /&gt;
&lt;br /&gt;
2)&amp;nbsp;Keep&amp;nbsp;liver in the refrigerator once reach home, and bring it out only&amp;nbsp;till the moment of slicing or cooking it.&lt;br /&gt;
&lt;br /&gt;
3)&amp;nbsp;Just rinse the whole liver once, then slice it very thinly. Or best if you could get the butcher to do the slicing for better&amp;nbsp;&lt;em&gt;cut&lt;/em&gt; result. Then, briefly rinse one more time, when sliced.&lt;br /&gt;
&lt;br /&gt;
&lt;em&gt;When you cook the liver:&lt;/em&gt;&lt;br /&gt;
1) You have to do the cooking pretty quickly. Heat up a pot of water with adding some salt in it&amp;nbsp;(&lt;em&gt;and add&amp;nbsp;even slice of ginger, if desired&lt;/em&gt;), then heat off once it's boiled or almost boiled. Plunge liver slices into the hot water, preferably on a strainer, for easier manipulation. Shift the strainer constantly while blanching.&amp;nbsp;If you do not have a strainer, then it's OK. Just plunge liver slices in the pot of hot water. Use a chopstick to stir the liver while blanching. &lt;br /&gt;
&lt;br /&gt;
2) Need not to blanch it too long, about 10 - 15 seconds will do,&amp;nbsp;even it is&amp;nbsp; still very raw.&amp;nbsp;I just blanch it briefly to get rid of some&amp;nbsp;impurities from the meat. By the act of blanching, it also help a little in eliminating the &lt;em&gt;strong&lt;/em&gt; smell&amp;nbsp;of the liver.&lt;br /&gt;
&lt;br /&gt;
3) When you cook it, do it very quickly. Stir-fry the ginger and spring onion/ scallion first. Then, here add the liver slices, and condiments. You may get all the necessary condiments mixed first or ready on hand, so that you may just add them in immediately after adding liver. Stir-fry just a little more with fast hand, reduce heat, if it is too strong. &lt;br /&gt;
&lt;br /&gt;
4) Heat off and you may let the remaining heat in the wok to further cook it, but dish up once it's just done and still remained tender. &lt;br /&gt;
&lt;br /&gt;
This liver dish I cooked, definately without any &lt;em&gt;strong&lt;/em&gt; smell of the&amp;nbsp;"&lt;em&gt;pig's taste&lt;/em&gt;" or weird texture. The robust flavour&amp;nbsp;cooked&amp;nbsp;with this recipe does help to make it more pleasant to taste, too.&amp;nbsp;You&amp;nbsp;may even add some&amp;nbsp;chopped Chili padi (&lt;em&gt;Bird's eye chili&lt;/em&gt;) to spice the&amp;nbsp;flavour up a little more!&amp;nbsp;&amp;nbsp;Well, if you are a pig's liver lover, you will surely&amp;nbsp;like this recipe! &lt;br /&gt;
&lt;br /&gt;
&lt;div class="separator" style="clear: both; text-align: center;"&gt;&lt;br /&gt;
&lt;/div&gt;*&lt;em&gt;Just a post&amp;nbsp;to share my cooking experience.&lt;/em&gt;&lt;div class="blogger-post-footer"&gt;&lt;img width='1' height='1' src='https://blogger.googleusercontent.com/tracker/490982868559256368-8660699612204840128?l=www.mywoklife.com' alt='' /&gt;&lt;/div&gt;</content><link rel="replies" type="application/atom+xml" href="http://www.mywoklife.com/feeds/8660699612204840128/comments/default" title="Post Comments" /><link rel="replies" type="text/html" href="https://www.blogger.com/comment.g?blogID=490982868559256368&amp;postID=8660699612204840128" title="10 Comments" /><link rel="edit" type="application/atom+xml" href="http://www.blogger.com/feeds/490982868559256368/posts/default/8660699612204840128?v=2" /><link rel="self" type="application/atom+xml" href="http://www.blogger.com/feeds/490982868559256368/posts/default/8660699612204840128?v=2" /><link rel="alternate" type="text/html" href="http://www.mywoklife.com/2010/01/stir-fried-pigs-liver-with-spring-onion.html" title="Stir-Fried Pig's Liver with Spring Onion and Ginger (姜葱豬肝)" /><author><name>PatriCa BB</name><uri>http://www.blogger.com/profile/15253488652628099847</uri><email>admin@mywoklife.com</email><gd:extendedProperty name="OpenSocialUserId" value="16712851664488271850" /></author><media:thumbnail xmlns:media="http://search.yahoo.com/mrss/" url="http://4.bp.blogspot.com/_X60ewjhV9Aw/S0My7ehFxfI/AAAAAAAADOg/PVXFKJonyvQ/s72-c/19948_266436741417_76217406417_4782528_6978537_n.jpg" height="72" width="72" /><thr:total xmlns:thr="http://purl.org/syndication/thread/1.0">10</thr:total></entry><entry gd:etag="W/&quot;DE4ER3k4fyp7ImA9WxBRFks.&quot;"><id>tag:blogger.com,1999:blog-490982868559256368.post-8886868493524373732</id><published>2010-01-05T12:41:00.002+08:00</published><updated>2010-01-05T12:48:26.737+08:00</updated><app:edited xmlns:app="http://www.w3.org/2007/app">2010-01-05T12:48:26.737+08:00</app:edited><category scheme="http://www.blogger.com/atom/ns#" term="Recipe" /><category scheme="http://www.blogger.com/atom/ns#" term="Vegetarian" /><category scheme="http://www.blogger.com/atom/ns#" term="Tofu (Beancurd)" /><category scheme="http://www.blogger.com/atom/ns#" term="Tips n' Guides" /><title>Pan-Fried Tofu with Spring Onion</title><content type="html">&lt;div class="separator" style="clear: both; text-align: center;"&gt;&lt;a href="http://4.bp.blogspot.com/_X60ewjhV9Aw/S0LCyNWLc5I/AAAAAAAADOY/7I6sgQgHgA4/s1600-h/IMG_0922.JPG" imageanchor="1" style="margin-left: 1em; margin-right: 1em;"&gt;&lt;img border="0" ps="true" src="http://4.bp.blogspot.com/_X60ewjhV9Aw/S0LCyNWLc5I/AAAAAAAADOY/7I6sgQgHgA4/s640/IMG_0922.JPG" /&gt;&lt;/a&gt;&lt;br /&gt;
&lt;/div&gt;&lt;strong&gt;&lt;span style="color: cyan;"&gt;"Check out&amp;nbsp;what are the tips and tricks on making this sautéed tofu dish a success in both taste and appearance!"&lt;/span&gt;&lt;/strong&gt;&lt;br /&gt;
&lt;br /&gt;
Hey! I continued to post about this tofu dish... Mind me, it was because I wanted to tell you more about this particular dish and to introduce it to you as usual Chinese dishes now, since this is not the '&lt;em&gt;original&lt;/em&gt;' version, but the&amp;nbsp;modified one by pan-frying/ sautéing&amp;nbsp;method&amp;nbsp;(&lt;em&gt;smile&lt;/em&gt;). &lt;br /&gt;
&lt;br /&gt;
No worries, I am not repeating the &lt;a href="http://www.mywoklife.com/2010/01/scholar-dishes.html"&gt;recipe&lt;/a&gt; which you may find it in previous post, I just&amp;nbsp;wanted to share with you my experience in cooking this tofu dish down to details, with some cooking tips and cautions to be taken starting from preparing till cooking, too. &lt;br /&gt;
&lt;br /&gt;
&lt;em&gt;When you&amp;nbsp;prepare the tofu:&lt;/em&gt;&lt;br /&gt;
1) Cut tofu in large pieces, to minimise tofu from&amp;nbsp;&lt;em&gt;disintegrated&lt;/em&gt; later when stir-frying. &lt;br /&gt;
&lt;br /&gt;
2) Pat dry the tofu cubes with kitchen towel/ paper, so that the oil would not splash so much while placing them into the heated oil. &lt;br /&gt;
&lt;br /&gt;
&lt;em&gt;When you cook the tofu:&lt;/em&gt;&lt;br /&gt;
1) Heat the oil in wok over high heat, and sprinkle some salt on the tofu before placing them into wok. Do not put so much oil to pan-fry it as I want&amp;nbsp;to use the&amp;nbsp;shallow frying method instead of deep-frying. Use a wok/&amp;nbsp;lar frying pan&amp;nbsp;to do the pan-frying will do, unless you are always there to monitor your deep-fryer. Using the deep fryer with much more oil in it will be good only to make the browning more evenly, but&amp;nbsp;you have to monitor the frying all the way so that&amp;nbsp;the tofu will not be fried for too long till totally crisped. The tofu is required to be only slightly sautéed, in order to remain its tenderness inside out. &lt;br /&gt;
&lt;br /&gt;
2) After frying tofu, drain on kitchen towel to lessen the oil intake.&lt;br /&gt;
&lt;br /&gt;
3) Be gentle when you return the sautéed tofu to the wok to stir fry&amp;nbsp;it with the sauce and spring onion. Otherwise, tofu will be easily &lt;em&gt;disintegrated&lt;/em&gt; and affect the appearance on the dish later. &lt;br /&gt;
&lt;br /&gt;
4) If you prefer more gravy, add more chicken broth. Eliminate or lessen the adding of the cornstarch slurry if you find the gravy is thick enough for the dish. &lt;br /&gt;
&lt;br /&gt;
5) Place the spring onion/ scallion&amp;nbsp;only on last stage. Dish up gently, too.&lt;br /&gt;
&lt;br /&gt;
&lt;strong&gt;&lt;em&gt;As Vegetarian dish:&lt;/em&gt;&lt;/strong&gt;&lt;br /&gt;
&lt;strong&gt;This should be a vegetarian dish. For religious purpose, simply omit the adding of garlic, and cook&amp;nbsp;this dish to serve as your vegetarian meal. However, I understand some of the more particular vegetarians are not even allowed to take spring onion. So, it depends also on&amp;nbsp;your religious belief, in that case.&amp;nbsp;for me, I am going to&amp;nbsp;cook it&amp;nbsp;on my next vegetarian day.&lt;/strong&gt;&lt;div class="blogger-post-footer"&gt;&lt;img width='1' height='1' src='https://blogger.googleusercontent.com/tracker/490982868559256368-8886868493524373732?l=www.mywoklife.com' alt='' /&gt;&lt;/div&gt;</content><link rel="replies" type="application/atom+xml" href="http://www.mywoklife.com/feeds/8886868493524373732/comments/default" title="Post Comments" /><link rel="replies" type="text/html" href="https://www.blogger.com/comment.g?blogID=490982868559256368&amp;postID=8886868493524373732" title="0 Comments" /><link rel="edit" type="application/atom+xml" href="http://www.blogger.com/feeds/490982868559256368/posts/default/8886868493524373732?v=2" /><link rel="self" type="application/atom+xml" href="http://www.blogger.com/feeds/490982868559256368/posts/default/8886868493524373732?v=2" /><link rel="alternate" type="text/html" href="http://www.mywoklife.com/2010/01/pan-fried-tofu-with-spring-onion.html" title="Pan-Fried Tofu with Spring Onion" /><author><name>PatriCa BB</name><uri>http://www.blogger.com/profile/15253488652628099847</uri><email>admin@mywoklife.com</email><gd:extendedProperty name="OpenSocialUserId" value="16712851664488271850" /></author><media:thumbnail xmlns:media="http://search.yahoo.com/mrss/" url="http://4.bp.blogspot.com/_X60ewjhV9Aw/S0LCyNWLc5I/AAAAAAAADOY/7I6sgQgHgA4/s72-c/IMG_0922.JPG" height="72" width="72" /><thr:total xmlns:thr="http://purl.org/syndication/thread/1.0">0</thr:total></entry></feed>
